
"2024 Approved Boosting Collaboration Essential Zoom Video Alterations"
Boosting Collaboration: Essential Zoom Video Alterations
Today, face-to-face contact is severely constrained in modern society, making the zoom for pc download quite helpful. One of its finest features is the ability to record meetings in order to capture every moment as a video. Using the Zoom app requires understanding how to convert ZOOM recordings to MP4 video format for free online. Zoom is a really practical technology that, as you undoubtedly well know, enables individuals to continue working or attending school despite the epidemic. If you have a Zoom recording, you undoubtedly have questions about how to get to the videos. Additionally, you must convert your Zoom recordings to mp4 if you detect that they are an unknown file format. However, Zoom recordings are immediately saved to your PC in MP4 format. However, sometimes the conversion is unsuccessful, leaving you with .Zoom files for your recordings. In this situation, you must convert the zoom recording to MP4.
One of its most intriguing features is the ability to record meetings in order to save every event as a film. One of the most important aspects of utilizing the Zoom app is learning how to convert a ZOOM video recording format to MP4 for free online. Zoom is a tool or software that enables several users to participate in a videoconference. It operates through meetings that attempt to replicate many of the activities we may perform at a meeting in person of any sort. Zoom allows you to record meetings, and after the meeting is over, it will begin to convert the recording to MP4. But a number of factors might lead this phase to fail. You may be wondering, “How do I convert a Zoom recording to MP4?” when you encounter the Zoom failed to convert recording problem. Thankfully, it’s a rather straightforward procedure that doesn’t need for any additional software. This article will demonstrate three different approaches for converting Zoom recordings to MP4 files. However, you must be the host of the meeting or have authorization to record it.
 Easy GIF Animator is a powerful animated GIF editor and the top tool for creating animated pictures, banners, buttons and GIF videos. You get extensive animation editing features, animation effects, unmatched image quality and optimization for the web. No other GIF animation software matches our features and ease of use, that’s why Easy GIF Animator is so popular.
Way 1. Convert the Local Recording in Zoom App
Zoom provides both local and cloud recording options. Users of the former may capture meeting video and audio thanks to its availability to both free and paid members. The latter allows paying subscribers to audio, video, and text-record the conference. Additionally, the recording file formats include TXT, MP4, and M4A. At the conclusion of a meeting, Zoom automatically transforms the raw video to an mp4 file. However, the video will be stored as a .zoom file if the operation is aborted. A.mp4 file that is an MP4 contains both audio and video data. M4A only has audio files in it. All MP4 files may be played using the M3U playlist file. Additionally, meeting chat conversations are saved in a TXT file.
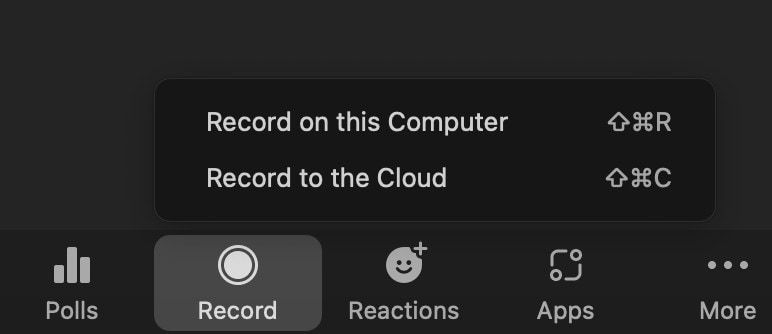
Step1Create the Recording
The recording must first be made by entering the Zoom meeting and selecting Record. Zoom gives you the option of either PC storage or cloud storage for the recordings. Both choices offer advantages and disadvantages. You should convert the files into mp4 if you want to save them on your computer since they are smaller without sacrificing quality and take up less space. You will need a Zoom account to store the files if you decide to use cloud storage.
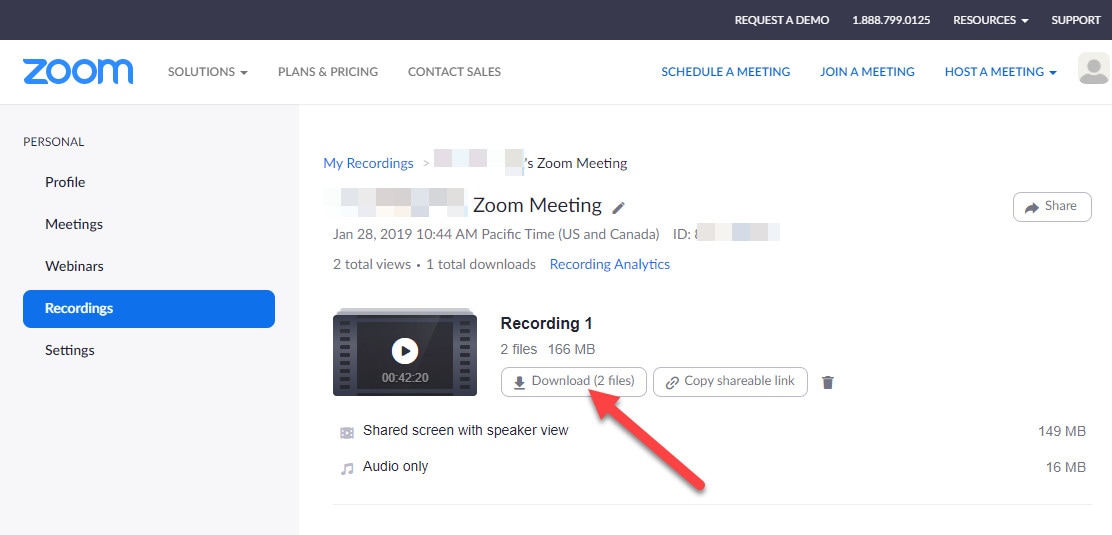
Step2Download the Recording
By accessing the Zoom folder in your computer’s Documents folder, you may quickly locate your Zoom recordings. Alternately, copy and paste the address shown here: Change “USERNAME” to the username you use for your machine in the path: Users/USERNAME/Documents. If you wish to arrange all of your films, the date, time, and meeting name are all included in the local Zoom folders. You may initially attempt manually converting the recording to MP4 if Zoom’s conversion of local recordings fails. Observe the directions.
Step3Launch the Zoom Desktop Client application
On your computer, launch the Zoom program. You can locate any meetings you’ve recorded in the app.

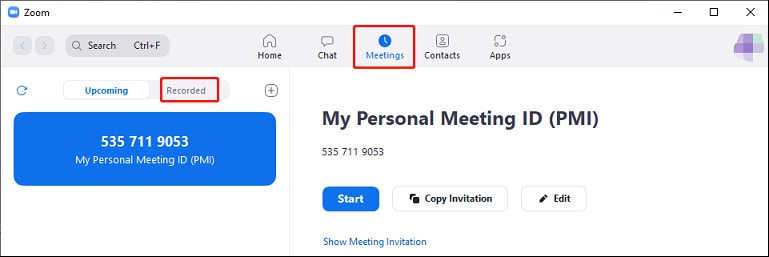
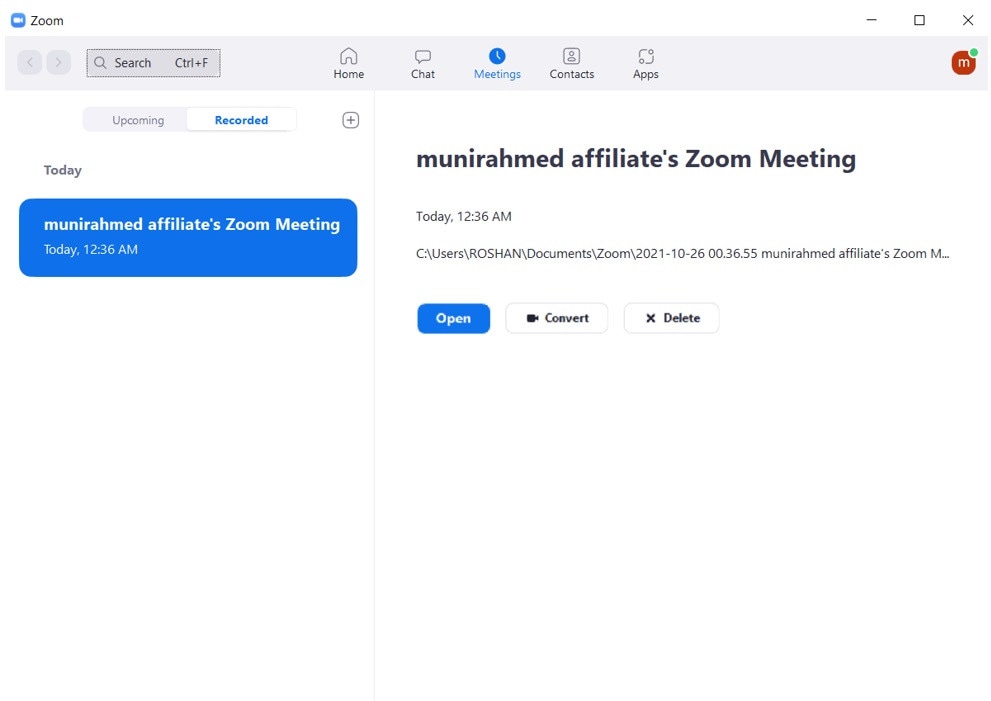
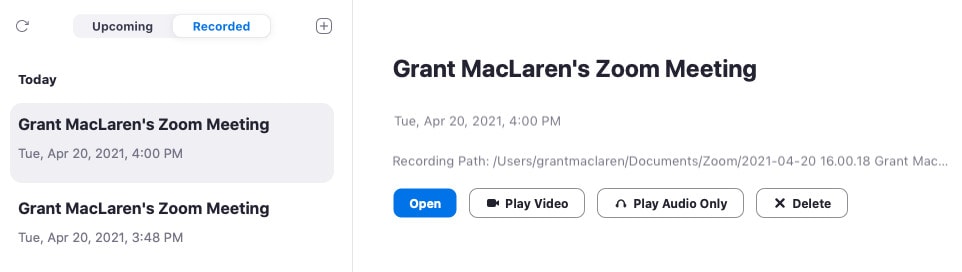
Step4Go to Meetings
A number of tabs are shown at the top of the window. Toggle to Meetings. There are two options, Upcoming and Recorded, on the Meetings page. You must choose Recorded.

Step5Convert the File to Mp4
The meetings you’ve recorded are shown on the left. Select the recording by clicking on it. If the recording is in .zoom format, the Convert button will be shown. The Play button will be available if not.

Way 2. Record Zoom Meeting with Filmora
Zoom has a recording option, however you can only record a meeting if you are the host or have permission to do so. As a result, you are unable to record meetings anytime you want. A screen recording program from a third party, like Filmora from Wondershare, is the greatest answer to these issues. This professional program for Windows and Mac comes with a screen recording capability that enables you to record your screen activity in excellent definition, including zoom calls. Additionally, you have a variety of customizable recording options, including picture-in-picture, output format, frame rate, and quality.
The default Zoom recording is made in poor quality and offers no customizing options. Additionally, in order to record the meeting as a participant, you must have the host’s consent. MP4 is the ideal file type for saving Zoom meetings. This is due to the great compatibility of the MP4 format with a variety of hardware and media players. The MP4 format also provides high quality while being somewhat modest in size. Use Wondershare Filmora to get over these problems and capture Zoom meetings in excellent definition. The captured video may be transferred, compressed, and given further editing as required with this program.
Free Download For Win 7 or later(64-bit)
Free Download For macOS 10.14 or later
Steps to Record Zoom and Export the Video as Mp4 Format
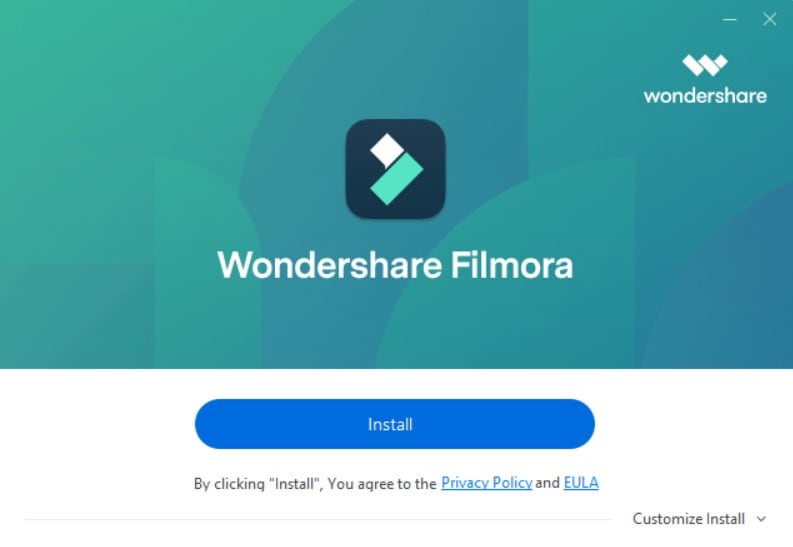
Step1Download and Install Filmora
In the first step, visit the official website to download the latest version of Filmora for your PC. Afterwards, launch the installer to initiate the installation process. Upon completion, you’ll be directed to the Filmora launcher as shown below:
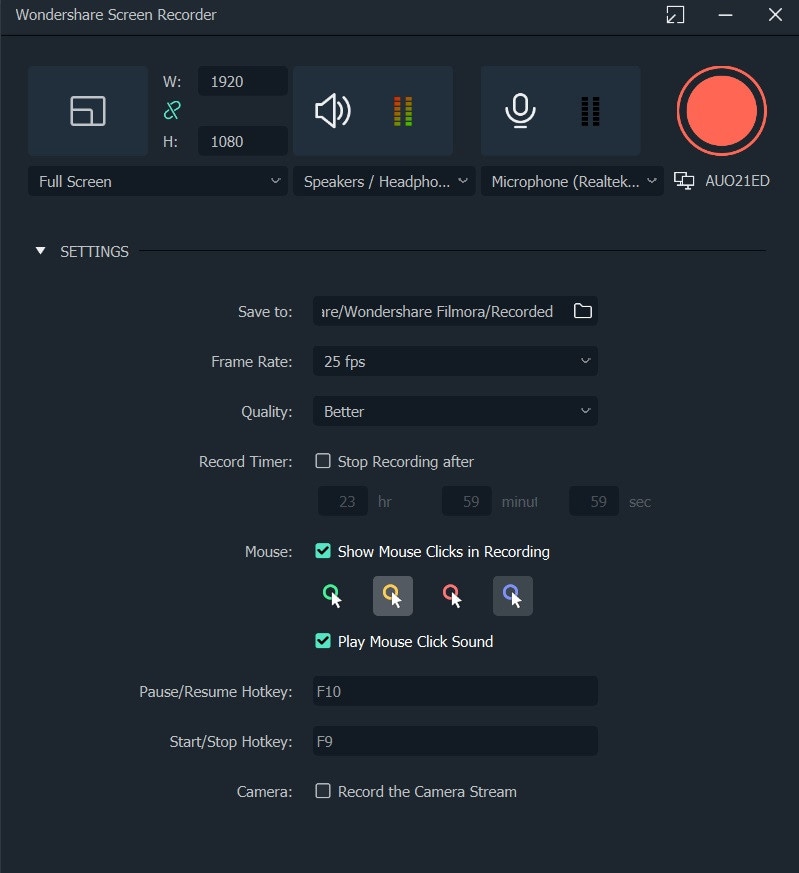
Step2Customize Zoom Screen
Now, go for the screen recorder option and on the other hand, visit the Zoom meeting which you want to record with Filmora in Mp4. Simply, launch the Meeting and subsequently, configure the recording interface within the Filmora recorder as shown below. You can select Mp4 as file format of the recording here as well.

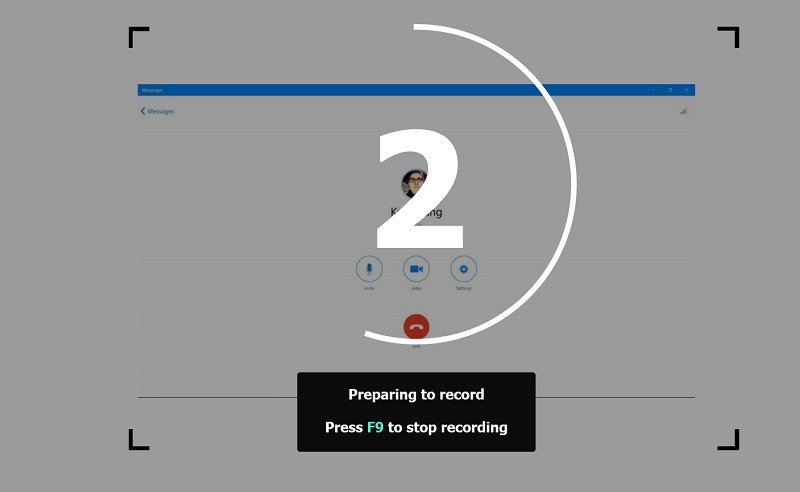
Step3Start Recording
Click the Recording button after the customization choices have been decided upon, and the recording will start after a 3-second countdown. You may further customize the recording while it is in progress by using the top bar to take screenshots, muffle the voice, and add unique shapes and lines.
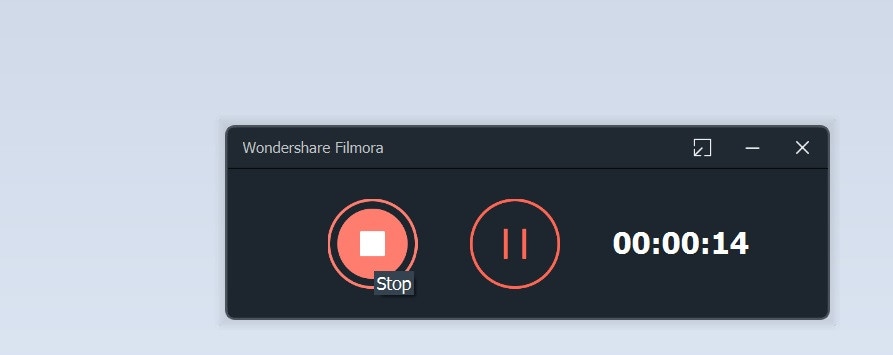
Step4Put Recording to End
Click the red Stop button after the zoom call is over or you want to end the recording. The recording will be processed by the program, and it will then show up on the user interface.
Step5Edit and Convert the Video in Mp4 Format
From the chosen folder on the system, you can discover the recorded video. Using the corresponding tabs on the interface, the recorded video may be further altered, converted, transferred, and compressed. Using the program, you may even alter the zoom pre-recorded movie.
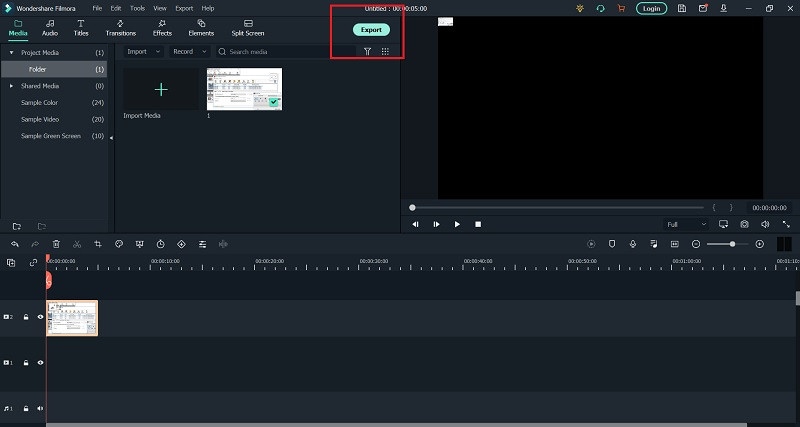
You can also share the recording upon the successful Mp4 conversion of Zoom meetings. Simply refer to the Export window and choose the best setting to share your Zoom recordings on the go.
Way 3. Use zTscoder.exe
You must first install the program before you can use zTscoder. Either the Windows installer or a download from the website may be used to install the program. By then, a recorded Zoom conference may be saved. Depending on the Zoom version you are using, there are really two methods to store your recordings. You can only store your recordings locally on your disk if you use Zoom’s free version. You may store your recordings both locally and to the Zoom cloud if you have a premium subscription, however. If the previous techniques didn’t work for you or you can’t locate your required meeting in the Recorded tab (this occurs when your meeting was recorded from a web browser), you might try the way below:
Step1Run the zTscoder Launcher
Click System and Security > System in the Control Panel after opening it. Select the Advanced system settings option. Select Environment Variables from the Advanced menu. Click Edit after selecting the Path variable under System variables. Then, add the following path to the Variable value box: Add C:\Users\username*\AppData\Roaming\Zoom\bin and then click OK.
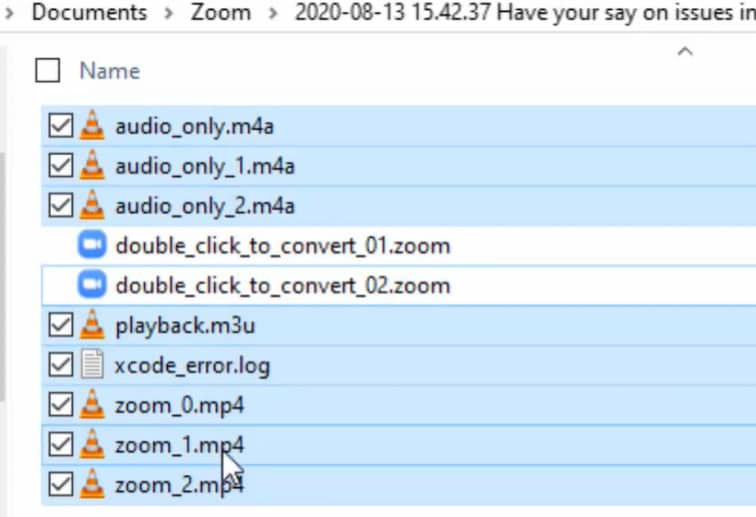
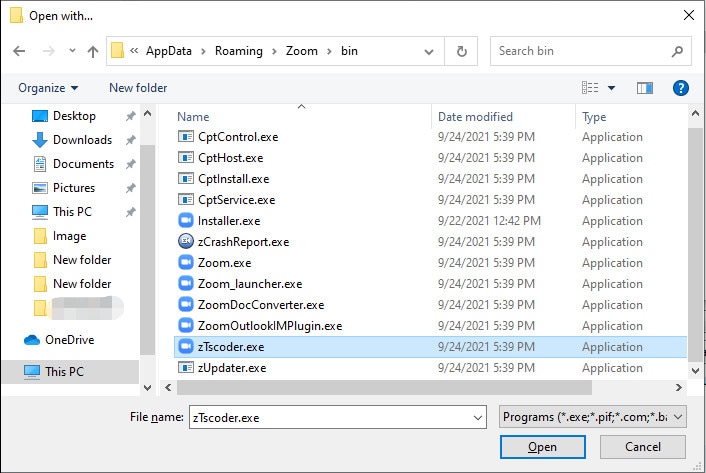
Step2Select the Video
Navigate to the folder where Zoom stores its recordings, right-click on the file, and choose “Open with…” Scroll down to the Look for another app on this PC section for more applications.
 KoolReport Pro is an advanced solution for creating data reports and dashboards in PHP. Equipped with all extended packages , KoolReport Pro is able to connect to various datasources, perform advanced data analysis, construct stunning charts and graphs and export your beautiful work to PDF, Excel, JPG or other formats. Plus, it includes powerful built-in reports such as pivot report and drill-down report which will save your time in building ones.
 It will help you to write dynamic data reports easily, to construct intuitive dashboards or to build a whole business intelligence cockpit.
KoolReport Pro package goes with Full Source Code, Royal Free, ONE (1) Year Priority Support, ONE (1) Year Free Upgrade and 30-Days Money Back Guarantee.
Developer License allows Single Developer to create Unlimited Reports, deploy on Unlimited Servers and able deliver the work to Unlimited Clients.
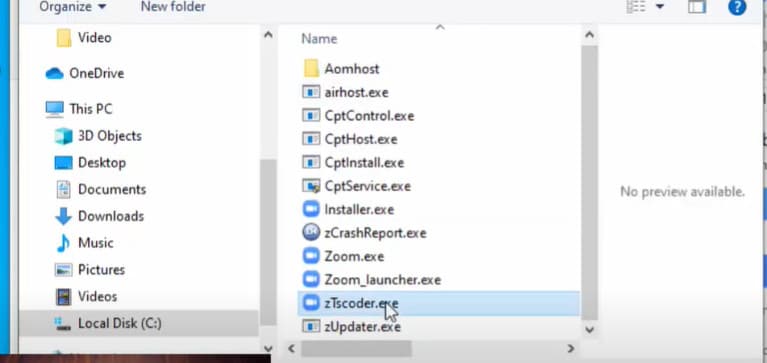
Step3Launch the Conversion
Click the Open button after selecting zTscoder.exe and going to the location: C:\Users\UserName\AppData\Roaming\Zoom\bin
Then, select zTscoder.exe, and click the Open.
Step4Preview the Converted File
At that point, an automated conversion of the Zoom recording to MP4 will begin. You’ll then see an MP4 video file.
Conclusion
Zoom recording not converting errors may be fixed by checking the disk capacity and, if required, making some space available. Additionally, the problem will persist if you shut down the computer while converting the recording or rename the .zoom file. If the conversion of your Zoom recording to MP4 is unsuccessful, try the two methods mentioned above. How can the Zoom recording not converting problem be fixed? To convert a Zoom recording to MP4, use the steps listed above. If your Zoom recording isn’t in MP4 format, as mentioned above, you may convert it using a video converter.
Free Download For Win 7 or later(64-bit)
Free Download For macOS 10.14 or later
Free Download For macOS 10.14 or later
Steps to Record Zoom and Export the Video as Mp4 Format
Step1Download and Install Filmora
In the first step, visit the official website to download the latest version of Filmora for your PC. Afterwards, launch the installer to initiate the installation process. Upon completion, you’ll be directed to the Filmora launcher as shown below:
Step2Customize Zoom Screen
Now, go for the screen recorder option and on the other hand, visit the Zoom meeting which you want to record with Filmora in Mp4. Simply, launch the Meeting and subsequently, configure the recording interface within the Filmora recorder as shown below. You can select Mp4 as file format of the recording here as well.
Step3Start Recording
Click the Recording button after the customization choices have been decided upon, and the recording will start after a 3-second countdown. You may further customize the recording while it is in progress by using the top bar to take screenshots, muffle the voice, and add unique shapes and lines.

Step4Put Recording to End
Click the red Stop button after the zoom call is over or you want to end the recording. The recording will be processed by the program, and it will then show up on the user interface.
Step5Edit and Convert the Video in Mp4 Format
From the chosen folder on the system, you can discover the recorded video. Using the corresponding tabs on the interface, the recorded video may be further altered, converted, transferred, and compressed. Using the program, you may even alter the zoom pre-recorded movie.
You can also share the recording upon the successful Mp4 conversion of Zoom meetings. Simply refer to the Export window and choose the best setting to share your Zoom recordings on the go.
Way 3. Use zTscoder.exe
You must first install the program before you can use zTscoder. Either the Windows installer or a download from the website may be used to install the program. By then, a recorded Zoom conference may be saved. Depending on the Zoom version you are using, there are really two methods to store your recordings. You can only store your recordings locally on your disk if you use Zoom’s free version. You may store your recordings both locally and to the Zoom cloud if you have a premium subscription, however. If the previous techniques didn’t work for you or you can’t locate your required meeting in the Recorded tab (this occurs when your meeting was recorded from a web browser), you might try the way below:
Step1Run the zTscoder Launcher
Click System and Security > System in the Control Panel after opening it. Select the Advanced system settings option. Select Environment Variables from the Advanced menu. Click Edit after selecting the Path variable under System variables. Then, add the following path to the Variable value box: Add C:\Users\username*\AppData\Roaming\Zoom\bin and then click OK.
Step2Select the Video
Navigate to the folder where Zoom stores its recordings, right-click on the file, and choose “Open with…” Scroll down to the Look for another app on this PC section for more applications.

Step3Launch the Conversion
Click the Open button after selecting zTscoder.exe and going to the location: C:\Users\UserName\AppData\Roaming\Zoom\bin
Then, select zTscoder.exe, and click the Open.
Step4Preview the Converted File
At that point, an automated conversion of the Zoom recording to MP4 will begin. You’ll then see an MP4 video file.

Conclusion
Zoom recording not converting errors may be fixed by checking the disk capacity and, if required, making some space available. Additionally, the problem will persist if you shut down the computer while converting the recording or rename the .zoom file. If the conversion of your Zoom recording to MP4 is unsuccessful, try the two methods mentioned above. How can the Zoom recording not converting problem be fixed? To convert a Zoom recording to MP4, use the steps listed above. If your Zoom recording isn’t in MP4 format, as mentioned above, you may convert it using a video converter.
Free Download For Win 7 or later(64-bit)
Free Download For macOS 10.14 or later
- Title: 2024 Approved Boosting Collaboration Essential Zoom Video Alterations
- Author: Mark
- Created at : 2024-07-26 18:40:47
- Updated at : 2024-07-27 18:40:47
- Link: https://extra-lessons.techidaily.com/2024-approved-boosting-collaboration-essential-zoom-video-alterations/
- License: This work is licensed under CC BY-NC-SA 4.0.