:max_bytes(150000):strip_icc()/nintendo-switch-vs-nintendo-switch-lite-01-61592395e9e44fc78403c7e99105de84.jpg)
Bend, Twist & Shape Your Digital Pics for 2024
Bend, Twist & Shape Your Digital Pics
Create High-Quality Video - Wondershare Filmora
An easy and powerful YouTube video editor
Numerous video and audio effects to choose from
Detailed tutorials are provided by the official channel
Digital images can look great when displayed on a computer monitor or printed on a photo printer. But they can look even better when you distort the picture to look more interesting or artistic. This article shows you how to distort pic using different tools and the benefits of adding this effect to your photos.
In this article
02 How to Distort Picture Using Different Tools
Why We Need to Distort Pic
In digital photography, distortion occurs when you deviate an observed pixel from its anticipated coordinate in a 2D plane, resulting in a more curvilinear appearance that appears unnatural to the viewer’s eye. People use it as a form of effector to share their perspectives. You can distort pic for various reasons. They include:
1. Allows You to Have Fun
Adding distortion effects to your pic is a fun thing to do. It’s always interesting to see what things will look like after adding distortion filters to your photo. You can have an enormous amount of fun, creativity, craziness, and laughing with your pics.
2. Helps You a Distinct Look
One of the simplest ways of making your pics distinct is by adding distortion effects. These effects can make your images stand out within seconds. Because it allows you to create eye-catching pics by adding instant charm, distorting pics can help you attract viewers to your work. Therefore, you can use this effect to wow your friends and audience.
What’s more? Both professional and amateur photographers can use distortion effects to improve the appearance of their pics.
3. Hide Certain Areas of Your Pic
You can use distortion effects if you do not want your viewers to see certain parts of your pic because it has errors or details that you don’t want them to see.
4. Allows You to Show Emphasis on Your Subject
Distorting a pic can help you emphasize its focal point: It allows you to direct viewers’ eyes to the focal point of your image. As such, you can use it to captivate your audience and grab their attention so you can tell them your story. When viewers look at your pic, they will immediately see what you want them to focus on.
You May Also be Interested In
How to Distort Picture Using Different Tools
We will look at three different ways of distorting a picture to make it more attractive, emphasize the subject, or hide errors.
How to Distort a Picture Using Adobe Photoshop
Photoshop is a popular application used to enhance and edit images. You can use this raster graphics editor to distort pics for different purposes. Photoshop has numerous distortion effects that you can apply to your photos.
With that being said, let’s look at how to distort a picture using Adobe Photoshop.
Step 1\
Open the image you want to distort in Adobe Photoshop.
Step 2\
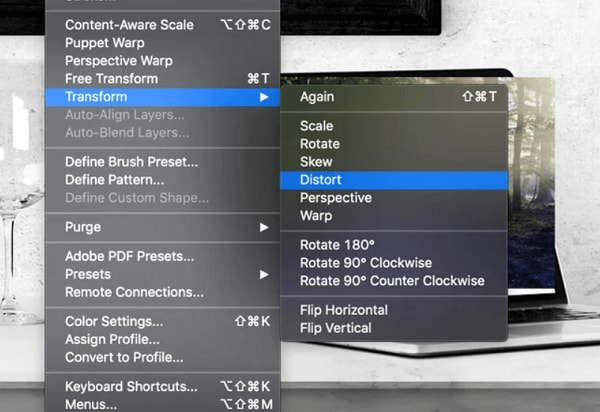
Select the Distort command from the Tools menu. Head to Edit, then select Transform and choose the Distort option.
Step 3\
Select the Horizontal Distortion tool from the fly-out menu.
Step 4\
Move the pointer over the part of the image you want to distort, hold down the left mouse button and drag inward or outward; this will distort that section of your image.
Step 5\
To make further changes, select one of these tools from its fly-out menu: Vertical Distortion, Skew, Perspective, or Warp. You can also use these tools in combination with each other by clicking on them to distort different parts of your image at once.
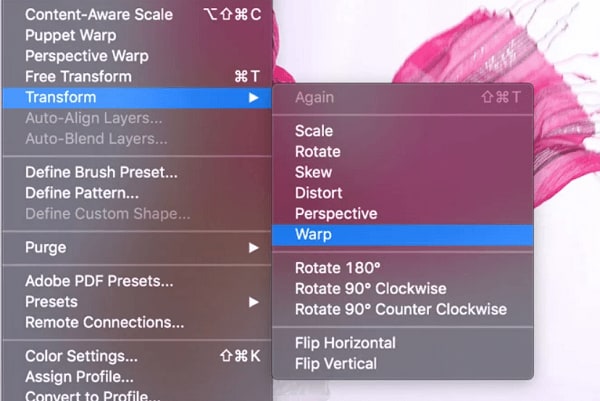
You can use the Warp tool to curve clothing or objects in your pic. To distort parts of your image, drag the handles; this will create a rectangular mesh with several control points.
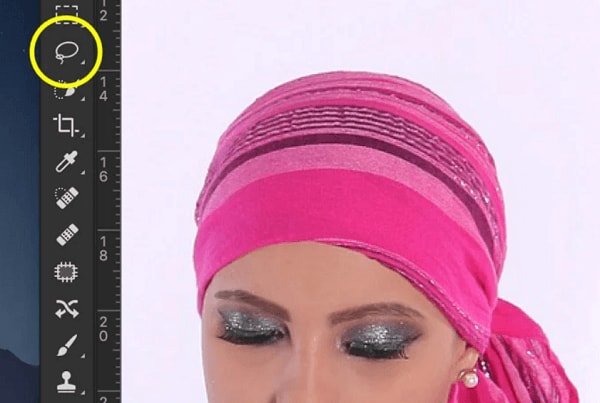
Select the area you would to distort using the Lasso tool. Be sure to make the range longer and wider than the actual object.
Step 6\
To restore your image to its original state, select the Reverse tool from the Tools menu.
Step 7\
Select the Horizontal Distortion tool from the fly-out menu, move the pointer over a section of your image that you want to restore, and press the left mouse button; this will flatten out that section of your image.
Step 8\
To restore other parts of your image, repeat step 7 for each part of your image that you want to flatten out by holding down the mouse button while dragging inward or outward with the pointer.
Step 9\
When you have finished distorting, click on OK to exit Photoshop and save your file as normal. You can now print or save your file as a JPEG or GIF file.
How to Distort a Picture Using an Online Tool
You can also distort a pic using an online tool. A distortion website allows you to morph and add noise to your image. These online tools offer multiple photo distortion filters and effects that you can add to your image and distort its look. After applying a filter, you can manually adjust the intensity of your distortion filter to suit your preferences.
Some of the images you can distort using online tools include:
- Over-Exposition: This is when the person in the photo is too bright or overexposed to show the subject’s features.
- Under-Exposure: This is when the person in the photo is too dark or under-exposed to show the subject’s features.
- Visual Stretching is when you digitally stretch an image to the desired size, sometimes using a “zoom” feature to get closer or broader shots of the subject.
Photomosh.com is one of the online tools that people use to edit images online. You can use it to distort photos to create new visual content that showcases your creativity and personality; this website is user-friendly and allows you to create your photo distortion quickly. The tool lets users distort images of various formats such as GIF, JPG, and WEBM.
With that in mind, let’s look at how to distort a pic using photomosh.com:
- To use photomash.com, visit the website and select and upload the image you want to distort.
- You can then add any distortion effects to the image.
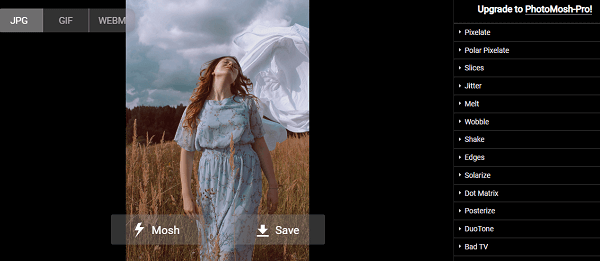
- The last step is clicking on the Mosh button. The website will then create a new image for you based on that image.
- You can save this new image to your computer and share it with your friends or use it in your graphic design project.
How to Distort a Picture on Mobile
Uploading pics on social media is exciting. But sometimes it can be boring if you display the same expression numerous times. Luckily, there are many distorted face apps for iOS and Android mobile devices.
Playing with expressions can be enough to create funny photos. Sometimes a face distortion app is what you need to produce unique images for a different purpose, including annoying close people, jokes, and memes. A distorted face app can turn a pic into an unrecognizable image after completely editing it.
Photo Warp is one of the best distortion apps for Android and iOS devices. The app allows you to get more creative with your pics.
This distorted face app will help you get more creative with your photos, caricatures, and GIFs. It is free to download the app and use its editor features to make ordinary images funny by distorting them.
Photo Warp allows you to drag the face on your pic, zoom in, make an attention-grabbing cheese-eating grin, distort legs, stretch arms, and turn it into a GIF. With just one click, you can buff your face up, make yourself thinner, or enlarge any part of the image. The best part is: The pic you produce will have high resolution to allow you to upload them on various social media platforms without fear of not being optimal or broken.
We’ll look at how to distort pic using Photo Warp on your Android device.
- Visit Google Play, then download and install Photo Warp on your Android mobile device. The application requires the 1.6 or higher version of Android.
- Launch the app when you finish the installation process.
- Take a pic directly from the app or upload one from your device’s memory.
- Apply any of the available five tools to your pic. Two of these tools allow you to rotate sections of your photo to each, while the other two tools let you shrink or enlarge specific areas of your pic. You can use the last one to move the image.
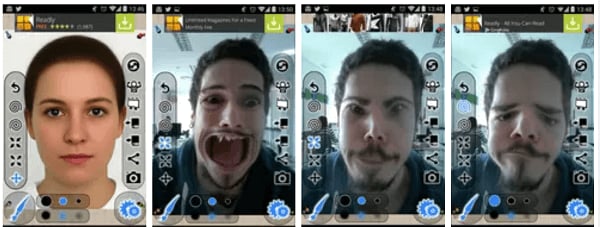
- To use these tools, select them, and then choose the cursor’s size. The undo button is useful when you make a mistake.
- When you finish editing your pic, share your creation on various social media platforms installed on your mobile device.
Add Distortion Effects to Your Video with Filmora
Distortion definitely is not for photos only. It could be much more interesting in videos if you used it right. Moreover, video editors make it easy to add distortion to your videos with all the preset effects, and Filmora is the best among them. Check the below video and learn more about distortion in Filmora.
For Win 7 or later (64-bit)
For macOS 10.12 or later
Conclusion
● If you are interested in distorting pi, you can use one of the methods above. The popularity of using distortion effects is growing every day. People use these effects to conceal errors, attract more viewers, or create funny pics to share on social networks.
Digital images can look great when displayed on a computer monitor or printed on a photo printer. But they can look even better when you distort the picture to look more interesting or artistic. This article shows you how to distort pic using different tools and the benefits of adding this effect to your photos.
In this article
02 How to Distort Picture Using Different Tools
Why We Need to Distort Pic
In digital photography, distortion occurs when you deviate an observed pixel from its anticipated coordinate in a 2D plane, resulting in a more curvilinear appearance that appears unnatural to the viewer’s eye. People use it as a form of effector to share their perspectives. You can distort pic for various reasons. They include:
1. Allows You to Have Fun
Adding distortion effects to your pic is a fun thing to do. It’s always interesting to see what things will look like after adding distortion filters to your photo. You can have an enormous amount of fun, creativity, craziness, and laughing with your pics.
2. Helps You a Distinct Look
One of the simplest ways of making your pics distinct is by adding distortion effects. These effects can make your images stand out within seconds. Because it allows you to create eye-catching pics by adding instant charm, distorting pics can help you attract viewers to your work. Therefore, you can use this effect to wow your friends and audience.
What’s more? Both professional and amateur photographers can use distortion effects to improve the appearance of their pics.
3. Hide Certain Areas of Your Pic
You can use distortion effects if you do not want your viewers to see certain parts of your pic because it has errors or details that you don’t want them to see.
4. Allows You to Show Emphasis on Your Subject
Distorting a pic can help you emphasize its focal point: It allows you to direct viewers’ eyes to the focal point of your image. As such, you can use it to captivate your audience and grab their attention so you can tell them your story. When viewers look at your pic, they will immediately see what you want them to focus on.
You May Also be Interested In
How to Distort Picture Using Different Tools
We will look at three different ways of distorting a picture to make it more attractive, emphasize the subject, or hide errors.
How to Distort a Picture Using Adobe Photoshop
Photoshop is a popular application used to enhance and edit images. You can use this raster graphics editor to distort pics for different purposes. Photoshop has numerous distortion effects that you can apply to your photos.
With that being said, let’s look at how to distort a picture using Adobe Photoshop.
Step 1\
Open the image you want to distort in Adobe Photoshop.
Step 2\
Select the Distort command from the Tools menu. Head to Edit, then select Transform and choose the Distort option.
Step 3\
Select the Horizontal Distortion tool from the fly-out menu.
Step 4\
Move the pointer over the part of the image you want to distort, hold down the left mouse button and drag inward or outward; this will distort that section of your image.
Step 5\
To make further changes, select one of these tools from its fly-out menu: Vertical Distortion, Skew, Perspective, or Warp. You can also use these tools in combination with each other by clicking on them to distort different parts of your image at once.
You can use the Warp tool to curve clothing or objects in your pic. To distort parts of your image, drag the handles; this will create a rectangular mesh with several control points.
Select the area you would to distort using the Lasso tool. Be sure to make the range longer and wider than the actual object.
Step 6\
To restore your image to its original state, select the Reverse tool from the Tools menu.
Step 7\
Select the Horizontal Distortion tool from the fly-out menu, move the pointer over a section of your image that you want to restore, and press the left mouse button; this will flatten out that section of your image.
Step 8\
To restore other parts of your image, repeat step 7 for each part of your image that you want to flatten out by holding down the mouse button while dragging inward or outward with the pointer.
Step 9\
When you have finished distorting, click on OK to exit Photoshop and save your file as normal. You can now print or save your file as a JPEG or GIF file.
How to Distort a Picture Using an Online Tool
You can also distort a pic using an online tool. A distortion website allows you to morph and add noise to your image. These online tools offer multiple photo distortion filters and effects that you can add to your image and distort its look. After applying a filter, you can manually adjust the intensity of your distortion filter to suit your preferences.
Some of the images you can distort using online tools include:
- Over-Exposition: This is when the person in the photo is too bright or overexposed to show the subject’s features.
- Under-Exposure: This is when the person in the photo is too dark or under-exposed to show the subject’s features.
- Visual Stretching is when you digitally stretch an image to the desired size, sometimes using a “zoom” feature to get closer or broader shots of the subject.
Photomosh.com is one of the online tools that people use to edit images online. You can use it to distort photos to create new visual content that showcases your creativity and personality; this website is user-friendly and allows you to create your photo distortion quickly. The tool lets users distort images of various formats such as GIF, JPG, and WEBM.
With that in mind, let’s look at how to distort a pic using photomosh.com:
- To use photomash.com, visit the website and select and upload the image you want to distort.
- You can then add any distortion effects to the image.
- The last step is clicking on the Mosh button. The website will then create a new image for you based on that image.
- You can save this new image to your computer and share it with your friends or use it in your graphic design project.
How to Distort a Picture on Mobile
Uploading pics on social media is exciting. But sometimes it can be boring if you display the same expression numerous times. Luckily, there are many distorted face apps for iOS and Android mobile devices.
Playing with expressions can be enough to create funny photos. Sometimes a face distortion app is what you need to produce unique images for a different purpose, including annoying close people, jokes, and memes. A distorted face app can turn a pic into an unrecognizable image after completely editing it.
Photo Warp is one of the best distortion apps for Android and iOS devices. The app allows you to get more creative with your pics.
This distorted face app will help you get more creative with your photos, caricatures, and GIFs. It is free to download the app and use its editor features to make ordinary images funny by distorting them.
Photo Warp allows you to drag the face on your pic, zoom in, make an attention-grabbing cheese-eating grin, distort legs, stretch arms, and turn it into a GIF. With just one click, you can buff your face up, make yourself thinner, or enlarge any part of the image. The best part is: The pic you produce will have high resolution to allow you to upload them on various social media platforms without fear of not being optimal or broken.
We’ll look at how to distort pic using Photo Warp on your Android device.
- Visit Google Play, then download and install Photo Warp on your Android mobile device. The application requires the 1.6 or higher version of Android.

- Launch the app when you finish the installation process.
- Take a pic directly from the app or upload one from your device’s memory.
- Apply any of the available five tools to your pic. Two of these tools allow you to rotate sections of your photo to each, while the other two tools let you shrink or enlarge specific areas of your pic. You can use the last one to move the image.
- To use these tools, select them, and then choose the cursor’s size. The undo button is useful when you make a mistake.
- When you finish editing your pic, share your creation on various social media platforms installed on your mobile device.
Add Distortion Effects to Your Video with Filmora
Distortion definitely is not for photos only. It could be much more interesting in videos if you used it right. Moreover, video editors make it easy to add distortion to your videos with all the preset effects, and Filmora is the best among them. Check the below video and learn more about distortion in Filmora.
For Win 7 or later (64-bit)
For macOS 10.12 or later
Conclusion
● If you are interested in distorting pi, you can use one of the methods above. The popularity of using distortion effects is growing every day. People use these effects to conceal errors, attract more viewers, or create funny pics to share on social networks.
Digital images can look great when displayed on a computer monitor or printed on a photo printer. But they can look even better when you distort the picture to look more interesting or artistic. This article shows you how to distort pic using different tools and the benefits of adding this effect to your photos.
In this article
02 How to Distort Picture Using Different Tools
Why We Need to Distort Pic
In digital photography, distortion occurs when you deviate an observed pixel from its anticipated coordinate in a 2D plane, resulting in a more curvilinear appearance that appears unnatural to the viewer’s eye. People use it as a form of effector to share their perspectives. You can distort pic for various reasons. They include:
1. Allows You to Have Fun
Adding distortion effects to your pic is a fun thing to do. It’s always interesting to see what things will look like after adding distortion filters to your photo. You can have an enormous amount of fun, creativity, craziness, and laughing with your pics.
2. Helps You a Distinct Look
One of the simplest ways of making your pics distinct is by adding distortion effects. These effects can make your images stand out within seconds. Because it allows you to create eye-catching pics by adding instant charm, distorting pics can help you attract viewers to your work. Therefore, you can use this effect to wow your friends and audience.
What’s more? Both professional and amateur photographers can use distortion effects to improve the appearance of their pics.
3. Hide Certain Areas of Your Pic
You can use distortion effects if you do not want your viewers to see certain parts of your pic because it has errors or details that you don’t want them to see.
4. Allows You to Show Emphasis on Your Subject
Distorting a pic can help you emphasize its focal point: It allows you to direct viewers’ eyes to the focal point of your image. As such, you can use it to captivate your audience and grab their attention so you can tell them your story. When viewers look at your pic, they will immediately see what you want them to focus on.
You May Also be Interested In
How to Distort Picture Using Different Tools
We will look at three different ways of distorting a picture to make it more attractive, emphasize the subject, or hide errors.
How to Distort a Picture Using Adobe Photoshop
Photoshop is a popular application used to enhance and edit images. You can use this raster graphics editor to distort pics for different purposes. Photoshop has numerous distortion effects that you can apply to your photos.
With that being said, let’s look at how to distort a picture using Adobe Photoshop.
Step 1\
Open the image you want to distort in Adobe Photoshop.
Step 2\
Select the Distort command from the Tools menu. Head to Edit, then select Transform and choose the Distort option.
Step 3\
Select the Horizontal Distortion tool from the fly-out menu.
Step 4\
Move the pointer over the part of the image you want to distort, hold down the left mouse button and drag inward or outward; this will distort that section of your image.
Step 5\
To make further changes, select one of these tools from its fly-out menu: Vertical Distortion, Skew, Perspective, or Warp. You can also use these tools in combination with each other by clicking on them to distort different parts of your image at once.
You can use the Warp tool to curve clothing or objects in your pic. To distort parts of your image, drag the handles; this will create a rectangular mesh with several control points.
Select the area you would to distort using the Lasso tool. Be sure to make the range longer and wider than the actual object.
Step 6\
To restore your image to its original state, select the Reverse tool from the Tools menu.
Step 7\
Select the Horizontal Distortion tool from the fly-out menu, move the pointer over a section of your image that you want to restore, and press the left mouse button; this will flatten out that section of your image.
Step 8\
To restore other parts of your image, repeat step 7 for each part of your image that you want to flatten out by holding down the mouse button while dragging inward or outward with the pointer.
Step 9\
When you have finished distorting, click on OK to exit Photoshop and save your file as normal. You can now print or save your file as a JPEG or GIF file.
How to Distort a Picture Using an Online Tool
You can also distort a pic using an online tool. A distortion website allows you to morph and add noise to your image. These online tools offer multiple photo distortion filters and effects that you can add to your image and distort its look. After applying a filter, you can manually adjust the intensity of your distortion filter to suit your preferences.
Some of the images you can distort using online tools include:
- Over-Exposition: This is when the person in the photo is too bright or overexposed to show the subject’s features.
- Under-Exposure: This is when the person in the photo is too dark or under-exposed to show the subject’s features.
- Visual Stretching is when you digitally stretch an image to the desired size, sometimes using a “zoom” feature to get closer or broader shots of the subject.
Photomosh.com is one of the online tools that people use to edit images online. You can use it to distort photos to create new visual content that showcases your creativity and personality; this website is user-friendly and allows you to create your photo distortion quickly. The tool lets users distort images of various formats such as GIF, JPG, and WEBM.
With that in mind, let’s look at how to distort a pic using photomosh.com:
- To use photomash.com, visit the website and select and upload the image you want to distort.
- You can then add any distortion effects to the image.
- The last step is clicking on the Mosh button. The website will then create a new image for you based on that image.
- You can save this new image to your computer and share it with your friends or use it in your graphic design project.
How to Distort a Picture on Mobile
Uploading pics on social media is exciting. But sometimes it can be boring if you display the same expression numerous times. Luckily, there are many distorted face apps for iOS and Android mobile devices.
Playing with expressions can be enough to create funny photos. Sometimes a face distortion app is what you need to produce unique images for a different purpose, including annoying close people, jokes, and memes. A distorted face app can turn a pic into an unrecognizable image after completely editing it.
Photo Warp is one of the best distortion apps for Android and iOS devices. The app allows you to get more creative with your pics.
This distorted face app will help you get more creative with your photos, caricatures, and GIFs. It is free to download the app and use its editor features to make ordinary images funny by distorting them.
Photo Warp allows you to drag the face on your pic, zoom in, make an attention-grabbing cheese-eating grin, distort legs, stretch arms, and turn it into a GIF. With just one click, you can buff your face up, make yourself thinner, or enlarge any part of the image. The best part is: The pic you produce will have high resolution to allow you to upload them on various social media platforms without fear of not being optimal or broken.
We’ll look at how to distort pic using Photo Warp on your Android device.
- Visit Google Play, then download and install Photo Warp on your Android mobile device. The application requires the 1.6 or higher version of Android.
- Launch the app when you finish the installation process.
- Take a pic directly from the app or upload one from your device’s memory.
- Apply any of the available five tools to your pic. Two of these tools allow you to rotate sections of your photo to each, while the other two tools let you shrink or enlarge specific areas of your pic. You can use the last one to move the image.
- To use these tools, select them, and then choose the cursor’s size. The undo button is useful when you make a mistake.
- When you finish editing your pic, share your creation on various social media platforms installed on your mobile device.
Add Distortion Effects to Your Video with Filmora
Distortion definitely is not for photos only. It could be much more interesting in videos if you used it right. Moreover, video editors make it easy to add distortion to your videos with all the preset effects, and Filmora is the best among them. Check the below video and learn more about distortion in Filmora.
For Win 7 or later (64-bit)
For macOS 10.12 or later
Conclusion
● If you are interested in distorting pi, you can use one of the methods above. The popularity of using distortion effects is growing every day. People use these effects to conceal errors, attract more viewers, or create funny pics to share on social networks.
Also read:
- [New] 7 Star-Rated Apps for Effortless YouTube LIVE Broadcast From iPhone and Android for 2024
- [New] Prime List Best Free Video Transcript Harvesters
- [Updated] Capture the Crash - Expert Surfer Cameras Review
- [Updated] In 2024, Polishing Your YouTube Projects The Premiere Pro Way
- 3 Ways to Track Oppo Reno 8T 5G without Them Knowing | Dr.fone
- Enhancing Photos with Chronological Details
- Expert Tips on Selecting Best FREE SRT Tools
- Get the Tunes You Love - Seamlessly Transfer Music From Jango to Portable Files Like MP3, WAV, or AAC Using Our Reliable Downloader Tool
- Imperfect Forgiveness | Free Book
- In 2024, Capturing Moments Like Never Before with SJ-CAM S6
- In 2024, How to Change Google Play Location On Realme GT Neo 5 | Dr.fone
- Is ChatGPT More Accurate than Traditional Horoscopes in Forecasting the Future?
- PicEditorPro Assessment – Complete Review
- Pro's 5 Virtual Helmets A Drone Racer's Choice
- Time-Loop Mastery How to Rewind iPhone Media
- Title: Bend, Twist & Shape Your Digital Pics for 2024
- Author: Mark
- Created at : 2024-10-26 18:37:56
- Updated at : 2024-11-03 01:17:43
- Link: https://extra-lessons.techidaily.com/bend-twist-and-shape-your-digital-pics-for-2024/
- License: This work is licensed under CC BY-NC-SA 4.0.