
:max_bytes(150000):strip_icc()/GettyImages-1140608006-bd7e83fd1127480bae301b7d0fdb990f.jpg)
"Color Keying 101 The Easy Guide to Digital Backdrops and Filming"
Color Keying 101: The Easy Guide to Digital Backdrops and Filming
How Do Green Screens Work? [A Complete Beginner’s Guide]

Benjamin Arango
Mar 27, 2024• Proven solutions
One of the most common questions in film school is, “How do green screens work?” How are green screen backgrounds added into TV shows and movies?
For the most part, the process is fairly simple. It only becomes difficult when you try to hide the fact a green screen is being used, or try to set up a scene to look 100% realistic. Here is how green screens work.
You will learn :
- What Is a Green Screen?
- Why Do Video Makers Use Green Screen?
- How Do Green Screens Work?
- How to Set Up Your Green Screen Scene in 5 Steps?
- 5 Green Screen Ideas for Each Video-Making Scenario
- The Best Green Screen Video Editing Tools for Beginners and Pros
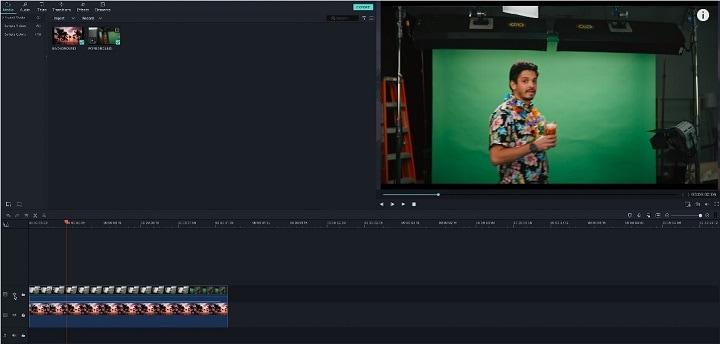
Best Easy to Use Video Editor to Composite Green Screen in 3 Minutes


What Is a Green Screen?
The term “Green Screen” is used to describe a camera and editing trick. A large canvas is placed behind a scene, and it contains a color that is not present elsewhere in the shot. The color is typically a bright shade of blue or green. During the editing session, the green screen color is keyed out of the scene. It then leaves a blank space where another image may be superimposed into the video.
Green screening doesn’t always happen in the editing room. For example, weather channels and services have used green screen in the moment. For many years, when a weather reporter was pointing at a board, the reporter couldn’t see what was on the board, only the people at home could see.
The misuse of colors sometimes led to series bloopers, such as when the weather reporter wore the same color shirt as the green screen. It sometimes resulted in part of the weather map being superimposed onto the weather reporter.
Why Do Video Makers Use Green Screen?
The most common use in the olden days was to cut down on costs. For example, rather than flying to Greece to film a scene in front of the ruins, one can use a green screen and make it appear like the participants are standing in front of the ruins.
These days, there is still a fair amount of green screen used in mainstream comedy and sitcom TV shows. This is partly due to its money-saving capacity, and partly due to people being more accepting of this sort of thing in comedy shows.
This is especially where the premise is not supposed to be taken seriously. In fact, there are many times when the fake green screen images being shown behind what is supposed to be a moving vehicle is part of the joke.
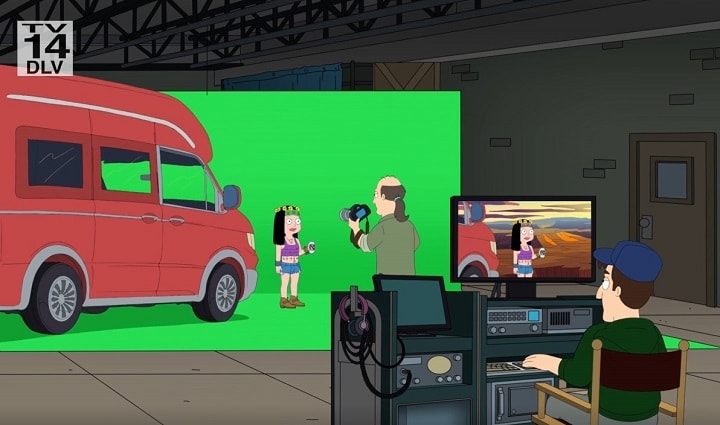
Green screen is more commonly used no mainstream TV, and to a lesser extent in movies, to fill out a scene. For example, the production company may have quickly built a seaside party set for a five-second scene.
Most props will cover the green screen, but the green screen is still present in the background to show things like clouds moving in the sky or boats moving on the ocean. It fills out a scene and makes a studio set look at little more realistic.
How Do Green Screens Work?
Before getting into the more technical stuff, think about this: you have just taken a photo, but there is an unwanted person in it. You go into MS Paint, and you can cut out all the people you want in the photo, and discard the rest.
You can discard the background and all the unwanted people. What is left over is a bunch of people, so you drop their image onto a nice background photo. When you do something like this, you are doing a similar thing that green screens do. In fact, people have been photoshopping in that way since the days of Leon Trotsky.
Green Screening Does Not Have to Include the Color Green
You can green screen by adding a certain color into the scene. Make it a color that is not seen elsewhere in the scene. Typically, this color is added as a canvas behind the screen, but it doesn’t have to work that way.
For example, you could use the color on somebody’s boots, and then edit out and change the boots in the edit. Maybe you could make the boots look like they are burning with the use of visual effects.
What Happens After You Add Your Green to the Scene?
Once you have added your color to the scene, you must record the scene as normal. Then, in the editing phase, you isolate a single color. The color you isolate is the green screen color, (whichever you chose). In the scene, you make that color transparent. This means that there are frames with transparent elements in them. This process is called chromakeying.
Once you have used chromakeying make a certain part of the frame transparent, you can replace that transparency with another image. When building a background, the image is sometimes a piece of video footage or a still image. Other times a visual effect is used such as CGI to make something appear to be in the scene, but is actually not.
How to Set Up Your Green Screen Scene in 5 Steps?
Step 1: Choose the right color
The first thing you need to do is make sure the color you choose is not present anywhere else on the scene. Even the way you light your scene can affect the colors where one color is almost reflected on another surface to create a new color. In short, you will need to do a lot of screen tests to be sure the color you pick does not appear elsewhere in the scene.
Step 2: Buying your materials
There are many pre-made green screens that you can buy. They are mostly made of a single-colored material that is non-reflective. The most common colors of a green screen background are a light green background, a dark green background and a mint green background.
Tools and Equipment to Set Up a Green Screen
All you need is something that is a single color. The color you choose it the color you key out later. For the sake of consistency, let’s say the color is green. Green is typically the color chosen, but it all depends on your scene. For example, if your set has a lot of green foliage in it, then the color may work better.
- A Projector Screen
Some people use projector screens with a green matte canvas on them. For example, a weather channel may use a projector screen and then superimpose the weather information onto the screen.
- A Large Green Canvas Background
TV studios will typically use a large green matte material that takes up an entire wall. This is used to build an entire scene behind a set. For example, the set may contain sun loungers, and the green screen shows a beach scene.
- A Large Painted Walls
Other production companies may use an entire wall that they paint in a green matte color. The trick is to then stand people in front of it so it looks like they are in different locations.
- Good Lighting
In order to avoid shadows, free-standing lights are needed. Using overhead lights alone will cause shadows to appear on the green screen. That is why large and powerful freestanding lights need to be used to fully illuminate the green screen.
Step 3: Lighting properly
Step three is the lighting, and it is burningly important that you get it right. If your green screen is not lit consistently, then different areas will show as having a different shade during the edit. Different shades of green are going to make the editing (chromakeying) process more difficult.
Step 4: Set individual lighting
The things you are green screening will not look real if they do not include their own light sources. An obvious one is if your green screen features a sky with a sun in it. In this case, you need lots of light coming from where the sun appears to be.
You also need to think about individual lighting and how it creates shadows. The objects that make up part of the green screen may be emitting their own lights. In which case, you need to make sure the objects actually emit a light so that they create the right types of light reflection and shadows on real-world objects.

Step 5: Post-editing
Step five is the editing process, and a large part involves thinking about how the green screen would interact with the other elements in the scene. Commonly forgotten elements in an indoor setting are shadows from clouds, the wind, and background noises like cars passing or dogs barking.
5 Green Screen Ideas for Each Video-Making Scenario
All green screen ideas needs to revolve around your plot that the things you wish to achieve. In many cases, green screen technology is going to save you money.
- Are there ways that green screen can save you money?
- Can you add in new locations?
- Can you add in new objects that were not previously there?
Using Green Screen to Improve a Scene
Green screens can be used to fix up a scene or improve it. Ask your how yourself scene could be improved thanks to green screening.
- Could you make your background more dynamic?
- Could you add more visual information to a screen?
- Are there things you would like to cut out of a scene using chromakeying.
Using Green Screen to Add Objects into a Scene
Would you like to add things to your scene? Perhaps you cannot afford a super car, so you create a model, scale it up, and add it over the green object you placed in your scene. Maybe you would like to add further details like computer consoles on your spaceship deck, or the stars flying by past your spaceship’s window.
- What details can you add to a scene?
- Which objects can you add to a scene to make it better?
- Can you create an atmosphere by adding something into a scene?
Using Green Screen Technology and Visual Effects
Maybe you would like to use green screen to add visual effects. Perhaps there are things that need improving. Maybe your TV show or movie features are piece of futuristic technology that has lots of moving parts. You could film a solid green object and then add the CGI animation over the green area by first making the area transparent with chromakeying.
- Would you benefit from adding animation to different objects?
- Should CGI be added into the transparent green screen areas?
- Could computer generated graphics enhance an already dynamic scene?
Be Careful When Picking What Should Be CGI Animated
Just make sure you make correct and smart choices when you decide to add in extra details with green screen. A classic example of a very bad idea was during the 2011 movie “Green Lantern,” when for some reason they added very ugly CGI eyes over the mask.
Green Screen Ideas Need Not Exist Just in Videos
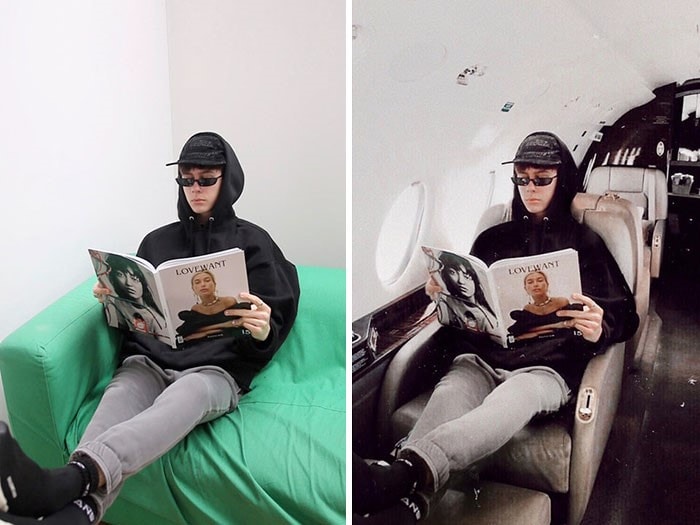
The best green screen ideas are ones that occur as natural solutions to your production problems. Sometimes the problems are as simple as budget constraints, and sometimes it is a more personal problem such as trying to edit out corporate logos or branded items that you do not have the authority to use. Green screen is even used by people who are trying to master Instagram. Take the example of people who are living an “Instagram Road Lifestyle.”
In fact, in real life, there are plenty of people who are faking their Instagram images to great success. Notice the blank colors in the background, and the green seat in the image below. Using chromakeying, it is possible to make the Instagram user look as if she is living a luxurious lifestyle.
The Best Green Screen Video Editing Tools for Beginners and Pros
The truth is that many different tools can be used to edit frames and replace elements within the frame, and the use of a green screen makes the process all the easier. You could easily use the free tools Blender and GIMP to manufacture a green-screened scene. However, using such tools is rather labor intensive, and it is often easier, quicker and more efficient to use specially designed video recording and/or editing tools.
The tools that make green screening easy are often very expensive, but many of them come with a free trial that you can use prior to buying. For example, Wondershare Filmora comes with a free trial for both Microsoft and Apple desktop products. There are also tools like the VSDC Video Editor, iMovie, Virtual Dub and so forth.
Do not be fooled by article that claim they list free Chroma key or green screening tools. Firstly, the genuinely free tools, such as the open source tools like Blender, are very labor intensive. Secondly, such articles are claiming the green-screening tools are free, but they only have free trials, you will be required to pay if you want to use the tools over the long term.
The 3 Best Green Screen Video Editors
In reality, the front-runner in the race for best green screen video editor is the Wondershare Filmora . Adobe has some nice products that may interest some people, but the best is still Wondershare Filmora. Here are a few for green screen video editors for your consideration.
1. Wondershare Filmora
It is a strong piece of video editing software that is perfectly able to handle green screening, and has many only editing features that will appeal to novice and professional film makers.
[+] Very easy to set up and use
[+] Offers great value for money
[+] You can upload directly the Vimeo and YouTube
[+] Is suitable for beginners and professionals
[+] Has plenty of features and tools
[+] You can edit 4K video and there are GIF output options
[ - ] You will need a yearly subscription if you want to use their effects store
[ - ] The program no longer has storyboard editing
[ - ] Cannot export single sections of a timeline without cutting them
[ - ] It could use more shortcuts for navigating the timeline
It’s free to download. Have a try now.
2. iMovie

The iMovie program is the cheap and tacky entry in the video editing world. It is only available on the iOS and Mac, and is mostly suited for people who do not want to spend a lot of money on their video editing software.
[+] You are able to add background music
[+] Add in some text and some smooth looking end credits
[+] You can fix shaky videos with this program
[+] Get up close and edit your clips
[+] Changing the audio over the clips you insert is easy
[ - ] Uploading to other platforms is too difficult
[ - ] Importing formats are limited
[ - ] Does not have all the capabilities of most modern video editors
[ - ] The GUI looks cheap and a little dated
[ - ] It is not customizable enough for a professional editor
3. Lightworks

Despite having a few advanced tools, this is probably the best example of bad design and marketing ideas in the video editing world. The free version is so clunky and awful that nobody would agree to buy the premium version. Furthermore, the GUI is terrible and very unintuitive. It looks like a cheap update of a 1990s editor.
[+] The free version is a nice touch
[+] Has real-time effects as standard
[+] Export straight to Vimeo or YouTube
[+] The VFX panel is segmented in a traditional way
[+] It has a good range of import formats
[+] Has robust support for a range of video formats
[+] Editing can be done quickly and speedily
[ - ] Exports are limited to just 720p
[ - ] Does not have Full HD or 4K support
[ - ] Has very few guided wizards or tutorials
[ - ] Timeline rendering requires the paid version
[ - ] Mac menu options are not supported
[ - ] You cannot display iPhone landscape videos
Buyer Beware When Looking For Video Editors
As mentioned earlier, a common trick is to offer you a free trial and then roll your free trial over to a paid subscription. When an editor claims to be free, you need to check just how free it really is. Another trick is to claim the tools are free, so you work on your project, and then when it is time to export you are asked for payment.
Another common trick is to offer you a free trial and then load your computer up with all types of bloatware. Plus, some video editors offer you free services, but they will add a watermark over your edited video.
In addition, if an editing tool asks you to sign in to your other accounts, such as your YouTube account or Google account, then perhaps uninstall the program. You need to do this because there is no guarantee of security with these programs, which means you cannot be sure of the safety of your passwords when you enter them into video editing tools, (especially free ones).
Conclusion - Getting it Right is the Hard Part
Now that this article has answered the question, “How do green screens work,” You are now free to try it yourself. You are going to read a lot of articles that say green screening is easy. Where it is true that the method is easy, in reality it is very difficult to get green screening right. It is just like how cooking is pretty easy, but cooking a great meal is not.
Are you finding it difficult? Are you using green screen technology in a clever way?
Let us know in the comments, and please share our content on social media so that your friends can discover how green screens work.
Benjamin Arango
Benjamin Arango is a writer and a lover of all things video.
Follow @Benjamin Arango
Benjamin Arango
Mar 27, 2024• Proven solutions
One of the most common questions in film school is, “How do green screens work?” How are green screen backgrounds added into TV shows and movies?
For the most part, the process is fairly simple. It only becomes difficult when you try to hide the fact a green screen is being used, or try to set up a scene to look 100% realistic. Here is how green screens work.
You will learn :
- What Is a Green Screen?
- Why Do Video Makers Use Green Screen?
- How Do Green Screens Work?
- How to Set Up Your Green Screen Scene in 5 Steps?
- 5 Green Screen Ideas for Each Video-Making Scenario
- The Best Green Screen Video Editing Tools for Beginners and Pros
Best Easy to Use Video Editor to Composite Green Screen in 3 Minutes
What Is a Green Screen?
The term “Green Screen” is used to describe a camera and editing trick. A large canvas is placed behind a scene, and it contains a color that is not present elsewhere in the shot. The color is typically a bright shade of blue or green. During the editing session, the green screen color is keyed out of the scene. It then leaves a blank space where another image may be superimposed into the video.
Green screening doesn’t always happen in the editing room. For example, weather channels and services have used green screen in the moment. For many years, when a weather reporter was pointing at a board, the reporter couldn’t see what was on the board, only the people at home could see.
The misuse of colors sometimes led to series bloopers, such as when the weather reporter wore the same color shirt as the green screen. It sometimes resulted in part of the weather map being superimposed onto the weather reporter.
Why Do Video Makers Use Green Screen?
The most common use in the olden days was to cut down on costs. For example, rather than flying to Greece to film a scene in front of the ruins, one can use a green screen and make it appear like the participants are standing in front of the ruins.
These days, there is still a fair amount of green screen used in mainstream comedy and sitcom TV shows. This is partly due to its money-saving capacity, and partly due to people being more accepting of this sort of thing in comedy shows.
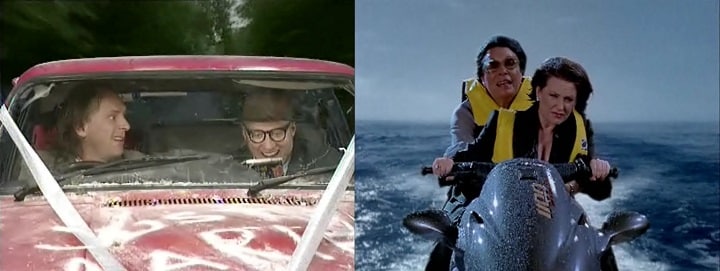
This is especially where the premise is not supposed to be taken seriously. In fact, there are many times when the fake green screen images being shown behind what is supposed to be a moving vehicle is part of the joke.
Green screen is more commonly used no mainstream TV, and to a lesser extent in movies, to fill out a scene. For example, the production company may have quickly built a seaside party set for a five-second scene.
Most props will cover the green screen, but the green screen is still present in the background to show things like clouds moving in the sky or boats moving on the ocean. It fills out a scene and makes a studio set look at little more realistic.
How Do Green Screens Work?
Before getting into the more technical stuff, think about this: you have just taken a photo, but there is an unwanted person in it. You go into MS Paint, and you can cut out all the people you want in the photo, and discard the rest.
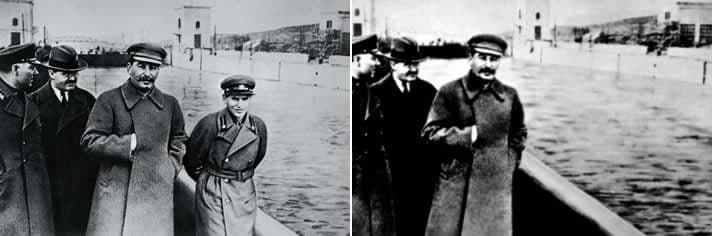
You can discard the background and all the unwanted people. What is left over is a bunch of people, so you drop their image onto a nice background photo. When you do something like this, you are doing a similar thing that green screens do. In fact, people have been photoshopping in that way since the days of Leon Trotsky.
Green Screening Does Not Have to Include the Color Green
You can green screen by adding a certain color into the scene. Make it a color that is not seen elsewhere in the scene. Typically, this color is added as a canvas behind the screen, but it doesn’t have to work that way.
For example, you could use the color on somebody’s boots, and then edit out and change the boots in the edit. Maybe you could make the boots look like they are burning with the use of visual effects.
What Happens After You Add Your Green to the Scene?
Once you have added your color to the scene, you must record the scene as normal. Then, in the editing phase, you isolate a single color. The color you isolate is the green screen color, (whichever you chose). In the scene, you make that color transparent. This means that there are frames with transparent elements in them. This process is called chromakeying.
Once you have used chromakeying make a certain part of the frame transparent, you can replace that transparency with another image. When building a background, the image is sometimes a piece of video footage or a still image. Other times a visual effect is used such as CGI to make something appear to be in the scene, but is actually not.
How to Set Up Your Green Screen Scene in 5 Steps?
Step 1: Choose the right color
The first thing you need to do is make sure the color you choose is not present anywhere else on the scene. Even the way you light your scene can affect the colors where one color is almost reflected on another surface to create a new color. In short, you will need to do a lot of screen tests to be sure the color you pick does not appear elsewhere in the scene.
Step 2: Buying your materials
There are many pre-made green screens that you can buy. They are mostly made of a single-colored material that is non-reflective. The most common colors of a green screen background are a light green background, a dark green background and a mint green background.
Tools and Equipment to Set Up a Green Screen
All you need is something that is a single color. The color you choose it the color you key out later. For the sake of consistency, let’s say the color is green. Green is typically the color chosen, but it all depends on your scene. For example, if your set has a lot of green foliage in it, then the color may work better.
- A Projector Screen
Some people use projector screens with a green matte canvas on them. For example, a weather channel may use a projector screen and then superimpose the weather information onto the screen.
- A Large Green Canvas Background
TV studios will typically use a large green matte material that takes up an entire wall. This is used to build an entire scene behind a set. For example, the set may contain sun loungers, and the green screen shows a beach scene.
- A Large Painted Walls
Other production companies may use an entire wall that they paint in a green matte color. The trick is to then stand people in front of it so it looks like they are in different locations.
- Good Lighting
In order to avoid shadows, free-standing lights are needed. Using overhead lights alone will cause shadows to appear on the green screen. That is why large and powerful freestanding lights need to be used to fully illuminate the green screen.
Step 3: Lighting properly
Step three is the lighting, and it is burningly important that you get it right. If your green screen is not lit consistently, then different areas will show as having a different shade during the edit. Different shades of green are going to make the editing (chromakeying) process more difficult.
Step 4: Set individual lighting
The things you are green screening will not look real if they do not include their own light sources. An obvious one is if your green screen features a sky with a sun in it. In this case, you need lots of light coming from where the sun appears to be.
You also need to think about individual lighting and how it creates shadows. The objects that make up part of the green screen may be emitting their own lights. In which case, you need to make sure the objects actually emit a light so that they create the right types of light reflection and shadows on real-world objects.
Step 5: Post-editing
Step five is the editing process, and a large part involves thinking about how the green screen would interact with the other elements in the scene. Commonly forgotten elements in an indoor setting are shadows from clouds, the wind, and background noises like cars passing or dogs barking.
5 Green Screen Ideas for Each Video-Making Scenario
All green screen ideas needs to revolve around your plot that the things you wish to achieve. In many cases, green screen technology is going to save you money.
- Are there ways that green screen can save you money?
- Can you add in new locations?
- Can you add in new objects that were not previously there?
Using Green Screen to Improve a Scene
Green screens can be used to fix up a scene or improve it. Ask your how yourself scene could be improved thanks to green screening.
- Could you make your background more dynamic?
- Could you add more visual information to a screen?
- Are there things you would like to cut out of a scene using chromakeying.
Using Green Screen to Add Objects into a Scene
Would you like to add things to your scene? Perhaps you cannot afford a super car, so you create a model, scale it up, and add it over the green object you placed in your scene. Maybe you would like to add further details like computer consoles on your spaceship deck, or the stars flying by past your spaceship’s window.
- What details can you add to a scene?
- Which objects can you add to a scene to make it better?
- Can you create an atmosphere by adding something into a scene?
Using Green Screen Technology and Visual Effects
Maybe you would like to use green screen to add visual effects. Perhaps there are things that need improving. Maybe your TV show or movie features are piece of futuristic technology that has lots of moving parts. You could film a solid green object and then add the CGI animation over the green area by first making the area transparent with chromakeying.
- Would you benefit from adding animation to different objects?
- Should CGI be added into the transparent green screen areas?
- Could computer generated graphics enhance an already dynamic scene?
Be Careful When Picking What Should Be CGI Animated
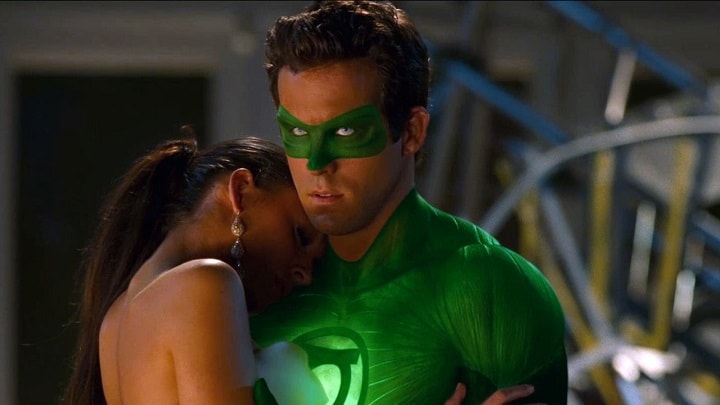
Just make sure you make correct and smart choices when you decide to add in extra details with green screen. A classic example of a very bad idea was during the 2011 movie “Green Lantern,” when for some reason they added very ugly CGI eyes over the mask.
Green Screen Ideas Need Not Exist Just in Videos
The best green screen ideas are ones that occur as natural solutions to your production problems. Sometimes the problems are as simple as budget constraints, and sometimes it is a more personal problem such as trying to edit out corporate logos or branded items that you do not have the authority to use. Green screen is even used by people who are trying to master Instagram. Take the example of people who are living an “Instagram Road Lifestyle.”
In fact, in real life, there are plenty of people who are faking their Instagram images to great success. Notice the blank colors in the background, and the green seat in the image below. Using chromakeying, it is possible to make the Instagram user look as if she is living a luxurious lifestyle.
The Best Green Screen Video Editing Tools for Beginners and Pros
The truth is that many different tools can be used to edit frames and replace elements within the frame, and the use of a green screen makes the process all the easier. You could easily use the free tools Blender and GIMP to manufacture a green-screened scene. However, using such tools is rather labor intensive, and it is often easier, quicker and more efficient to use specially designed video recording and/or editing tools.
The tools that make green screening easy are often very expensive, but many of them come with a free trial that you can use prior to buying. For example, Wondershare Filmora comes with a free trial for both Microsoft and Apple desktop products. There are also tools like the VSDC Video Editor, iMovie, Virtual Dub and so forth.
Do not be fooled by article that claim they list free Chroma key or green screening tools. Firstly, the genuinely free tools, such as the open source tools like Blender, are very labor intensive. Secondly, such articles are claiming the green-screening tools are free, but they only have free trials, you will be required to pay if you want to use the tools over the long term.
The 3 Best Green Screen Video Editors
In reality, the front-runner in the race for best green screen video editor is the Wondershare Filmora . Adobe has some nice products that may interest some people, but the best is still Wondershare Filmora. Here are a few for green screen video editors for your consideration.
1. Wondershare Filmora
It is a strong piece of video editing software that is perfectly able to handle green screening, and has many only editing features that will appeal to novice and professional film makers.
[+] Very easy to set up and use
[+] Offers great value for money
[+] You can upload directly the Vimeo and YouTube
[+] Is suitable for beginners and professionals
[+] Has plenty of features and tools
[+] You can edit 4K video and there are GIF output options
[ - ] You will need a yearly subscription if you want to use their effects store
[ - ] The program no longer has storyboard editing
[ - ] Cannot export single sections of a timeline without cutting them
[ - ] It could use more shortcuts for navigating the timeline
It’s free to download. Have a try now.
2. iMovie
The iMovie program is the cheap and tacky entry in the video editing world. It is only available on the iOS and Mac, and is mostly suited for people who do not want to spend a lot of money on their video editing software.
[+] You are able to add background music
[+] Add in some text and some smooth looking end credits
[+] You can fix shaky videos with this program
[+] Get up close and edit your clips
[+] Changing the audio over the clips you insert is easy
[ - ] Uploading to other platforms is too difficult
[ - ] Importing formats are limited
[ - ] Does not have all the capabilities of most modern video editors
[ - ] The GUI looks cheap and a little dated
[ - ] It is not customizable enough for a professional editor
3. Lightworks
Despite having a few advanced tools, this is probably the best example of bad design and marketing ideas in the video editing world. The free version is so clunky and awful that nobody would agree to buy the premium version. Furthermore, the GUI is terrible and very unintuitive. It looks like a cheap update of a 1990s editor.
[+] The free version is a nice touch
[+] Has real-time effects as standard
[+] Export straight to Vimeo or YouTube
[+] The VFX panel is segmented in a traditional way
[+] It has a good range of import formats
[+] Has robust support for a range of video formats
[+] Editing can be done quickly and speedily
[ - ] Exports are limited to just 720p
[ - ] Does not have Full HD or 4K support
[ - ] Has very few guided wizards or tutorials
[ - ] Timeline rendering requires the paid version
[ - ] Mac menu options are not supported
[ - ] You cannot display iPhone landscape videos
Buyer Beware When Looking For Video Editors
As mentioned earlier, a common trick is to offer you a free trial and then roll your free trial over to a paid subscription. When an editor claims to be free, you need to check just how free it really is. Another trick is to claim the tools are free, so you work on your project, and then when it is time to export you are asked for payment.
Another common trick is to offer you a free trial and then load your computer up with all types of bloatware. Plus, some video editors offer you free services, but they will add a watermark over your edited video.
In addition, if an editing tool asks you to sign in to your other accounts, such as your YouTube account or Google account, then perhaps uninstall the program. You need to do this because there is no guarantee of security with these programs, which means you cannot be sure of the safety of your passwords when you enter them into video editing tools, (especially free ones).
Conclusion - Getting it Right is the Hard Part
Now that this article has answered the question, “How do green screens work,” You are now free to try it yourself. You are going to read a lot of articles that say green screening is easy. Where it is true that the method is easy, in reality it is very difficult to get green screening right. It is just like how cooking is pretty easy, but cooking a great meal is not.
Are you finding it difficult? Are you using green screen technology in a clever way?
Let us know in the comments, and please share our content on social media so that your friends can discover how green screens work.
Benjamin Arango
Benjamin Arango is a writer and a lover of all things video.
Follow @Benjamin Arango
Benjamin Arango
Mar 27, 2024• Proven solutions
One of the most common questions in film school is, “How do green screens work?” How are green screen backgrounds added into TV shows and movies?
For the most part, the process is fairly simple. It only becomes difficult when you try to hide the fact a green screen is being used, or try to set up a scene to look 100% realistic. Here is how green screens work.
You will learn :
- What Is a Green Screen?
- Why Do Video Makers Use Green Screen?
- How Do Green Screens Work?
- How to Set Up Your Green Screen Scene in 5 Steps?
- 5 Green Screen Ideas for Each Video-Making Scenario
- The Best Green Screen Video Editing Tools for Beginners and Pros
Best Easy to Use Video Editor to Composite Green Screen in 3 Minutes
What Is a Green Screen?
The term “Green Screen” is used to describe a camera and editing trick. A large canvas is placed behind a scene, and it contains a color that is not present elsewhere in the shot. The color is typically a bright shade of blue or green. During the editing session, the green screen color is keyed out of the scene. It then leaves a blank space where another image may be superimposed into the video.
Green screening doesn’t always happen in the editing room. For example, weather channels and services have used green screen in the moment. For many years, when a weather reporter was pointing at a board, the reporter couldn’t see what was on the board, only the people at home could see.
The misuse of colors sometimes led to series bloopers, such as when the weather reporter wore the same color shirt as the green screen. It sometimes resulted in part of the weather map being superimposed onto the weather reporter.
Why Do Video Makers Use Green Screen?
The most common use in the olden days was to cut down on costs. For example, rather than flying to Greece to film a scene in front of the ruins, one can use a green screen and make it appear like the participants are standing in front of the ruins.
These days, there is still a fair amount of green screen used in mainstream comedy and sitcom TV shows. This is partly due to its money-saving capacity, and partly due to people being more accepting of this sort of thing in comedy shows.
This is especially where the premise is not supposed to be taken seriously. In fact, there are many times when the fake green screen images being shown behind what is supposed to be a moving vehicle is part of the joke.
Green screen is more commonly used no mainstream TV, and to a lesser extent in movies, to fill out a scene. For example, the production company may have quickly built a seaside party set for a five-second scene.
Most props will cover the green screen, but the green screen is still present in the background to show things like clouds moving in the sky or boats moving on the ocean. It fills out a scene and makes a studio set look at little more realistic.
How Do Green Screens Work?
Before getting into the more technical stuff, think about this: you have just taken a photo, but there is an unwanted person in it. You go into MS Paint, and you can cut out all the people you want in the photo, and discard the rest.
You can discard the background and all the unwanted people. What is left over is a bunch of people, so you drop their image onto a nice background photo. When you do something like this, you are doing a similar thing that green screens do. In fact, people have been photoshopping in that way since the days of Leon Trotsky.
Green Screening Does Not Have to Include the Color Green
You can green screen by adding a certain color into the scene. Make it a color that is not seen elsewhere in the scene. Typically, this color is added as a canvas behind the screen, but it doesn’t have to work that way.
For example, you could use the color on somebody’s boots, and then edit out and change the boots in the edit. Maybe you could make the boots look like they are burning with the use of visual effects.
What Happens After You Add Your Green to the Scene?
Once you have added your color to the scene, you must record the scene as normal. Then, in the editing phase, you isolate a single color. The color you isolate is the green screen color, (whichever you chose). In the scene, you make that color transparent. This means that there are frames with transparent elements in them. This process is called chromakeying.
Once you have used chromakeying make a certain part of the frame transparent, you can replace that transparency with another image. When building a background, the image is sometimes a piece of video footage or a still image. Other times a visual effect is used such as CGI to make something appear to be in the scene, but is actually not.
How to Set Up Your Green Screen Scene in 5 Steps?
Step 1: Choose the right color
The first thing you need to do is make sure the color you choose is not present anywhere else on the scene. Even the way you light your scene can affect the colors where one color is almost reflected on another surface to create a new color. In short, you will need to do a lot of screen tests to be sure the color you pick does not appear elsewhere in the scene.
Step 2: Buying your materials
There are many pre-made green screens that you can buy. They are mostly made of a single-colored material that is non-reflective. The most common colors of a green screen background are a light green background, a dark green background and a mint green background.
Tools and Equipment to Set Up a Green Screen
All you need is something that is a single color. The color you choose it the color you key out later. For the sake of consistency, let’s say the color is green. Green is typically the color chosen, but it all depends on your scene. For example, if your set has a lot of green foliage in it, then the color may work better.
- A Projector Screen
Some people use projector screens with a green matte canvas on them. For example, a weather channel may use a projector screen and then superimpose the weather information onto the screen.
- A Large Green Canvas Background
TV studios will typically use a large green matte material that takes up an entire wall. This is used to build an entire scene behind a set. For example, the set may contain sun loungers, and the green screen shows a beach scene.
- A Large Painted Walls
Other production companies may use an entire wall that they paint in a green matte color. The trick is to then stand people in front of it so it looks like they are in different locations.
- Good Lighting
In order to avoid shadows, free-standing lights are needed. Using overhead lights alone will cause shadows to appear on the green screen. That is why large and powerful freestanding lights need to be used to fully illuminate the green screen.
Step 3: Lighting properly
Step three is the lighting, and it is burningly important that you get it right. If your green screen is not lit consistently, then different areas will show as having a different shade during the edit. Different shades of green are going to make the editing (chromakeying) process more difficult.
Step 4: Set individual lighting
The things you are green screening will not look real if they do not include their own light sources. An obvious one is if your green screen features a sky with a sun in it. In this case, you need lots of light coming from where the sun appears to be.
You also need to think about individual lighting and how it creates shadows. The objects that make up part of the green screen may be emitting their own lights. In which case, you need to make sure the objects actually emit a light so that they create the right types of light reflection and shadows on real-world objects.
Step 5: Post-editing
Step five is the editing process, and a large part involves thinking about how the green screen would interact with the other elements in the scene. Commonly forgotten elements in an indoor setting are shadows from clouds, the wind, and background noises like cars passing or dogs barking.
5 Green Screen Ideas for Each Video-Making Scenario
All green screen ideas needs to revolve around your plot that the things you wish to achieve. In many cases, green screen technology is going to save you money.
- Are there ways that green screen can save you money?
- Can you add in new locations?
- Can you add in new objects that were not previously there?
Using Green Screen to Improve a Scene
Green screens can be used to fix up a scene or improve it. Ask your how yourself scene could be improved thanks to green screening.
- Could you make your background more dynamic?
- Could you add more visual information to a screen?
- Are there things you would like to cut out of a scene using chromakeying.
Using Green Screen to Add Objects into a Scene
Would you like to add things to your scene? Perhaps you cannot afford a super car, so you create a model, scale it up, and add it over the green object you placed in your scene. Maybe you would like to add further details like computer consoles on your spaceship deck, or the stars flying by past your spaceship’s window.
- What details can you add to a scene?
- Which objects can you add to a scene to make it better?
- Can you create an atmosphere by adding something into a scene?
Using Green Screen Technology and Visual Effects
Maybe you would like to use green screen to add visual effects. Perhaps there are things that need improving. Maybe your TV show or movie features are piece of futuristic technology that has lots of moving parts. You could film a solid green object and then add the CGI animation over the green area by first making the area transparent with chromakeying.
- Would you benefit from adding animation to different objects?
- Should CGI be added into the transparent green screen areas?
- Could computer generated graphics enhance an already dynamic scene?
Be Careful When Picking What Should Be CGI Animated
Just make sure you make correct and smart choices when you decide to add in extra details with green screen. A classic example of a very bad idea was during the 2011 movie “Green Lantern,” when for some reason they added very ugly CGI eyes over the mask.
Green Screen Ideas Need Not Exist Just in Videos
The best green screen ideas are ones that occur as natural solutions to your production problems. Sometimes the problems are as simple as budget constraints, and sometimes it is a more personal problem such as trying to edit out corporate logos or branded items that you do not have the authority to use. Green screen is even used by people who are trying to master Instagram. Take the example of people who are living an “Instagram Road Lifestyle.”
In fact, in real life, there are plenty of people who are faking their Instagram images to great success. Notice the blank colors in the background, and the green seat in the image below. Using chromakeying, it is possible to make the Instagram user look as if she is living a luxurious lifestyle.
The Best Green Screen Video Editing Tools for Beginners and Pros
The truth is that many different tools can be used to edit frames and replace elements within the frame, and the use of a green screen makes the process all the easier. You could easily use the free tools Blender and GIMP to manufacture a green-screened scene. However, using such tools is rather labor intensive, and it is often easier, quicker and more efficient to use specially designed video recording and/or editing tools.
The tools that make green screening easy are often very expensive, but many of them come with a free trial that you can use prior to buying. For example, Wondershare Filmora comes with a free trial for both Microsoft and Apple desktop products. There are also tools like the VSDC Video Editor, iMovie, Virtual Dub and so forth.
Do not be fooled by article that claim they list free Chroma key or green screening tools. Firstly, the genuinely free tools, such as the open source tools like Blender, are very labor intensive. Secondly, such articles are claiming the green-screening tools are free, but they only have free trials, you will be required to pay if you want to use the tools over the long term.
The 3 Best Green Screen Video Editors
In reality, the front-runner in the race for best green screen video editor is the Wondershare Filmora . Adobe has some nice products that may interest some people, but the best is still Wondershare Filmora. Here are a few for green screen video editors for your consideration.
1. Wondershare Filmora
It is a strong piece of video editing software that is perfectly able to handle green screening, and has many only editing features that will appeal to novice and professional film makers.
[+] Very easy to set up and use
[+] Offers great value for money
[+] You can upload directly the Vimeo and YouTube
[+] Is suitable for beginners and professionals
[+] Has plenty of features and tools
[+] You can edit 4K video and there are GIF output options
[ - ] You will need a yearly subscription if you want to use their effects store
[ - ] The program no longer has storyboard editing
[ - ] Cannot export single sections of a timeline without cutting them
[ - ] It could use more shortcuts for navigating the timeline
It’s free to download. Have a try now.
2. iMovie
The iMovie program is the cheap and tacky entry in the video editing world. It is only available on the iOS and Mac, and is mostly suited for people who do not want to spend a lot of money on their video editing software.
[+] You are able to add background music
[+] Add in some text and some smooth looking end credits
[+] You can fix shaky videos with this program
[+] Get up close and edit your clips
[+] Changing the audio over the clips you insert is easy
[ - ] Uploading to other platforms is too difficult
[ - ] Importing formats are limited
[ - ] Does not have all the capabilities of most modern video editors
[ - ] The GUI looks cheap and a little dated
[ - ] It is not customizable enough for a professional editor
3. Lightworks
Despite having a few advanced tools, this is probably the best example of bad design and marketing ideas in the video editing world. The free version is so clunky and awful that nobody would agree to buy the premium version. Furthermore, the GUI is terrible and very unintuitive. It looks like a cheap update of a 1990s editor.
[+] The free version is a nice touch
[+] Has real-time effects as standard
[+] Export straight to Vimeo or YouTube
[+] The VFX panel is segmented in a traditional way
[+] It has a good range of import formats
[+] Has robust support for a range of video formats
[+] Editing can be done quickly and speedily
[ - ] Exports are limited to just 720p
[ - ] Does not have Full HD or 4K support
[ - ] Has very few guided wizards or tutorials
[ - ] Timeline rendering requires the paid version
[ - ] Mac menu options are not supported
[ - ] You cannot display iPhone landscape videos
Buyer Beware When Looking For Video Editors
As mentioned earlier, a common trick is to offer you a free trial and then roll your free trial over to a paid subscription. When an editor claims to be free, you need to check just how free it really is. Another trick is to claim the tools are free, so you work on your project, and then when it is time to export you are asked for payment.
Another common trick is to offer you a free trial and then load your computer up with all types of bloatware. Plus, some video editors offer you free services, but they will add a watermark over your edited video.
In addition, if an editing tool asks you to sign in to your other accounts, such as your YouTube account or Google account, then perhaps uninstall the program. You need to do this because there is no guarantee of security with these programs, which means you cannot be sure of the safety of your passwords when you enter them into video editing tools, (especially free ones).
Conclusion - Getting it Right is the Hard Part
Now that this article has answered the question, “How do green screens work,” You are now free to try it yourself. You are going to read a lot of articles that say green screening is easy. Where it is true that the method is easy, in reality it is very difficult to get green screening right. It is just like how cooking is pretty easy, but cooking a great meal is not.
Are you finding it difficult? Are you using green screen technology in a clever way?
Let us know in the comments, and please share our content on social media so that your friends can discover how green screens work.
Benjamin Arango
Benjamin Arango is a writer and a lover of all things video.
Follow @Benjamin Arango
Also read:
- In 2024, 10 Must-Know iPhone X Tricks to Enhance Usage
- 2024 Approved Bridging Gaps in Dialogue Techniques for Smooth Editing with GarageBand
- [New] Chirp with Charisma Producing Text Memes Now
- 2024 Approved 5 Tips for Enhancing Photo Colors Effortlessly
- [Updated] Best Choices of Cameras for 2D Animations
- Proven Ways to Enhance Your Home NBA Streams
- 2024 Approved Altering Game Console Tones PS5/PS4 Guide
- Now’s VR Tech Landscape
- [New] Capturing Change Time-Lapse on Samsung Smartphones
- [Updated] 5 Quick Hacks to Sharpen Your Indie Filmmaking Skills
- Navigating Cloud Data Costs Comparison & Best Price Paths
- IPhone-Ready Syncing Photos & Videos From PC
- Navigating the World of Laughter How to Create Memes on 9GAG
- Secrets to Acquiring Unblemished Image Libraries
- 2024 Approved Burn Video to DVD on Mac [2 Ways]
- Are Bloggers Getting Cash for Product Insights for 2024
- The Ultimate Guide Top 8 Online Places for Free 3D Text Files
- In 2024, ASUS MG28UQ - A Gateway to Unprecedented 4K Gaming and More
- [New] Best Instant Windows Photograph Gazing Tool
- Four Essential Tips for Acquiring YouTube SRT
- In 2024, Complete Guide to Optimizing Your PicsArt Experience
- [New] Crafting Cinematic Memories with Music
- [Updated] Boost Cinematic Excellence with Final Cut’s Best 10 Plugins
- Abridged Blueprint for Starting Virtual Conversations Zoom Edition for 2024
- Mastering the Art of Collage Creation
- In 2024, A Deep Dive Into Streamlining Your Google Podcast Process
- Invisible Broadcasts Anonymous Instagram Live Tips
- Transformative Talk 20 Words to Bolster Marketing Success
- Top 10 Lost and Found Techniques for iPhone X
- Drone VFX Experience – Try No-Cost LUTS on Mini & Air Drones
- Navigate the Best Free Photography Enhancers Worldwide
- In 2024, Best Android Photo Editor Is PickUp Top?
- The Digital Sound Artist's Guide Discovering No-Cost Audio Effect Solutions
- [Updated] Chart-Topping Storytellers to Follow on YouTube This Year
- What's New in VR?
- M1 Masterpiece Flawless Video Edits, Just a Click Away
- Comprehensive Guide to WhatsApp Vocal Exchange for 2024
- [New] Chill Challenge Highlighting the Speed and Skill of Winter Olympics X-C Skiers
- Crafting Gentle Volume Declines in Premiere Pro Videos for 2024
- Detailed Study of Easy High-Dynamic Range Photography
- Pinnacle Apps Android's Ultimate Cloud Keepsakes
- In 2024, NVIDIA Screen Recorder - Record Games with Ease
- New Transform Your Ideas Into Films A Beginners Handbook
- The Deadly Drafts Cutthroat Selection of Top Zombie Titles
- Three Solutions to Hard Reset Motorola Moto G Stylus (2023)? | Dr.fone
- Unlocking Made Easy The Best 10 Apps for Unlocking Your Itel P40+ Device
- Updated In 2024, The Ultimate Checklist for Picking a Trustworthy YouTube to MP3 Converter
- Innovative Replacements to OBS for Screencasts for 2024
- In 2024, The Most Useful Tips for Pokemon Go Ultra League On Apple iPhone 13 Pro Max | Dr.fone
- In 2024, How to Unlock Apple iPhone 6s Plus with IMEI Code?
- The Magnificent Art of Pokemon Go Streaming On Honor Magic 5 Pro? | Dr.fone
- How to Detect and Stop mSpy from Spying on Your Lava Blaze Curve 5G | Dr.fone
- [Updated] Amplify Your FB Video Content A Complete Music Integration Tutorial
- [New] In 2024, Instagram Video Descriptions - The Key to Threefold Success
- In 2024, Dose Life360 Notify Me When Someone Checks My Location On Apple iPhone 12 Pro Max? | Dr.fone
- [New] In 2024, Guiding Principles for Speech Conversion in Google Translate
- Looking For A Location Changer On Nubia Red Magic 9 Pro? Look No Further | Dr.fone
- Updated Glitch Up Your Videos Top iOS and Android Editing Apps for 2024
- Updated 2024 Approved Animate Like a Pro Top 10 Tools for Beginners and Experts Alike
- [Updated] Mastering Tunes with Mac Studios for 2024
- Upset Timeline Trail on TikTok – Undo Recent Loadout for 2024
- [New] Ultimate Guide Testing MyCam Recording Capabilities
- In 2024, Oppo ADB Format Tool for PC vs. Other Unlocking Tools Which One is the Best?
- How to Factory Reset Oppo A59 5G without Losing Data | Dr.fone
- How To Change Country on App Store for Apple iPhone 11 With 7 Methods | Dr.fone
- Videography Titans Battle for 2024
- [Updated] Top Quality Screen Recording for Windows 10 Pro for 2024
- How To Change Realme V30T Lock Screen Clock in Seconds
- [New] In 2024, Ultimate Ranking of No-Cost, Remote Desktop Collaboration Tools
- Possible solutions to restore deleted messages from Oppo Reno 9A
- [New] In 2024, The Future of Social Media Sharing Twitter Videos on FB
- Guide to Mirror Your Xiaomi Redmi Note 13 Pro 5G to Other Android devices | Dr.fone
- [Updated] How to Make Money on Vimeo Your Ultimate Guide to Vimeo Monetization for 2024
- Updated 2024 Approved From Confusion to Clarity The Only Facebook Video Aspect Ratio Guide You Need
- In 2024, Can I Remove the Apple Watch Activation Lock By iPhone X without the Previous Owner?
- New 2024 Approved Techniques for Excising Drum Sections in Online Music Editing
- In 2024, Virtual Space Clearing Perfecting Your Backdrop in Zoom & Google Meet
- Title: "Color Keying 101 The Easy Guide to Digital Backdrops and Filming"
- Author: Mark
- Created at : 2024-05-24 07:17:23
- Updated at : 2024-05-25 07:17:23
- Link: https://extra-lessons.techidaily.com/color-keying-101-the-easy-guide-to-digital-backdrops-and-filming/
- License: This work is licensed under CC BY-NC-SA 4.0.
