
"Diving Into the Spectrum A Photoshop Guide to Improved Hue Control"
Diving Into the Spectrum: A Photoshop Guide to Improved Hue Control
Create High-Quality Video - Wondershare Filmora
An easy and powerful YouTube video editor
Numerous video and audio effects to choose from
Detailed tutorials provided by the official channel
From 1990, when Photoshop was initially launched, editing photos and videos using the software used to be a walk in the park. It was not until Photoshop decided to incorporate tons of functionalities. Since then, Photoshop users have been finding it a ‘hard row to hoe’ when incorporating these functionalities into use.
Color Correction is one of the functionalities that is giving not only beginners but also intermediate editors sleepless nights. This article clearly illustrates the three simple methods for color correction in Photoshop. Therefore, by going through this piece to completion, you will find out that color correcting footage using Photoshop is not rocket science.
Let’s dive in!
In this article
01 What is Color Correction in Photoshop
02 3 Simple Methods for Color Correction

What is Color Correction in Photoshop
Color correction is a functionality feature in Photoshop that allows you to alter footage to match a consistent standard of appearance.
For instance, certain shots will have unbalanced coloration when taking photos or videos using a camera during the day. Usually, this is due to a change in the sun’s quality because of the sun’s movement. And this is where color correction comes in.
The Color Correction feature will allow you to edit your footage, giving you a balance of color. It will appear as if all the shots were taken at the same time of the day, yet they were of different times.
Besides, color correction does not only involve correcting object colors but also human skin tones. One thing that will be assured of when using color correction is that your creativity will go to the extremes.

3 Simple Methods for Color Correction
With Photoshop, you can carry out a color correction in 3 simple methods. Read this article and find out a method that will suit you.
Method 1. Correcting Tones and Colors with Level in Photoshop
The first method we will look at is using levels to color correction in Photoshop. The level is a feature in Photoshop that stretches the brightness levels of footage in a histogram. Besides brightness, levels also play a significant role in regulating contrast and tonal range.
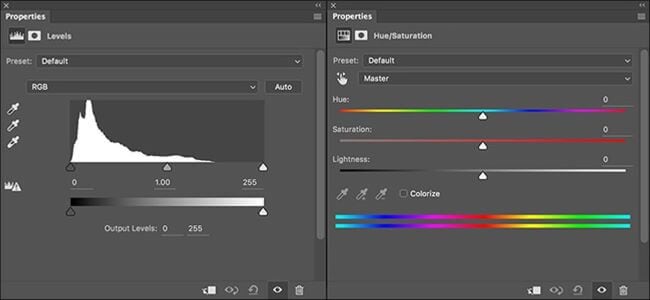
Levels specify the location of complete white, mid-tones, and complete black in a histogram. To adjust color and tone in a histogram, one moves the sliders marked as “Input Level,” and the resulting changes are portrayed on the “Output” bar.
Usually, the output levels are calibrated with marking from 0 to 225, representing black and white, respectively.
Here are the steps on how to color balance using Levels in Photoshop

Step 1. Add your image to the Photoshop timeline
First, open your Adobe Photoshop software. Add your image to the software, then drag and drop it to your timeline.

Step 2. Set the Levels to default
Before heading over to correcting colors and tones, you need to make sure that your Photoshop settings are at default.
Click on the “Image menu,” which is at the top of your interface. A drop-down menu will pop. Click on “Adjustments” > “Levels,” and a dialogue box will pop up.
Alternatively, you can use the command prompt “Command+L” in Mac or “CTRL+L” in Windows, and the dialogue box will appear.
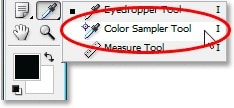
There are three eyedroppers on the bottom right corner of your screen. Double-click on the last one on the left, and color picker will appear. Set your RGB to a default of 245 and click “OK” to save the changes. Go back and click on the eyedropper on the furthest right. Set 10 to be its default from the displayed color picker and save it by clicking “OK.”

Step 3. Add levels adjust layer
Head over to the Layers panel and click on the “Snap Camera” option at the bottom right of your interface. From the drop-down menu, click on “Adjustments.” By doing so, you will have added your adjustment layer.
Step 4. Begin correcting the tone and color of your image
If you have your levels dialogue box, two target markers will be displayed on your image. Now, determine the parts you want to correct the color and tone. Then move one of your target markers to that area. Usually, the top target market adjusts the white levels in the image, whereas the bottom target marker adjusts the image’s black levels.
Use the sliders to regulate the color and tone levels.

Step 5. Save your image
After being contented with your color and tone corrections, you can save your image and even print it.

Method 2: Use Photoshop Automatic Color Correction
Another effective way of correcting color and tone in images is Photoshop auto color correction. With automatic color correction Photoshop, you don’t have to know anything about the commands and histograms – Which saves you much time.
Photoshop has three auto commands, i.e., Auto color, Auto-tone, and Auto contrast. With all these three functionalities, you will get a sparkling image. Usually, Photoshop mixes the three primary colors, i.e., red, green, and blue, using color channels. The color channels for every primary color are positioned in the “Channels” menu.
Here are the simple steps on how automatic color correction Photoshop works.

Step 1. Add your photo to Photoshop Timeline
First, open Photoshop editor and add your image to the software. To start working on it, drag and drop it to the timeline.
 /a>
/a>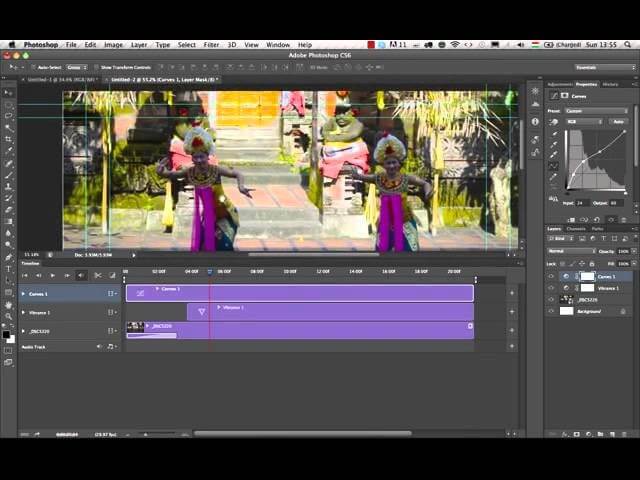
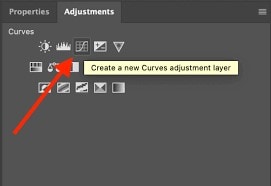
Step 2. Create a simple adjustment curve
Click on the “adjustment layer” icon at the bottom right of your interface. From the displayed menu, select “Curves.”
Step 3. Set your default settings
A histogram will be displayed near your image. Click on the “auto” option at the right corner of the histogram.
A list of customizable functionalities will be displayed. Click on your preferred settings and hit the “save as default” option.
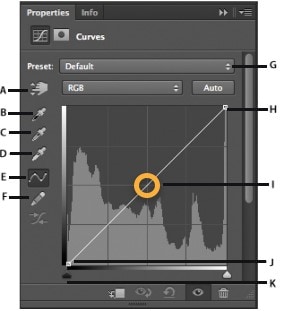
Step 4. Adjust your settings
Regulate the tone, color, and contrast levels by using the pointer. Move the pointer forward or backward to increase and reduce the adjustment levels.


Step 5. Apply your corrections
Lastly, hit the green “Save” button to apply the changes.

Method 3: Using Gradient Tool to Correct Color in Photoshop
The last method of color correcting in Photoshop is using the gradient tool. The gradient tool allows you to create a gradual transition between two or more colors. In Photoshop, the gradient tool is usually represented by the “G” or a rectangular icon.
With the gradient tool, you can edit gradients by choosing different colors, adding more colors, removing colors, and rearranging colors. Furthermore, you can also add transparency and adjust how the colors transition.
Since a gradient needs transitioning from one hue to another, it will always require two or more colors. With a clear understanding of the gradient tools, you can perfectly control the gradient looks and parts of the photo and the specific points affected.
Here are the simple steps to correct color in Photoshop using gradient tools.
Step 1. Select a shape in Photoshop
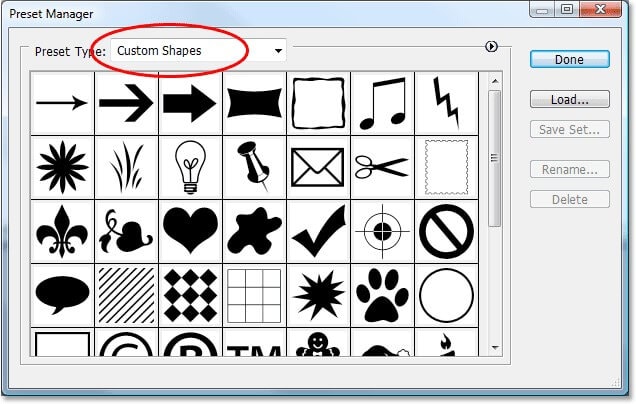
First, open Photoshop software. Select “Shape tool” from the left-hand side margin of your interface > “Custom Shapes.” Make a shape based on your preference, i.e., a square. Click and hold the shape tool to create other shapes.
Step 2. Fill your Gradient Shape
Hover over to the top of your screen and click on the “Fill” option. From the drop-down menu, select a gradient option.
 Glarysoft File Recovery Pro - Helps to recover your lost file/data, even permanently deleted data.

Step 3. Open the Gradient Tool Settings
Here, click on the “Layers” option on the right-hand side of the screen—double-click on the layer thumbnail for your shape. A gradient settings box will open and display a wide range of functionalities.
 The BootIt Collection covers multi-booting, partitioning, and disk imaging on traditional PC’s using the standard BIOS and newer PC’s using UEFI. The collection includes BootIt Bare Metal (BIBM) for standard BIOS systems and BootIt UEFI (BIU) for UEFI system.
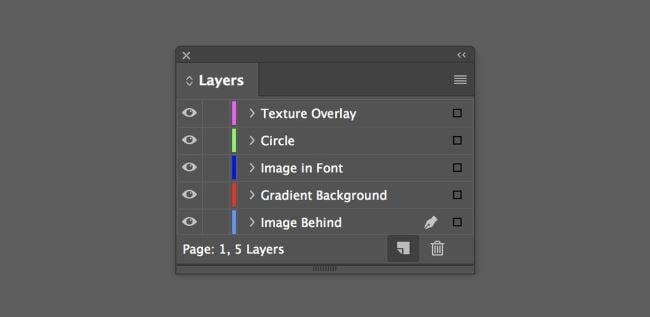
Step 4. Select a Gradient Color to Use
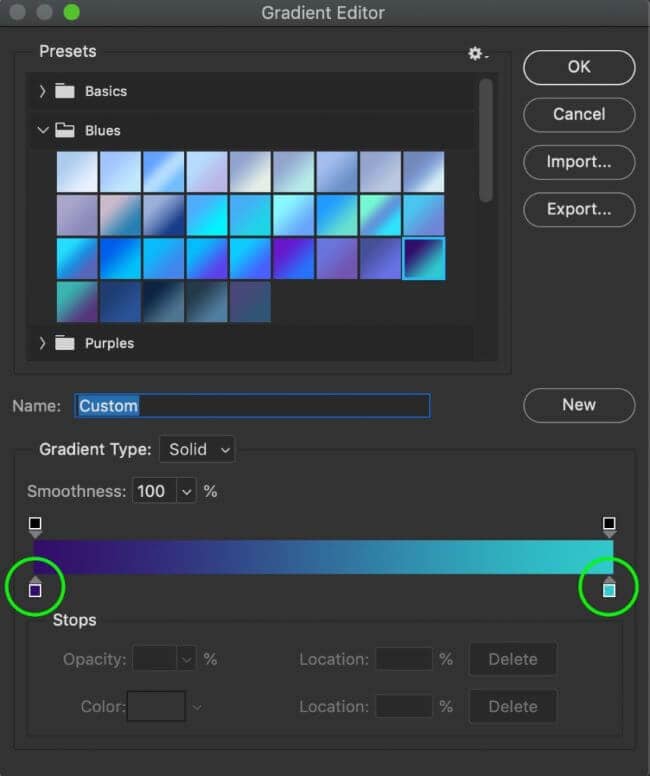
Change your gradient color by double-clicking on “Gradient” and select a gradient color to use. Click on the bottom handle and double-click on it to get additional colors. A new window will open to select a color based on your preference.
You can use your downloaded gradient colors by clicking on the “Import” button. Once you are sure of your color choice, hit the “OK” button to incorporate them.
Step 5. Select a style for your gradient
In the gradient fill, click on the style option. A menu list (radial, angle, reflected, and diamond) will be displayed. Double click on the circles on both sides of the gradient pick a color that will work for you to graduate.
Apply the gradient by clicking within the shapes. Click “OK” to save your changes.
 EmEditor Professional (Lifetime License, non-store app)


Conclusion
● Color correction in Photoshop is as easy as that. Select a method that you think will work best for you from the above three. If you want to use a simple and easy-to-use method, you should go for Photoshop automatic color correction. It would be best to keep in mind that though the auto color correction is fast and easy, you cannot make more adjustable color tunings.
From 1990, when Photoshop was initially launched, editing photos and videos using the software used to be a walk in the park. It was not until Photoshop decided to incorporate tons of functionalities. Since then, Photoshop users have been finding it a ‘hard row to hoe’ when incorporating these functionalities into use.
Color Correction is one of the functionalities that is giving not only beginners but also intermediate editors sleepless nights. This article clearly illustrates the three simple methods for color correction in Photoshop. Therefore, by going through this piece to completion, you will find out that color correcting footage using Photoshop is not rocket science.
Let’s dive in!
In this article
01 What is Color Correction in Photoshop
02 3 Simple Methods for Color Correction
What is Color Correction in Photoshop
Color correction is a functionality feature in Photoshop that allows you to alter footage to match a consistent standard of appearance.
For instance, certain shots will have unbalanced coloration when taking photos or videos using a camera during the day. Usually, this is due to a change in the sun’s quality because of the sun’s movement. And this is where color correction comes in.
The Color Correction feature will allow you to edit your footage, giving you a balance of color. It will appear as if all the shots were taken at the same time of the day, yet they were of different times.
Besides, color correction does not only involve correcting object colors but also human skin tones. One thing that will be assured of when using color correction is that your creativity will go to the extremes.
3 Simple Methods for Color Correction
With Photoshop, you can carry out a color correction in 3 simple methods. Read this article and find out a method that will suit you.
Method 1. Correcting Tones and Colors with Level in Photoshop
The first method we will look at is using levels to color correction in Photoshop. The level is a feature in Photoshop that stretches the brightness levels of footage in a histogram. Besides brightness, levels also play a significant role in regulating contrast and tonal range.
Levels specify the location of complete white, mid-tones, and complete black in a histogram. To adjust color and tone in a histogram, one moves the sliders marked as “Input Level,” and the resulting changes are portrayed on the “Output” bar.
Usually, the output levels are calibrated with marking from 0 to 225, representing black and white, respectively.
Here are the steps on how to color balance using Levels in Photoshop
Step 1. Add your image to the Photoshop timeline
First, open your Adobe Photoshop software. Add your image to the software, then drag and drop it to your timeline.
 SwifDoo PDF Perpetual (1 PC) Free upgrade. No monthly fees ever.
Step 2. Set the Levels to default
Before heading over to correcting colors and tones, you need to make sure that your Photoshop settings are at default.
Click on the “Image menu,” which is at the top of your interface. A drop-down menu will pop. Click on “Adjustments” > “Levels,” and a dialogue box will pop up.
Alternatively, you can use the command prompt “Command+L” in Mac or “CTRL+L” in Windows, and the dialogue box will appear.
There are three eyedroppers on the bottom right corner of your screen. Double-click on the last one on the left, and color picker will appear. Set your RGB to a default of 245 and click “OK” to save the changes. Go back and click on the eyedropper on the furthest right. Set 10 to be its default from the displayed color picker and save it by clicking “OK.”
Step 3. Add levels adjust layer
Head over to the Layers panel and click on the “Snap Camera” option at the bottom right of your interface. From the drop-down menu, click on “Adjustments.” By doing so, you will have added your adjustment layer.
Step 4. Begin correcting the tone and color of your image
If you have your levels dialogue box, two target markers will be displayed on your image. Now, determine the parts you want to correct the color and tone. Then move one of your target markers to that area. Usually, the top target market adjusts the white levels in the image, whereas the bottom target marker adjusts the image’s black levels.
Use the sliders to regulate the color and tone levels.
 Forex Robotron Gold Package
Step 5. Save your image
After being contented with your color and tone corrections, you can save your image and even print it.
Method 2: Use Photoshop Automatic Color Correction
Another effective way of correcting color and tone in images is Photoshop auto color correction. With automatic color correction Photoshop, you don’t have to know anything about the commands and histograms – Which saves you much time.
Photoshop has three auto commands, i.e., Auto color, Auto-tone, and Auto contrast. With all these three functionalities, you will get a sparkling image. Usually, Photoshop mixes the three primary colors, i.e., red, green, and blue, using color channels. The color channels for every primary color are positioned in the “Channels” menu.
Here are the simple steps on how automatic color correction Photoshop works.
 Allavsoft Batch Download Online Videos, Music Offline to MP4, MP3, MOV, etc format
Step 1. Add your photo to Photoshop Timeline
First, open Photoshop editor and add your image to the software. To start working on it, drag and drop it to the timeline.
Step 2. Create a simple adjustment curve
Click on the “adjustment layer” icon at the bottom right of your interface. From the displayed menu, select “Curves.”

Step 3. Set your default settings
A histogram will be displayed near your image. Click on the “auto” option at the right corner of the histogram.
A list of customizable functionalities will be displayed. Click on your preferred settings and hit the “save as default” option.

Step 4. Adjust your settings
Regulate the tone, color, and contrast levels by using the pointer. Move the pointer forward or backward to increase and reduce the adjustment levels.
Lastly, hit the green “Save” button to apply the changes.
Method 3: Using Gradient Tool to Correct Color in Photoshop
The last method of color correcting in Photoshop is using the gradient tool. The gradient tool allows you to create a gradual transition between two or more colors. In Photoshop, the gradient tool is usually represented by the “G” or a rectangular icon.
With the gradient tool, you can edit gradients by choosing different colors, adding more colors, removing colors, and rearranging colors. Furthermore, you can also add transparency and adjust how the colors transition.
Since a gradient needs transitioning from one hue to another, it will always require two or more colors. With a clear understanding of the gradient tools, you can perfectly control the gradient looks and parts of the photo and the specific points affected.
Here are the simple steps to correct color in Photoshop using gradient tools.

Key features:
• Import from any devices and cams, including GoPro and drones. All formats supported. Сurrently the only free video editor that allows users to export in a new H265/HEVC codec, something essential for those working with 4K and HD.
• Everything for hassle-free basic editing: cut, crop and merge files, add titles and favorite music
• Visual effects, advanced color correction and trendy Instagram-like filters
• All multimedia processing done from one app: video editing capabilities reinforced by a video converter, a screen capture, a video capture, a disc burner and a YouTube uploader
• Non-linear editing: edit several files with simultaneously
• Easy export to social networks: special profiles for YouTube, Facebook, Vimeo, Twitter and Instagram
• High quality export – no conversion quality loss, double export speed even of HD files due to hardware acceleration
• Stabilization tool will turn shaky or jittery footage into a more stable video automatically.
• Essential toolset for professional video editing: blending modes, Mask tool, advanced multiple-color Chroma Key
Step 1. Select a shape in Photoshop
First, open Photoshop software. Select “Shape tool” from the left-hand side margin of your interface > “Custom Shapes.” Make a shape based on your preference, i.e., a square. Click and hold the shape tool to create other shapes.
Step 2. Fill your Gradient Shape
Hover over to the top of your screen and click on the “Fill” option. From the drop-down menu, select a gradient option.
Step 3. Open the Gradient Tool Settings
Here, click on the “Layers” option on the right-hand side of the screen—double-click on the layer thumbnail for your shape. A gradient settings box will open and display a wide range of functionalities.
Step 4. Select a Gradient Color to Use
Change your gradient color by double-clicking on “Gradient” and select a gradient color to use. Click on the bottom handle and double-click on it to get additional colors. A new window will open to select a color based on your preference.
You can use your downloaded gradient colors by clicking on the “Import” button. Once you are sure of your color choice, hit the “OK” button to incorporate them.
Step 5. Select a style for your gradient
In the gradient fill, click on the style option. A menu list (radial, angle, reflected, and diamond) will be displayed. Double click on the circles on both sides of the gradient pick a color that will work for you to graduate.
Apply the gradient by clicking within the shapes. Click “OK” to save your changes.
Conclusion
● Color correction in Photoshop is as easy as that. Select a method that you think will work best for you from the above three. If you want to use a simple and easy-to-use method, you should go for Photoshop automatic color correction. It would be best to keep in mind that though the auto color correction is fast and easy, you cannot make more adjustable color tunings.
From 1990, when Photoshop was initially launched, editing photos and videos using the software used to be a walk in the park. It was not until Photoshop decided to incorporate tons of functionalities. Since then, Photoshop users have been finding it a ‘hard row to hoe’ when incorporating these functionalities into use.
Color Correction is one of the functionalities that is giving not only beginners but also intermediate editors sleepless nights. This article clearly illustrates the three simple methods for color correction in Photoshop. Therefore, by going through this piece to completion, you will find out that color correcting footage using Photoshop is not rocket science.
Let’s dive in!
In this article
01 What is Color Correction in Photoshop
02 3 Simple Methods for Color Correction
What is Color Correction in Photoshop
Color correction is a functionality feature in Photoshop that allows you to alter footage to match a consistent standard of appearance.
For instance, certain shots will have unbalanced coloration when taking photos or videos using a camera during the day. Usually, this is due to a change in the sun’s quality because of the sun’s movement. And this is where color correction comes in.
The Color Correction feature will allow you to edit your footage, giving you a balance of color. It will appear as if all the shots were taken at the same time of the day, yet they were of different times.
Besides, color correction does not only involve correcting object colors but also human skin tones. One thing that will be assured of when using color correction is that your creativity will go to the extremes.
3 Simple Methods for Color Correction
With Photoshop, you can carry out a color correction in 3 simple methods. Read this article and find out a method that will suit you.
Method 1. Correcting Tones and Colors with Level in Photoshop
The first method we will look at is using levels to color correction in Photoshop. The level is a feature in Photoshop that stretches the brightness levels of footage in a histogram. Besides brightness, levels also play a significant role in regulating contrast and tonal range.
Levels specify the location of complete white, mid-tones, and complete black in a histogram. To adjust color and tone in a histogram, one moves the sliders marked as “Input Level,” and the resulting changes are portrayed on the “Output” bar.
Usually, the output levels are calibrated with marking from 0 to 225, representing black and white, respectively.
Here are the steps on how to color balance using Levels in Photoshop
Step 1. Add your image to the Photoshop timeline
First, open your Adobe Photoshop software. Add your image to the software, then drag and drop it to your timeline.

Step 2. Set the Levels to default
Before heading over to correcting colors and tones, you need to make sure that your Photoshop settings are at default.
Click on the “Image menu,” which is at the top of your interface. A drop-down menu will pop. Click on “Adjustments” > “Levels,” and a dialogue box will pop up.
Alternatively, you can use the command prompt “Command+L” in Mac or “CTRL+L” in Windows, and the dialogue box will appear.
There are three eyedroppers on the bottom right corner of your screen. Double-click on the last one on the left, and color picker will appear. Set your RGB to a default of 245 and click “OK” to save the changes. Go back and click on the eyedropper on the furthest right. Set 10 to be its default from the displayed color picker and save it by clicking “OK.”
 Power Tools add-on for Google Sheets, 12-month subscription
Step 3. Add levels adjust layer
Head over to the Layers panel and click on the “Snap Camera” option at the bottom right of your interface. From the drop-down menu, click on “Adjustments.” By doing so, you will have added your adjustment layer.
Step 4. Begin correcting the tone and color of your image
If you have your levels dialogue box, two target markers will be displayed on your image. Now, determine the parts you want to correct the color and tone. Then move one of your target markers to that area. Usually, the top target market adjusts the white levels in the image, whereas the bottom target marker adjusts the image’s black levels.
Use the sliders to regulate the color and tone levels.
Step 5. Save your image
After being contented with your color and tone corrections, you can save your image and even print it.
Method 2: Use Photoshop Automatic Color Correction
Another effective way of correcting color and tone in images is Photoshop auto color correction. With automatic color correction Photoshop, you don’t have to know anything about the commands and histograms – Which saves you much time.
Photoshop has three auto commands, i.e., Auto color, Auto-tone, and Auto contrast. With all these three functionalities, you will get a sparkling image. Usually, Photoshop mixes the three primary colors, i.e., red, green, and blue, using color channels. The color channels for every primary color are positioned in the “Channels” menu.
Here are the simple steps on how automatic color correction Photoshop works.
Step 1. Add your photo to Photoshop Timeline
First, open Photoshop editor and add your image to the software. To start working on it, drag and drop it to the timeline.
 PDF application, powered by AI-based OCR, for unified workflows with both digital and scanned documents.
 Step 2. Create a simple adjustment curve
Click on the “adjustment layer” icon at the bottom right of your interface. From the displayed menu, select “Curves.”
Step 3. Set your default settings
A histogram will be displayed near your image. Click on the “auto” option at the right corner of the histogram.
A list of customizable functionalities will be displayed. Click on your preferred settings and hit the “save as default” option.
Step 4. Adjust your settings
Regulate the tone, color, and contrast levels by using the pointer. Move the pointer forward or backward to increase and reduce the adjustment levels.
Step 5. Apply your corrections
Lastly, hit the green “Save” button to apply the changes.

Method 3: Using Gradient Tool to Correct Color in Photoshop
The last method of color correcting in Photoshop is using the gradient tool. The gradient tool allows you to create a gradual transition between two or more colors. In Photoshop, the gradient tool is usually represented by the “G” or a rectangular icon.
With the gradient tool, you can edit gradients by choosing different colors, adding more colors, removing colors, and rearranging colors. Furthermore, you can also add transparency and adjust how the colors transition.
Since a gradient needs transitioning from one hue to another, it will always require two or more colors. With a clear understanding of the gradient tools, you can perfectly control the gradient looks and parts of the photo and the specific points affected.
Here are the simple steps to correct color in Photoshop using gradient tools.
Step 1. Select a shape in Photoshop
First, open Photoshop software. Select “Shape tool” from the left-hand side margin of your interface > “Custom Shapes.” Make a shape based on your preference, i.e., a square. Click and hold the shape tool to create other shapes.
Step 2. Fill your Gradient Shape
Hover over to the top of your screen and click on the “Fill” option. From the drop-down menu, select a gradient option.
 Simple and intuitive video editing
Step 3. Open the Gradient Tool Settings
Here, click on the “Layers” option on the right-hand side of the screen—double-click on the layer thumbnail for your shape. A gradient settings box will open and display a wide range of functionalities.
Step 4. Select a Gradient Color to Use
Change your gradient color by double-clicking on “Gradient” and select a gradient color to use. Click on the bottom handle and double-click on it to get additional colors. A new window will open to select a color based on your preference.
You can use your downloaded gradient colors by clicking on the “Import” button. Once you are sure of your color choice, hit the “OK” button to incorporate them.
Step 5. Select a style for your gradient
In the gradient fill, click on the style option. A menu list (radial, angle, reflected, and diamond) will be displayed. Double click on the circles on both sides of the gradient pick a color that will work for you to graduate.
Apply the gradient by clicking within the shapes. Click “OK” to save your changes.
Conclusion
● Color correction in Photoshop is as easy as that. Select a method that you think will work best for you from the above three. If you want to use a simple and easy-to-use method, you should go for Photoshop automatic color correction. It would be best to keep in mind that though the auto color correction is fast and easy, you cannot make more adjustable color tunings.
From 1990, when Photoshop was initially launched, editing photos and videos using the software used to be a walk in the park. It was not until Photoshop decided to incorporate tons of functionalities. Since then, Photoshop users have been finding it a ‘hard row to hoe’ when incorporating these functionalities into use.
Color Correction is one of the functionalities that is giving not only beginners but also intermediate editors sleepless nights. This article clearly illustrates the three simple methods for color correction in Photoshop. Therefore, by going through this piece to completion, you will find out that color correcting footage using Photoshop is not rocket science.
Let’s dive in!
In this article
01 What is Color Correction in Photoshop
02 3 Simple Methods for Color Correction
What is Color Correction in Photoshop
Color correction is a functionality feature in Photoshop that allows you to alter footage to match a consistent standard of appearance.
For instance, certain shots will have unbalanced coloration when taking photos or videos using a camera during the day. Usually, this is due to a change in the sun’s quality because of the sun’s movement. And this is where color correction comes in.
The Color Correction feature will allow you to edit your footage, giving you a balance of color. It will appear as if all the shots were taken at the same time of the day, yet they were of different times.
Besides, color correction does not only involve correcting object colors but also human skin tones. One thing that will be assured of when using color correction is that your creativity will go to the extremes.
3 Simple Methods for Color Correction
With Photoshop, you can carry out a color correction in 3 simple methods. Read this article and find out a method that will suit you.
Method 1. Correcting Tones and Colors with Level in Photoshop
The first method we will look at is using levels to color correction in Photoshop. The level is a feature in Photoshop that stretches the brightness levels of footage in a histogram. Besides brightness, levels also play a significant role in regulating contrast and tonal range.
Levels specify the location of complete white, mid-tones, and complete black in a histogram. To adjust color and tone in a histogram, one moves the sliders marked as “Input Level,” and the resulting changes are portrayed on the “Output” bar.
Usually, the output levels are calibrated with marking from 0 to 225, representing black and white, respectively.
Here are the steps on how to color balance using Levels in Photoshop
Step 1. Add your image to the Photoshop timeline
First, open your Adobe Photoshop software. Add your image to the software, then drag and drop it to your timeline.
Step 2. Set the Levels to default
Before heading over to correcting colors and tones, you need to make sure that your Photoshop settings are at default.
Click on the “Image menu,” which is at the top of your interface. A drop-down menu will pop. Click on “Adjustments” > “Levels,” and a dialogue box will pop up.
Alternatively, you can use the command prompt “Command+L” in Mac or “CTRL+L” in Windows, and the dialogue box will appear.
There are three eyedroppers on the bottom right corner of your screen. Double-click on the last one on the left, and color picker will appear. Set your RGB to a default of 245 and click “OK” to save the changes. Go back and click on the eyedropper on the furthest right. Set 10 to be its default from the displayed color picker and save it by clicking “OK.”

Step 3. Add levels adjust layer
Head over to the Layers panel and click on the “Snap Camera” option at the bottom right of your interface. From the drop-down menu, click on “Adjustments.” By doing so, you will have added your adjustment layer.
 DLNow Video Downloader
Step 4. Begin correcting the tone and color of your image
If you have your levels dialogue box, two target markers will be displayed on your image. Now, determine the parts you want to correct the color and tone. Then move one of your target markers to that area. Usually, the top target market adjusts the white levels in the image, whereas the bottom target marker adjusts the image’s black levels.
Use the sliders to regulate the color and tone levels.

Step 5. Save your image
After being contented with your color and tone corrections, you can save your image and even print it.
Method 2: Use Photoshop Automatic Color Correction
Another effective way of correcting color and tone in images is Photoshop auto color correction. With automatic color correction Photoshop, you don’t have to know anything about the commands and histograms – Which saves you much time.
Photoshop has three auto commands, i.e., Auto color, Auto-tone, and Auto contrast. With all these three functionalities, you will get a sparkling image. Usually, Photoshop mixes the three primary colors, i.e., red, green, and blue, using color channels. The color channels for every primary color are positioned in the “Channels” menu.
Here are the simple steps on how automatic color correction Photoshop works.

Step 1. Add your photo to Photoshop Timeline
First, open Photoshop editor and add your image to the software. To start working on it, drag and drop it to the timeline.
Step 2. Create a simple adjustment curve
Click on the “adjustment layer” icon at the bottom right of your interface. From the displayed menu, select “Curves.”
Step 3. Set your default settings
A histogram will be displayed near your image. Click on the “auto” option at the right corner of the histogram.
A list of customizable functionalities will be displayed. Click on your preferred settings and hit the “save as default” option.
Step 4. Adjust your settings
Regulate the tone, color, and contrast levels by using the pointer. Move the pointer forward or backward to increase and reduce the adjustment levels.
Step 5. Apply your corrections
Lastly, hit the green “Save” button to apply the changes.
Method 3: Using Gradient Tool to Correct Color in Photoshop
The last method of color correcting in Photoshop is using the gradient tool. The gradient tool allows you to create a gradual transition between two or more colors. In Photoshop, the gradient tool is usually represented by the “G” or a rectangular icon.
With the gradient tool, you can edit gradients by choosing different colors, adding more colors, removing colors, and rearranging colors. Furthermore, you can also add transparency and adjust how the colors transition.
Since a gradient needs transitioning from one hue to another, it will always require two or more colors. With a clear understanding of the gradient tools, you can perfectly control the gradient looks and parts of the photo and the specific points affected.
Here are the simple steps to correct color in Photoshop using gradient tools.
Step 1. Select a shape in Photoshop
First, open Photoshop software. Select “Shape tool” from the left-hand side margin of your interface > “Custom Shapes.” Make a shape based on your preference, i.e., a square. Click and hold the shape tool to create other shapes.
 Forex Robotron Basic Package
 Project Manager - Asset Browser for 3Ds Max
Step 2. Fill your Gradient Shape
Hover over to the top of your screen and click on the “Fill” option. From the drop-down menu, select a gradient option.
Step 3. Open the Gradient Tool Settings
Here, click on the “Layers” option on the right-hand side of the screen—double-click on the layer thumbnail for your shape. A gradient settings box will open and display a wide range of functionalities.

Step 4. Select a Gradient Color to Use
Change your gradient color by double-clicking on “Gradient” and select a gradient color to use. Click on the bottom handle and double-click on it to get additional colors. A new window will open to select a color based on your preference.
You can use your downloaded gradient colors by clicking on the “Import” button. Once you are sure of your color choice, hit the “OK” button to incorporate them.
Step 5. Select a style for your gradient
In the gradient fill, click on the style option. A menu list (radial, angle, reflected, and diamond) will be displayed. Double click on the circles on both sides of the gradient pick a color that will work for you to graduate.
Apply the gradient by clicking within the shapes. Click “OK” to save your changes.
 vMix 4K - Software based live production. vMix 4K includes everything in vMix HD plus 4K support, PTZ control, External/Fullscreen output, 4 Virtual Outputs, 1 Replay, 4 vMix Call, and 2 Recorders.
Conclusion
● Color correction in Photoshop is as easy as that. Select a method that you think will work best for you from the above three. If you want to use a simple and easy-to-use method, you should go for Photoshop automatic color correction. It would be best to keep in mind that though the auto color correction is fast and easy, you cannot make more adjustable color tunings.
- Title: Diving Into the Spectrum A Photoshop Guide to Improved Hue Control
- Author: Mark
- Created at : 2024-07-26 18:32:53
- Updated at : 2024-07-27 18:32:53
- Link: https://extra-lessons.techidaily.com/diving-into-the-spectrum-a-photoshop-guide-to-improved-hue-control/
- License: This work is licensed under CC BY-NC-SA 4.0.