
"Enhance the Listener Experience Advanced Techniques for Audio Editing"
Enhance the Listener Experience: Advanced Techniques for Audio Editing
“Hello, I’m looking to edit a podcast for my show with GarageBand on my Mac computer, but the problem is I have no idea how the tool works. So please, if you know how to edit podcasts in GarageBand, kindly share the steps.”
Editing a podcast in GarageBand is not as difficult as many people think. Although the tool might require a learning curve, the right guide should help you navigate the app seamlessly.
So, suppose you want to edit podcasts on your Mac computer using GarageBand, but you don’t know how to go about it. This article will teach you how to edit podcasts in GarageBand within a few clicks. Then, all you have to do is to keep reading.
Part 1: Guide on how to edit podcasts in GarageBand on macOS, iOS or iPadOS
GarageBand is a free open-source digital audio workstation for Apple devices. It offers great audio editing functionalities. Also, it boasts a professional interface packed with instrument lessons, music effects, plugins, etc.
You can get free access to essential features to create high-quality podcasts when you have GarageBand at your fingertips. Also, transferring the edited podcast between your iPhone and Mac won’t be a problem as it facilitates easy file syncing across Apple devices.
Supported System: macOS, iOS, iPadOS
Key Features
- Easily export files for your project through emails or add them to iTunes.
- It supports over 250 loops for users to explore.
- Great guitar amps and effects.
- Sync podcasts between your Mac and iOS devices without any complications.
- It supports third-party plugins.
- Record and edit vocals using advanced tools.
How to edit Podcast with GarageBand?
The step varies depending on whether you’re working on your Mac computer on an iPhone. However, we’ve outlined simple step-by-step instructions that can help you operate smoothly regardless of what device you’re currently using.
Steps for editing a podcast on Apple mobile device with GarageBand
For iphone and iPad users, the steps are much easier than operating on a desktop. You can refer to the short video below to get started quickly.
Steps to edit a podcast on Mac with GarageBand
Step1 Innstall GarageBand on mac
GarageBand can be installed on macOS 12.3 or later. Please ensure your current mac version or keep updates before installing the latest version of the GarageBand software on your Mac.
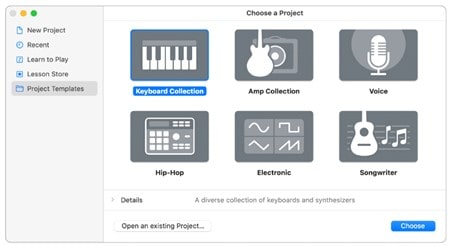
Step2 Launch GarageBand after installing
Click Project Templates, choose the Voice option and click the Choose button from the bottom right corner.
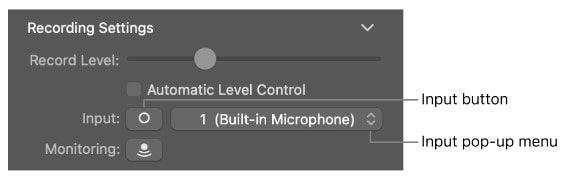
Step3 Input podcast audio
You’ll be prompted to select your podcast audio input. Select the source from the Input pop-up menu under the Recording Settings area, then click the Input button to switch between stereo input channels and mono input channels.
Step4 Setup Work Space
The workspace to edit your podcast will be displayed on your Mac screen. You just have to navigate to the top section displaying time and beat, then change the settings so that it’ll show only the time.

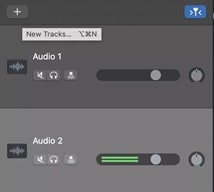
Step5 Create Different Audio Track for Podcast
Navigate to the section displaying the Audio 1 track. Then, use the Plus icon at the top left corner to add the tracks for different parts of your podcast. For example, Audio 1- Intro, Audio 2 - Intro voice, Audio 3 - Transition Music, Audio 4, Guest interview, etc.
Step6 Import the Recorded Podcast Files
Now, open the location where you saved the different parts of the podcast file and drag-n-drop it to the timeline right in front of the relevant audio track. See the screenshot below;

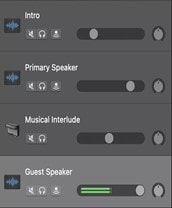
Step7 Adjust Audio Level
Next, adjust the audio level for each track containing different parts of your podcast according to your requirements. It helps you maintain an excellent audio balance if the audio in one track is louder than the others. For example, if your interviewed guest sounded not so loud, you can increase the audio level of the audio track containing that part of the podcast by using the relevant button.
Step8 Use Solo Tool
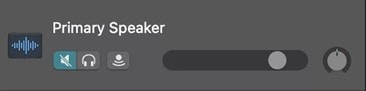
You can also solo specific tracks in your podcast by clicking the Solo feature. It allows you to detect unwanted noise in the podcast easily. All you have to do to use the Solo feature is to click the Headphones button next to each track to listen to a specific audio track.
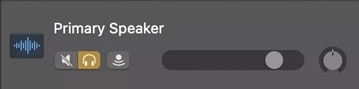
You can also use the mute button to silence the audio tracks you don’t want to be heard in your podcast.
Step9 Setup File Structure
Name the folders, subfolders, and session files for each part of your podcast. Doing this will help you quickly locate all related documents anytime needed. Also, it’s advisable to stay consistent with a particular file structure.
Step10 Export Edited Podcast
Once you complete the editing operation, navigate to the menu bar and choose File > Save As. In the Save As dialogue, enter a new name for the project, then click Save.
The above steps should help you edit podcasts on GarageBand efficiently.
Part 2. GarageBand errors? Why fail to edit, and how to fix
Unfortunately, we encountered some critical errors while using the GarageBand software to edit podcasts. These errors were due to technique or file format problems. The following are the errors you might encounter while using GarageBand to edit podcasts and their perfect fix.
Error 1: Error while synchronizing audio and MIDI
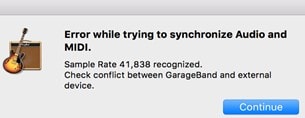
Sometimes, GarageBand fails to synchronize audio and MDI. It happens because the app detected an unusual sample rate that it’s unable to process.
Here are the fixes we recommend for this error
- Change USB Connection
- Close Background Apps
- Check Sample Rate
- Change the current mic you’re using
- Create New Profile on the GarageBand app.
Error 2: “greyed out” MP3/audio files in GarageBand
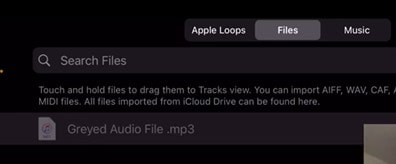
GarageBand does not allow the upload of MP3 files with unsupported codecs. So, suppose the podcast file you try to upload is greyed out. Then, chances are GarageBand does not support its codec.
Here are the fixes we recommend for this error
To fix this error, you have to change the file from .mp3 to .wav. If you’re using your iPhone, you can use a file converter app to operate. But if you’re on a macOS, you need to locate the podcast MP3 file, right-click on it, then rename it to be in .wav format.
This YouTube video should walk you through the process better.
Error 3: The save file operation failed
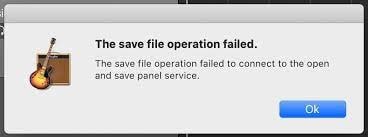
Another error is the inability to save the file. But this is usually due to problems like running an outdated macOS or iOS, insufficient storage space, Mac or iPhone errors, etc. The best way to fix this error is to do the following;
Here are the fixes we recommend for this error
- Update your macOS or iOS to the latest version
- Free up storage space
- Check background running apps and close them.
- Restart your device.
Error 4: The operation could not be completed
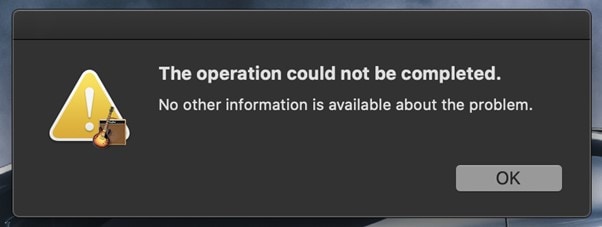
This error kept occurring when we tried to open a project in GarageBand, though it did not appear when we tried to create a new project. It might be due to an outdated version of the app, or there are bugs in your device that compromise the operation.
Here is how you can fix this error
- Check for the GarageBand’s new update and update it if there’s a new version.
- Restart your device.
- Force the app to close.
- Update your device to its latest version.
- Delete the app and download it again.
Part 3. What’s good and not good about GarageBand
However, the GarageBand program also has its positives and negatives. Read on to find out what is good and not good about GarageBand.
What’s Good
GarageBand is a beginner-friendly tool that offers fantastic features that we found helpful. From its clean drag-n-drop interface to the amps and guitar, effects, and more.
The following are things that make GarageBand a good program for editing podcasts;
- It’s 100% free.
- It supports many practical features for anyone to execute an audio-related task, be it podcast recording, music recording, or more.
- Great for podcasters looking to edit podcasts with high quality.
- The app is lightweight, only 795.1 MB.
- Audio files can be automatically synced across users’ Apple devices.
What’s Not Good
Besides the errors that we mentioned earlier, GarageBand also has some flaws that affect the use
- It’s supported only on apple devices. You can’t use it on Windows PC.
- Users might require a learning curve to use some of its features.
- It does not support audio mixing.
- Unavailability of mixing console.
Part 4: The Best GarageBand Alternative for Both Mac and Windows
Considering the flaws of GarageBand, there’s a high chance that many folks might want to look out for tools that can be used as an alternative. Here is where the Wondershare Filmora software comes in as the game changer.
Free Download For Win 7 or later(64-bit)
Free Download For macOS 10.14 or later
Filmora is a multi-functional video editor that supports many tools, including a video editor, audio editor, audio effects, and many more, that users with any experience can use to record a podcast without compromising quality.
Unlike GarageBand, this tool is compatible with Mac, Windows, Android, and iOS devices, making it easier for users to record or edit podcasts quickly and easily. It makes it easier for folks to
- Speech-to-Text - Convert podcast voiceover to readable text without hassle.
- Audio Ducking - Make podcast voiceover clearer in parts where other sounds are playing simultaneously.
- Audio Effects - Supports hundreds of audio effects that allow users to spice up the podcast
- Royalty-free Video Effects - Offers over a thousand video effects for transitions, titles, and lots more
- AI Portrait - Automatically remove unwanted backgrounds from video podcasts in just one click.
- Audio Beat Sync - Automatically sync your podcast with music and make it sound perfect.
Here is how to edit a podcast with Filmora
Step1 Download and Install Filmora software on your computer
Visit Wondershare Filmora’s official website and download the latest version of the tool. Then, install it.
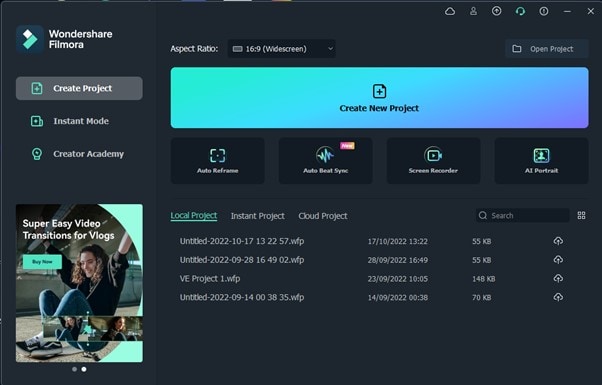
Step2 Create a new project
Launch Filmora and click Create New Project.
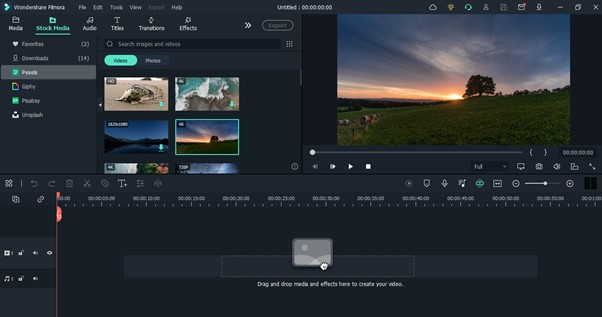
Step3 Upload your audio files
Click the Import button and upload the podcast files you wish to edit. You can upload a video or audio podcast. Filmora supports both.
Step4 Edit audio in clicks
Drag-n-drop the uploaded podcast clip to the Timeline and right-click on it, then select Edit Properties.
Tick the checkbox next to Ducking in the pop-up window that appears. Then, use the relevant buttons to adjust the Fade in, Fade out level, and Pitch level.

Step5 Use the Speech-to-text (STT) feature
You can convert your podcast voiceover to text using Filmora to make your content more accessible. The good news about this feature is that it supports various languages, thus enabling you to convert the voiceover to English, Chinese, Spanish, and other languages.
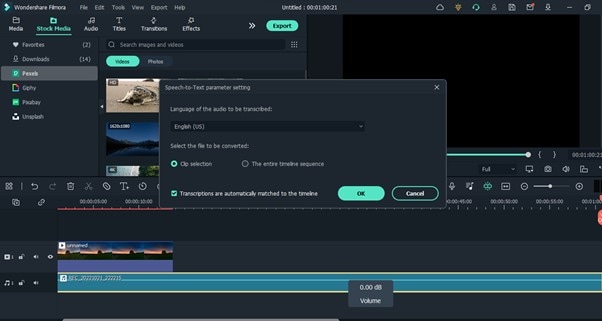
To use the feature, right-click the podcast clip from the timeline again. Then, select Speech-to-text from the pop-up menu.
Select the Language you wish to convert the voiceover and click OK to proceed.
Step6 Add effects on audio or videos
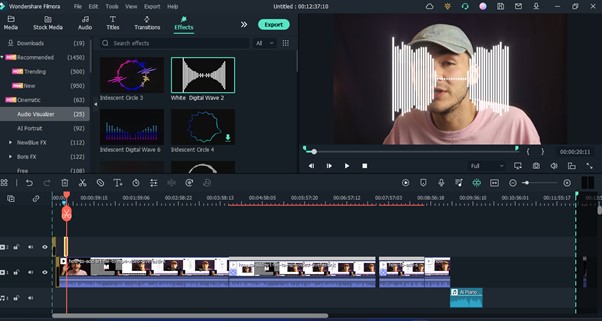
If you’re editing a video or audio podcast, Filmora offers many effects you can use to spice things up. To add video effects, click the Effects option from the top, select a preferred video or audio effect, and drag-n-drop it to the timeline.
Step7 Preview and save finished files
If you’ve completed the editing, play the podcast to preview it. Then, click the Export button and save the podcast file to your PC’s local storage.
Important Video Tutorial
Find out more on how to Record Podcast on Filmora.
Final Words
That’s how easily you can edit podcasts in GarageBand. The tool offers incredible features that can help you execute any podcast editing seamlessly, and you don’t need to be tech-savvy to operate.
However, if you’re looking to edit podcasts on Windows, a tool like Filmora supports the best features that can come in handy for you to operate like a pro. Besides, it’s supported on any platform, whether Mac, Windows, Android, or iPhone.
Steps to edit a podcast on Mac with GarageBand
Step1 Innstall GarageBand on mac
GarageBand can be installed on macOS 12.3 or later. Please ensure your current mac version or keep updates before installing the latest version of the GarageBand software on your Mac.
Step2 Launch GarageBand after installing
Click Project Templates, choose the Voice option and click the Choose button from the bottom right corner.
Step3 Input podcast audio
You’ll be prompted to select your podcast audio input. Select the source from the Input pop-up menu under the Recording Settings area, then click the Input button to switch between stereo input channels and mono input channels.
Step4 Setup Work Space
The workspace to edit your podcast will be displayed on your Mac screen. You just have to navigate to the top section displaying time and beat, then change the settings so that it’ll show only the time.
Step5 Create Different Audio Track for Podcast
Navigate to the section displaying the Audio 1 track. Then, use the Plus icon at the top left corner to add the tracks for different parts of your podcast. For example, Audio 1- Intro, Audio 2 - Intro voice, Audio 3 - Transition Music, Audio 4, Guest interview, etc.
Step6 Import the Recorded Podcast Files
Now, open the location where you saved the different parts of the podcast file and drag-n-drop it to the timeline right in front of the relevant audio track. See the screenshot below;
Step7 Adjust Audio Level
Next, adjust the audio level for each track containing different parts of your podcast according to your requirements. It helps you maintain an excellent audio balance if the audio in one track is louder than the others. For example, if your interviewed guest sounded not so loud, you can increase the audio level of the audio track containing that part of the podcast by using the relevant button.
Step8 Use Solo Tool
You can also solo specific tracks in your podcast by clicking the Solo feature. It allows you to detect unwanted noise in the podcast easily. All you have to do to use the Solo feature is to click the Headphones button next to each track to listen to a specific audio track.
You can also use the mute button to silence the audio tracks you don’t want to be heard in your podcast.
Step9 Setup File Structure
Name the folders, subfolders, and session files for each part of your podcast. Doing this will help you quickly locate all related documents anytime needed. Also, it’s advisable to stay consistent with a particular file structure.
Step10 Export Edited Podcast
Once you complete the editing operation, navigate to the menu bar and choose File > Save As. In the Save As dialogue, enter a new name for the project, then click Save.
The above steps should help you edit podcasts on GarageBand efficiently.
Part 2. GarageBand errors? Why fail to edit, and how to fix
Unfortunately, we encountered some critical errors while using the GarageBand software to edit podcasts. These errors were due to technique or file format problems. The following are the errors you might encounter while using GarageBand to edit podcasts and their perfect fix.
Error 1: Error while synchronizing audio and MIDI
Sometimes, GarageBand fails to synchronize audio and MDI. It happens because the app detected an unusual sample rate that it’s unable to process.
Here are the fixes we recommend for this error
- Change USB Connection
- Close Background Apps
- Check Sample Rate
- Change the current mic you’re using
- Create New Profile on the GarageBand app.
Error 2: “greyed out” MP3/audio files in GarageBand
GarageBand does not allow the upload of MP3 files with unsupported codecs. So, suppose the podcast file you try to upload is greyed out. Then, chances are GarageBand does not support its codec.
Here are the fixes we recommend for this error
To fix this error, you have to change the file from .mp3 to .wav. If you’re using your iPhone, you can use a file converter app to operate. But if you’re on a macOS, you need to locate the podcast MP3 file, right-click on it, then rename it to be in .wav format.
This YouTube video should walk you through the process better.
Error 3: The save file operation failed
Another error is the inability to save the file. But this is usually due to problems like running an outdated macOS or iOS, insufficient storage space, Mac or iPhone errors, etc. The best way to fix this error is to do the following;
Here are the fixes we recommend for this error
- Update your macOS or iOS to the latest version
- Free up storage space
- Check background running apps and close them.
- Restart your device.
Error 4: The operation could not be completed
This error kept occurring when we tried to open a project in GarageBand, though it did not appear when we tried to create a new project. It might be due to an outdated version of the app, or there are bugs in your device that compromise the operation.
Here is how you can fix this error
- Check for the GarageBand’s new update and update it if there’s a new version.
- Restart your device.
- Force the app to close.
- Update your device to its latest version.
- Delete the app and download it again.
Part 3. What’s good and not good about GarageBand
However, the GarageBand program also has its positives and negatives. Read on to find out what is good and not good about GarageBand.
What’s Good
GarageBand is a beginner-friendly tool that offers fantastic features that we found helpful. From its clean drag-n-drop interface to the amps and guitar, effects, and more.
The following are things that make GarageBand a good program for editing podcasts;
- It’s 100% free.
- It supports many practical features for anyone to execute an audio-related task, be it podcast recording, music recording, or more.
- Great for podcasters looking to edit podcasts with high quality.
- The app is lightweight, only 795.1 MB.
- Audio files can be automatically synced across users’ Apple devices.
What’s Not Good
Besides the errors that we mentioned earlier, GarageBand also has some flaws that affect the use
- It’s supported only on apple devices. You can’t use it on Windows PC.
- Users might require a learning curve to use some of its features.
- It does not support audio mixing.
- Unavailability of mixing console.
Part 4: The Best GarageBand Alternative for Both Mac and Windows
Considering the flaws of GarageBand, there’s a high chance that many folks might want to look out for tools that can be used as an alternative. Here is where the Wondershare Filmora software comes in as the game changer.
Free Download For Win 7 or later(64-bit)
Free Download For macOS 10.14 or later
Filmora is a multi-functional video editor that supports many tools, including a video editor, audio editor, audio effects, and many more, that users with any experience can use to record a podcast without compromising quality.
Unlike GarageBand, this tool is compatible with Mac, Windows, Android, and iOS devices, making it easier for users to record or edit podcasts quickly and easily. It makes it easier for folks to
- Speech-to-Text - Convert podcast voiceover to readable text without hassle.
- Audio Ducking - Make podcast voiceover clearer in parts where other sounds are playing simultaneously.
- Audio Effects - Supports hundreds of audio effects that allow users to spice up the podcast
- Royalty-free Video Effects - Offers over a thousand video effects for transitions, titles, and lots more
- AI Portrait - Automatically remove unwanted backgrounds from video podcasts in just one click.
- Audio Beat Sync - Automatically sync your podcast with music and make it sound perfect.
Here is how to edit a podcast with Filmora
Step1 Download and Install Filmora software on your computer
Visit Wondershare Filmora’s official website and download the latest version of the tool. Then, install it.
Step2 Create a new project
Launch Filmora and click Create New Project.
Step3 Upload your audio files
Click the Import button and upload the podcast files you wish to edit. You can upload a video or audio podcast. Filmora supports both.
Step4 Edit audio in clicks
Drag-n-drop the uploaded podcast clip to the Timeline and right-click on it, then select Edit Properties.
Tick the checkbox next to Ducking in the pop-up window that appears. Then, use the relevant buttons to adjust the Fade in, Fade out level, and Pitch level.
Step5 Use the Speech-to-text (STT) feature
You can convert your podcast voiceover to text using Filmora to make your content more accessible. The good news about this feature is that it supports various languages, thus enabling you to convert the voiceover to English, Chinese, Spanish, and other languages.
To use the feature, right-click the podcast clip from the timeline again. Then, select Speech-to-text from the pop-up menu.
Select the Language you wish to convert the voiceover and click OK to proceed.
Step6 Add effects on audio or videos
If you’re editing a video or audio podcast, Filmora offers many effects you can use to spice things up. To add video effects, click the Effects option from the top, select a preferred video or audio effect, and drag-n-drop it to the timeline.
Step7 Preview and save finished files
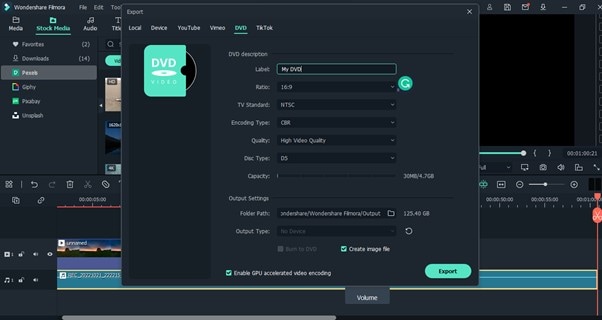
If you’ve completed the editing, play the podcast to preview it. Then, click the Export button and save the podcast file to your PC’s local storage.
Important Video Tutorial
Find out more on how to Record Podcast on Filmora.
Final Words
That’s how easily you can edit podcasts in GarageBand. The tool offers incredible features that can help you execute any podcast editing seamlessly, and you don’t need to be tech-savvy to operate.
However, if you’re looking to edit podcasts on Windows, a tool like Filmora supports the best features that can come in handy for you to operate like a pro. Besides, it’s supported on any platform, whether Mac, Windows, Android, or iPhone.
Also read:
- [New] 2024 Approved Instagram Stories Unseen Aspects Revealed
- [New] Accessible & Quality The Best 10 Online Passport Photo Tools Revealed
- [New] Adjust Your Screen with Confidence and Ease (iPhone)
- [New] Gain Unlimited Stock Videos Through Essential 4 YouTube Sources
- 2024 Approved Bridging Content and Commerce A Youtuber's Guide to Sponsorship
- 2024 Approved Selfie to World Stage Mastering the Art of Instagram Captions
- Capturing the World in HD with YI's 4K Camera for 2024
- Chromatic Choices Discover the Best 5 Screens Today for 2024
- How to Restore Deleted Samsung Galaxy F54 5G Pictures An Easy Method Explained.
- In 2024, 5 Easy Ways to Change Location on YouTube TV On Tecno Pop 7 Pro | Dr.fone
- In 2024, Avoiding Virtual Reality Nausea Tips and Tricks
- In 2024, How to Remove Forgotten PIN Of Your Oppo A56s 5G
- Niche Networking on Youtube From Phone, Small-Scale Approach
- No Third-Party Signs Detected on Inf Data
- Perfect Your Titling Skills with Our Best Practices
- Seek Immediate Medical Attention for All Significant Eye Injuries to Prevent Complications Such as Glaucoma or Retinal Detachment
- Smooth File Migration to Computer – 5 Proven Techniques
- Title: Enhance the Listener Experience Advanced Techniques for Audio Editing
- Author: Mark
- Created at : 2025-02-16 00:44:28
- Updated at : 2025-02-17 21:06:25
- Link: https://extra-lessons.techidaily.com/enhance-the-listener-experience-advanced-techniques-for-audio-editing/
- License: This work is licensed under CC BY-NC-SA 4.0.