
:max_bytes(150000):strip_icc()/IMG_20181029_144334716_HDR-5bd77873c9e77c005137f538.jpg)
Exploring Today's Best Podcast Animators
Exploring Today’s Best Podcast Animators
In today’s world, podcasting is the most popular means to publish content globally. The use of professional podcast visualizers is the critical factor of their success. Podcast visualizers show the audio’s rhythm, loudness, and frequency which helps in editing.
Please stick to the end, as we have listed the five best podcast visualizers. This article covers all the features, pros and cons, steps to use, and user reviews. But first, learn something fundamental about music visualizers. Then, let us dive into it!
Part 1. What Is a Podcast Visualizer?
A podcast visualizer can convert your podcast into animated, engaging videos to promote on social media. It is in the form of spectrums, lines, shapes, and animated blobs. A visualizer follows the rhythm, loudness, and frequency of the audio.

Most of the visualizers were developed back in the mid-70s for music. That was when there was no correlation between audio and video components.
So what they do is to get a visual life to the audio files. For example, the blobs of colors dance around the screen and stop dancing at the end of the audio. In this way, users can work on different input voices simultaneously. Here are a few critical factors by which we picked the best podcast visualizers.
Part 2. How We Tested and Picked Out the Best Podcast Visualizer?
We kept a few key factors in mind to list the best podcast visualizers. The main key factors are discussed below.
- Interface: the editing process becomes much easier with a user-friendly interface. Not only that but also the modernity of the interface also matters. A user should enjoy using the software.
- Animations: The output of the editing process is mainly dependent upon the usage of animations. Animation tools are always supportive of enhancing the overall output result. Stickers, sound waves, and texts are crucial when making a podcast visualizer.
- Pricing: Pricing of software matters a lot. We made sure to include all the software worth spending on and give value-added features.
- Customer Service: Customer service matters significantly in buying software. Quick response from the company makes it easier for the users to solve their problems.
- Free Plans and Trials: the software that provides free plans and trials are trustworthy. So before buying software, you know pre hand what features you will buy.
- User Reviews and Ratings: Much of the online market is based on the reviews and ratings of current users. It helps us make up our minds to buy a product.
Keeping these critical factors in mind, we have listed the five best podcast visualizers for you.
- Adobe After Effects
- Filmora
- VEED
- AEJuice
- Canva
Part 3. Comparison Chart of the Top 5 Podcast Visualizers
| | Adobe After Effects | Filmora | VEED | AEJuice | Canva | |
| ————————– | —————————— | ———————————————————— | —————————————————————– | ——————————————————– | ————————————— |
| Supported Platform | Windows and Mac | iPhone, Android, Windows, and Mac | Online | Windows 10 or higher and Mac OS X 10.14 or higher M1, M2 | iOS, Android, Windows, Mac |
| Third-Party Plugins | Yes | Yes | Yes | No | Yes |
| Maximum Minutes | 3 hours | No limit | 10 minutes on the Free version and 2 hours for the Pro version | 3 hours | 10 minutes |
| Batch Export | Yes | Yes | Yes | Yes | Yes |
| Animations | Yes | Yes | Yes | Yes | Yes |
| Skill Level | Intermediate to Expert | Beginner to Intermediate | Beginner to Intermediate | Beginners to Experts | Beginner to Intermediate |
| Modern Interface | Yes | Yes | Yes | Yes | Yes |
| Pricing | $20.99 per month | $19.99 Monthly | Free and Paid Plans (see below)Basic: $12 MonthlyPro: $24 Monthly | $200 one-time paid plan | Free and Paid PlansPro: $54.99 Yearly |
| Other highlights | Create virtual reality effects | Built-in stock media - a massive library of creative effects | Auto subtitles | Auto resolution support | Excellent tool for educational purposes |
We will now dive into the details of each podcast visualizer.
Part 4. Round-Up Review for the 5 Best Podcast Visualizers
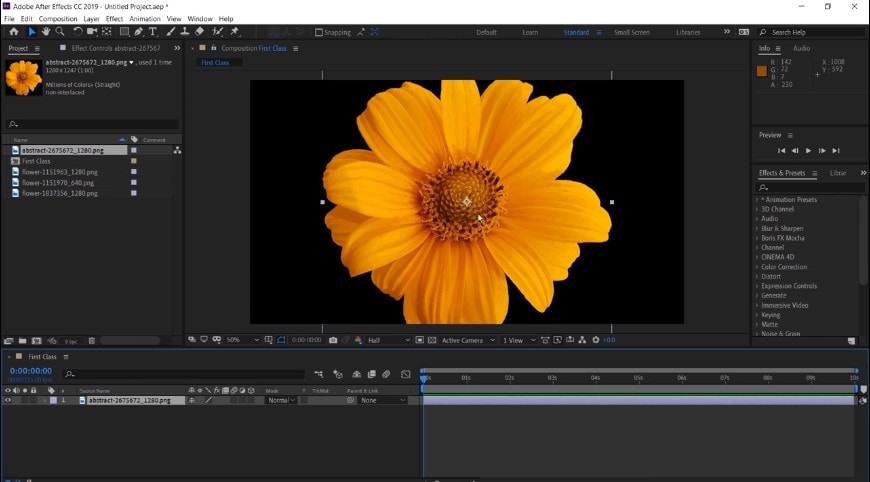
1. Adobe After Effects
Adobe After Effects is a creative animation program for designers and podcasters. This tool helps to create many visual effects. Using this, you can create high-level products.
It allows you to animate and customize your motion graphics and video effects. It will enable you to create 2D and 3D images with a motion that visualizers can use for marketing, entertainment, and education.
Why Do We Regard The Software Best For Podcast Visualizers?
- It sets texts and graphics in motion.
- You can control the transparency of any layer by setting any other layer in your composition.
- It has a customizable user interface and workspace for placing panels
- Speed Up the Animation Process Using Expressions.
Limitations While Using
- It needs to be faster in exporting larger files.
- It takes a considerable amount of time while previewing a video.
- Adobe After Effects is not for beginners.
Ratings and User Reviews
Adobe after effects is one of the finest software made by the makers. We can get the idea from well-known user review sites, like creating podcast visualizers. It has a rating of 8.8 out of 10 on TrustRadius , and its motion graphics are well appreciated at G2 .
| User Media | Remarks |
|---|---|
| User review at TrustRadius | “The Production department in my organization is using it. It addresses visualizing eye-catching and supporting graphics for our courses.” |
| User review at G2 | “The software is mostly good, and some of our team members use it daily. They are far behind in making them collaborative and browser-based, though.” |
| User review at Trustpilot | “Crooks! They charge you a FULL year if you cancel the service after 14 days. The T&C says you can cancel at any moment. That is simply untrue.” |
Steps to Use Adobe After Effects to Make a Podcast Visualizers
Step1 Creating New Compositions and Importing Files
- Always create a new composition and save the project.
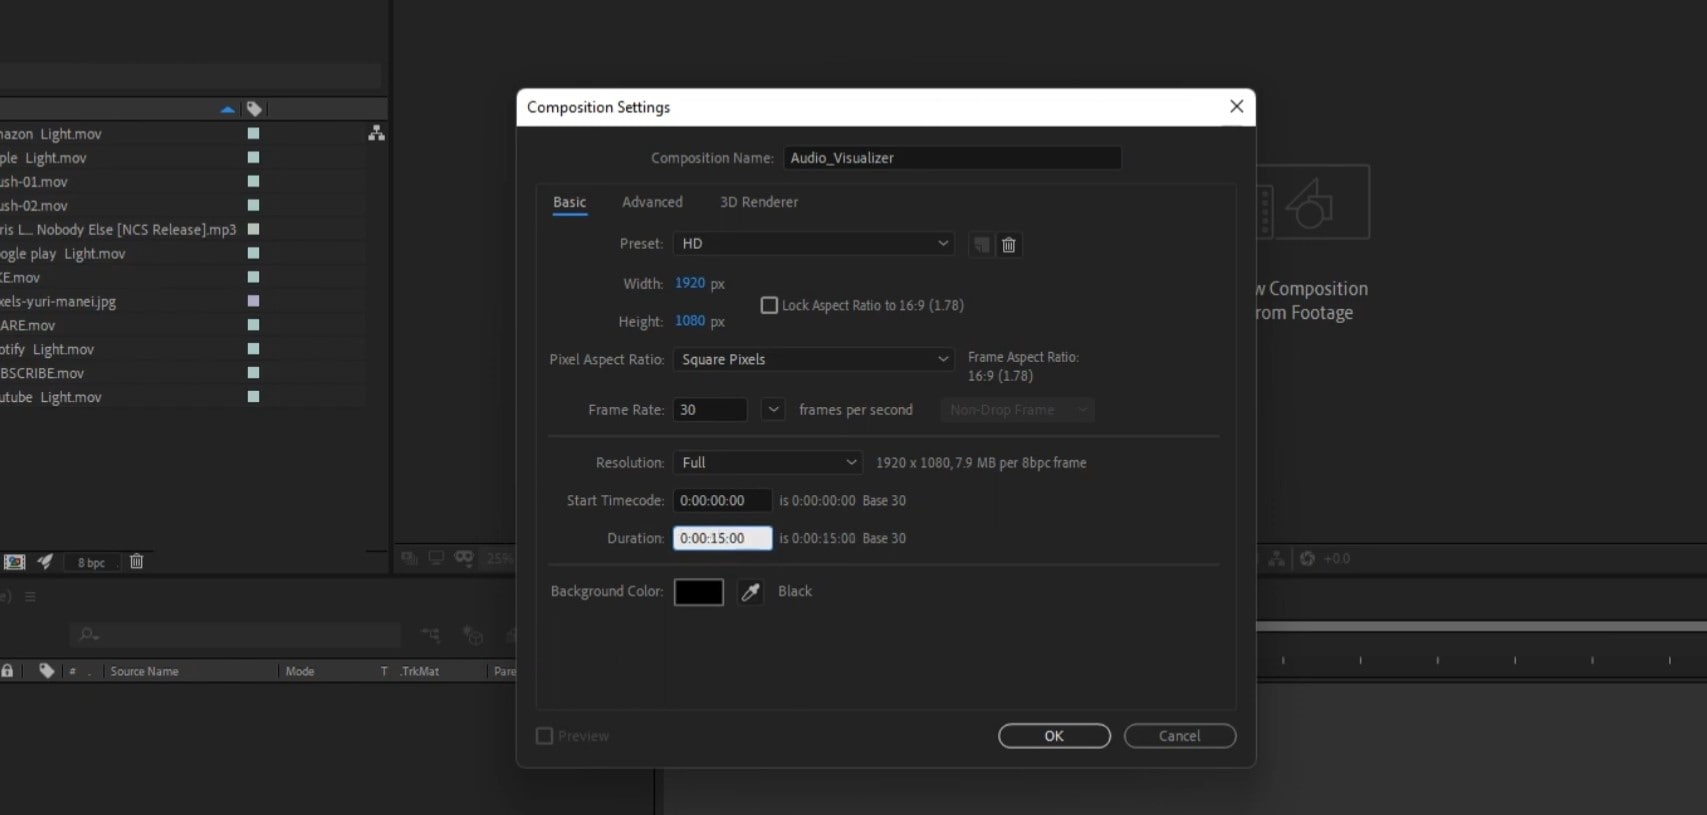
- Import your files. Imported files will appear on the “Project” tab.
- Drag the files from the “Project” tab to the “Timeline” tab.
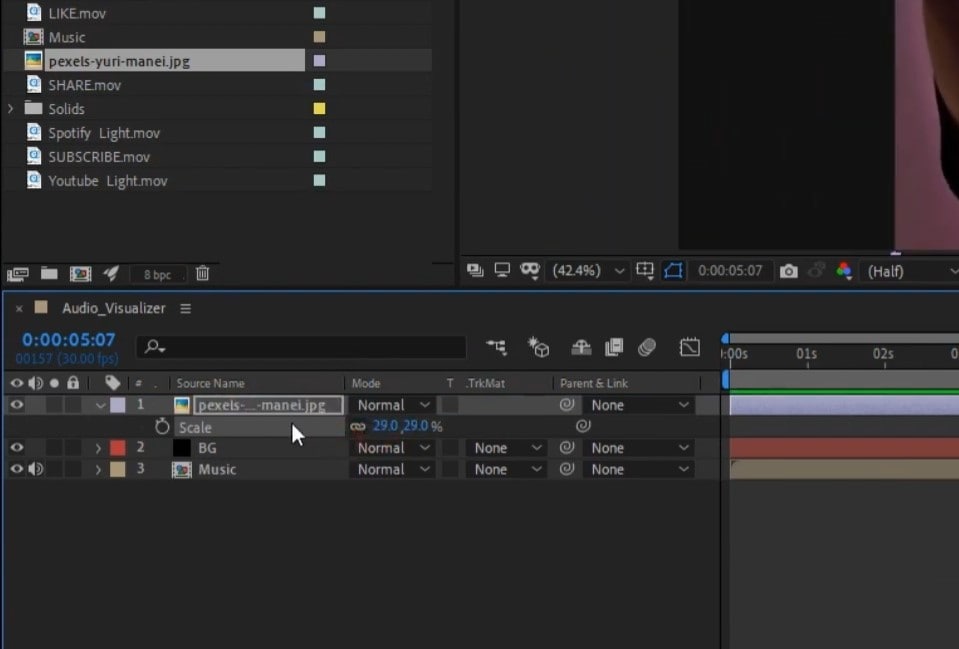
Step2 Adding Layers to Composition
- Alter the appearance of files and set the hierarchy from above downwards.
- Adjust the timelines of the layers and trim them if needed.
- Shrink, expand and rotate the layers to convert them into 2D and 3D layers.
- Apply parent function to the layers, which allows them to gel together.
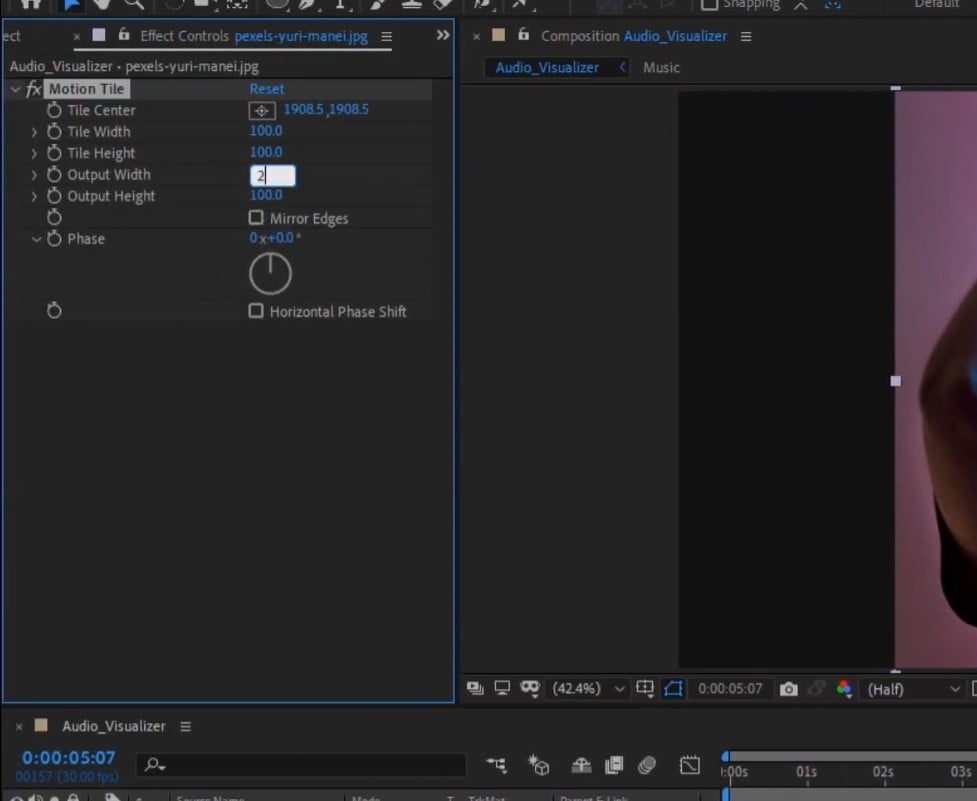
Step3 Addition of Animations, Effects, and Presets
- Add “Keyframes” to the layers. It allows you to start movements in a particular layer at the exact point.
- Now, animate your keyframes accordingly.
- Now apply “Effects and Presets” to the layers.
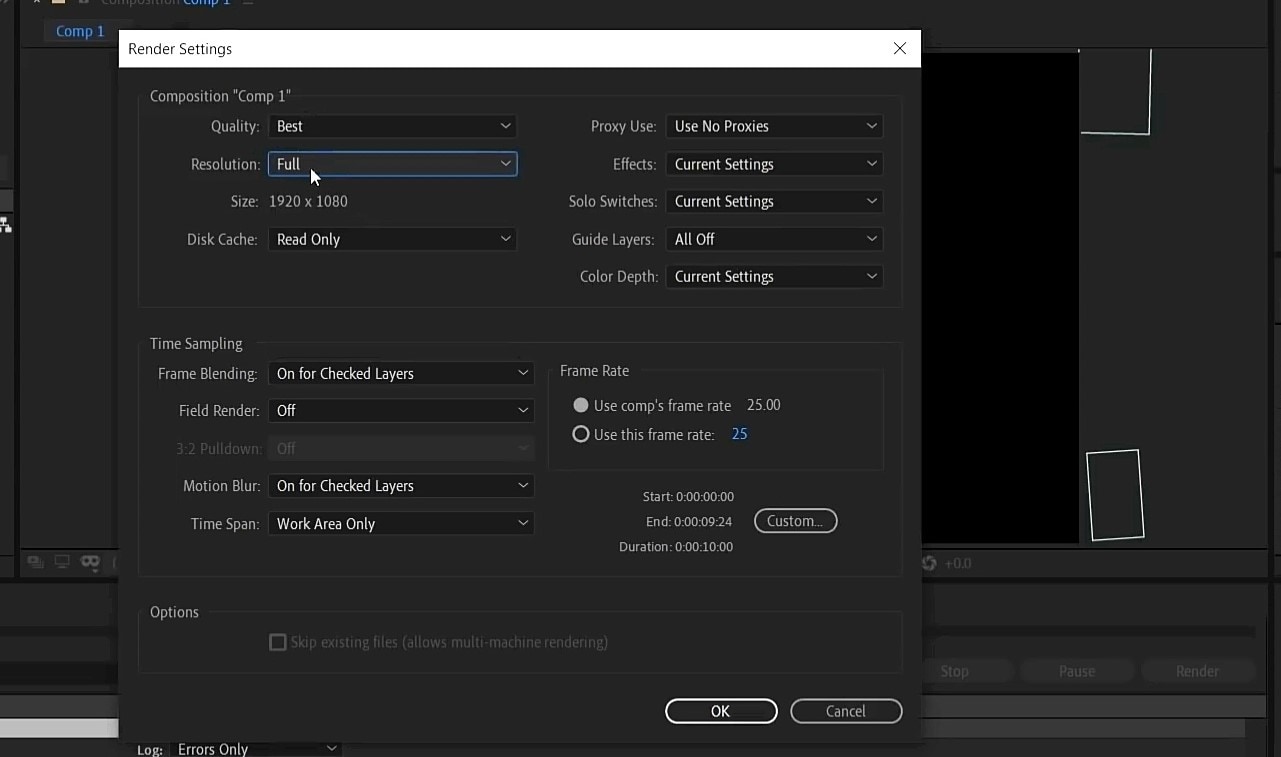
Step4 Previewing and Rendering of Your Composition
- Now preview your composition to see the rough draft.
- Make some alterations if you find any mistakes.
- In the end, export your project to the render queue.
- Set the render settings to have the final video on your device.
2. Wondershare Filmora
Second on the list of best podcast audio visualizers is Filmora. It comes with impressive features to enrich your video with an audio-visualizer effect. In addition, users get multiple options to style and add animation effects to their videos.
It allows you to add overlays, animations, and texts. In addition, Filmora can automatically add audio-visual effects to match the sound of your video.
Why Do We Regard The Software Best For Podcast Visualizers?
- There is no time limit when you apply a visualizer to your audio.
- It makes your video come alive on PC.
- It will match the sound of your video with dynamic effects.
- It also offers 50+ royalty-free music for using it in your podcast visualizer.
Limitations While Using
- Advanced features like “Speed Ramping” and “Key Frame,” frequently used in podcast visualizers, are not in trial versions.
- There is a watermark in the free versions.
Ratings and User Reviews
Wondershare Filmora makes it easier for editors to use it as a podcast visualizer. In addition, there are well-known websites for reviews to collect enough information about it. It scored 8.0 out of 10 on TrustRadius and is labeled a professional tool on G2 .
Free Download For Win 7 or later(64-bit)
Free Download For macOS 10.14 or later
| User Media | Remarks |
|---|---|
| User review at TrustRadius | “I take advantage of it regularly and make YouTube movies for my shoppers. Simple to create eye-catching movies.” |
| User review at G2 | “It is easy to use. I have so many features to edit videos and photos. Easy to access. It provides greater editing effects and awesome output. It supports a plethora of file formats which is very great.” |
| User review at Trustpilot | “I am pleased and excited about new updates that help make the videos more beautiful. Thanks, filmora!” |
Steps to Use Filmora to Make a Podcast Visualizers
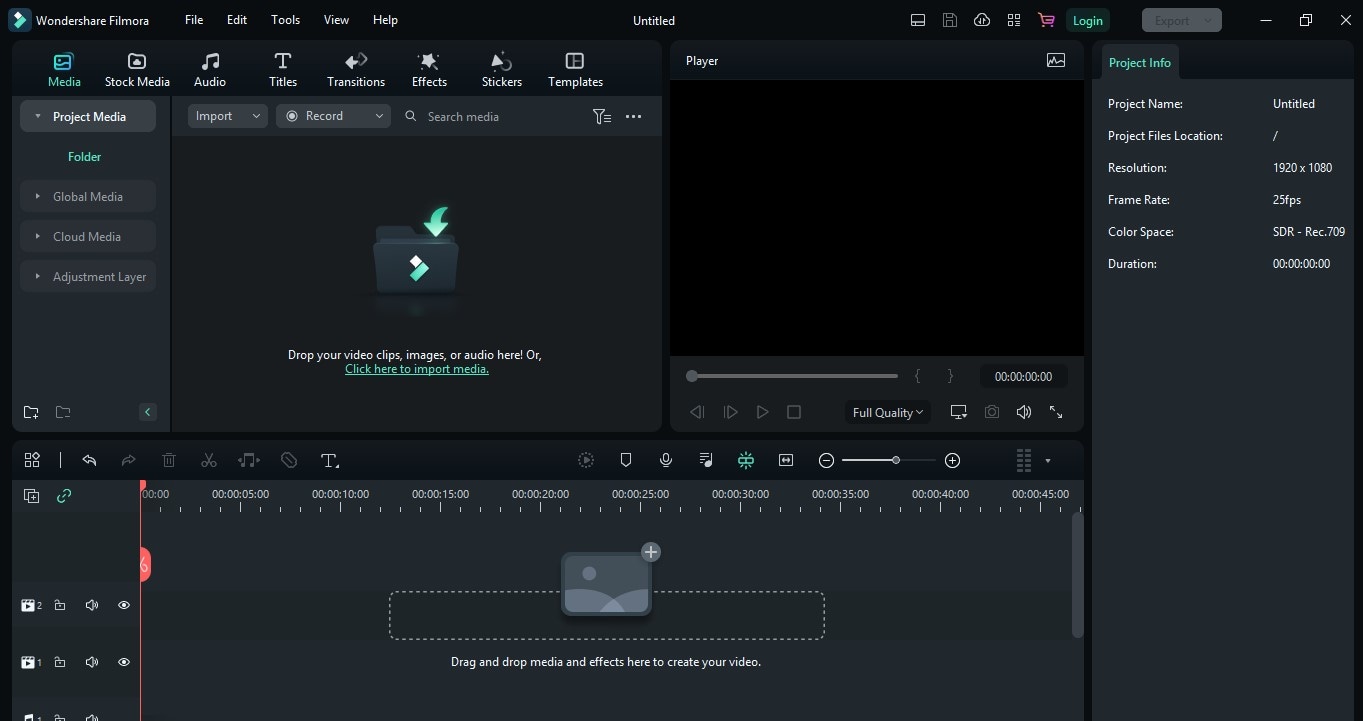
Step1 Downloading Filmora and Importing Files
- Download and install Wodershare Filmora on your PC or Mac.
- Start making your “New Project.”
- Import your files. Filmora will display imported files on your project.
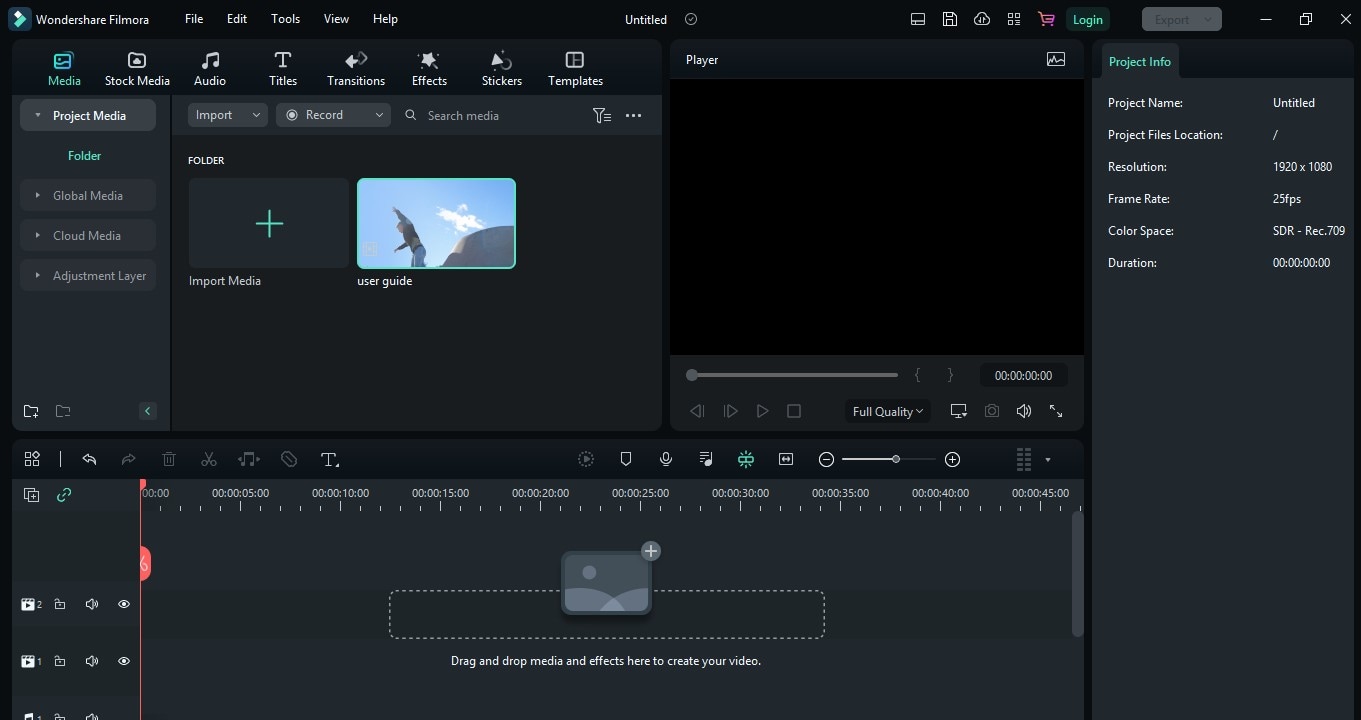
Step2 Making Layers to the Timeline
- Add your music to “Timeline.”
- Now drag the background image to the timeline. And increase its duration to that of the audio file.
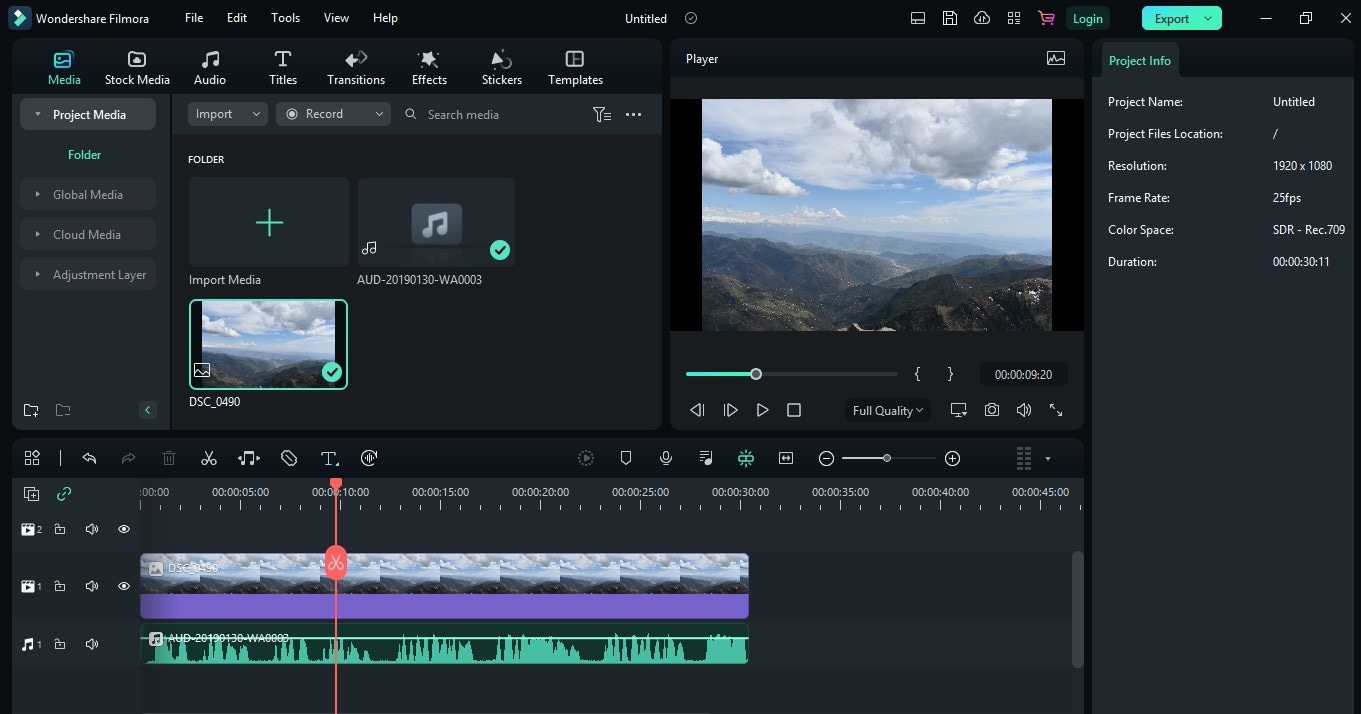
Step3 Adding Effects to the Layers
- Select the “Effects” button. Next, click “AudioEffects” and choose the “Audio Visualizer” category.
- Bring any visualizer of your choice to the timeline.
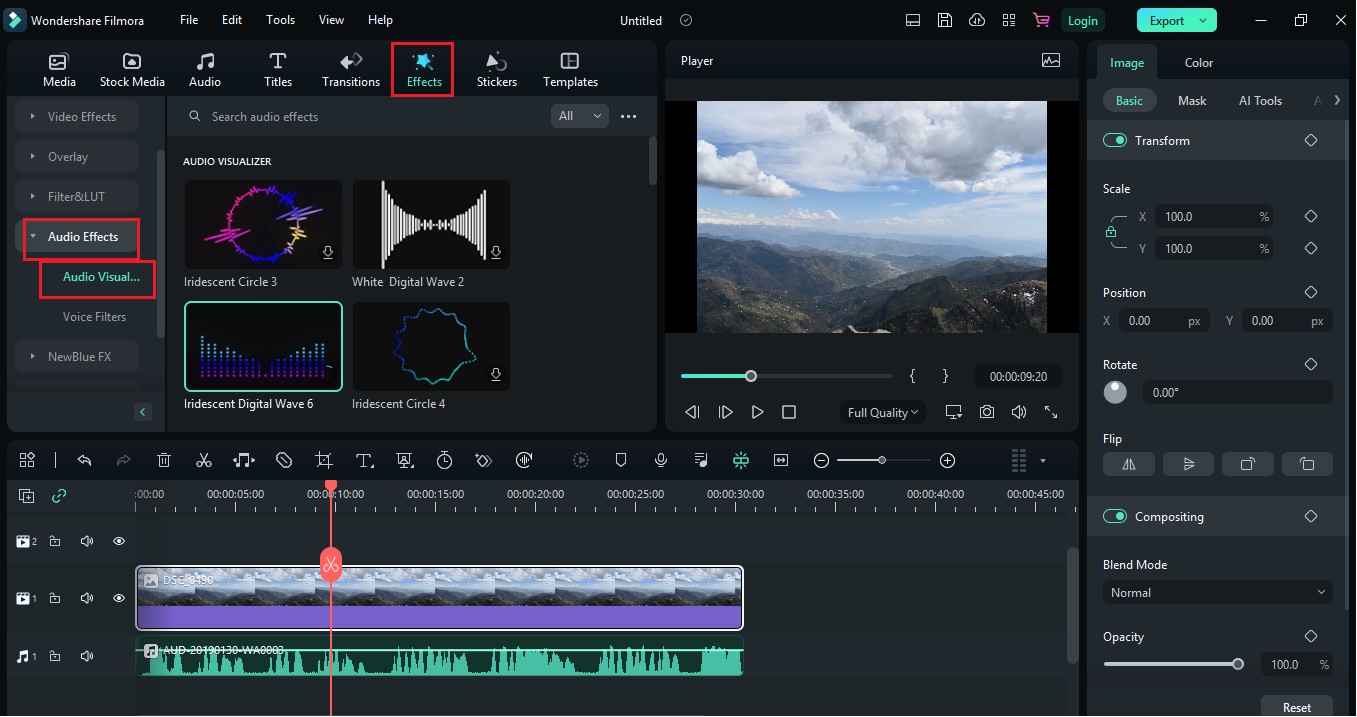
- Double-click on the visualizer to adjust color settings.
- Now bring your portrait photo to the timeline and adjust its size.

- Go to the “Audio Visualizer” again and bring any visualizer to the timeline.
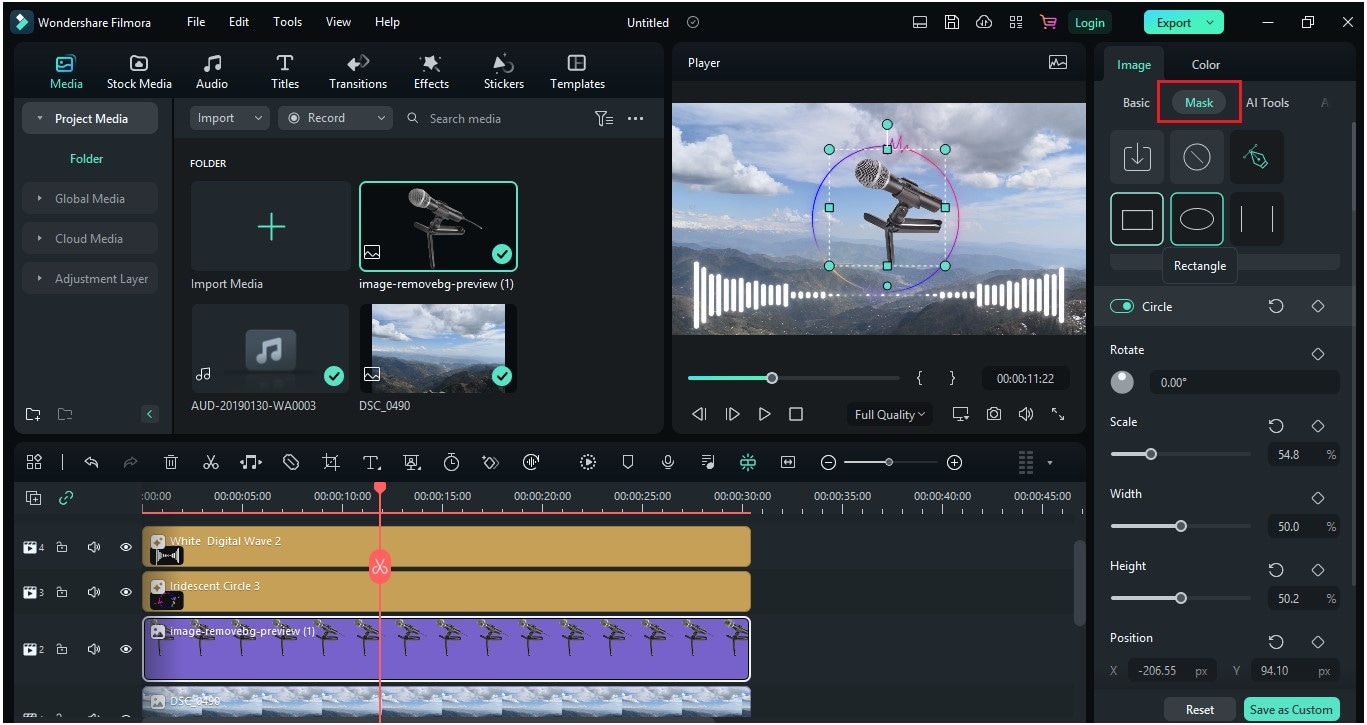
- Go the the “Mask” settings and change it according to your wish.
Step4 Adding Text to the Project
- You can add text to the layer by clicking the “Title” button. Add it to the timeline. By double-clicking on the title, you can add text.
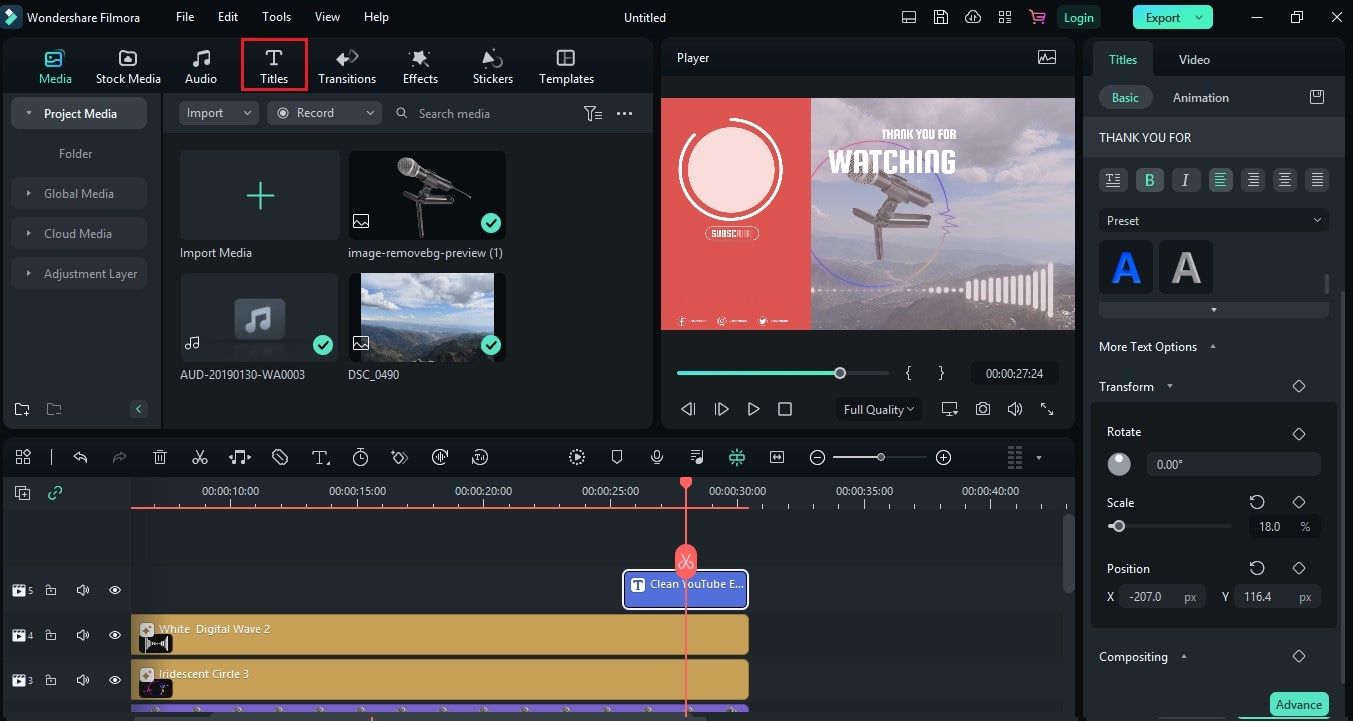
- You are ready to go with your audio podcast visualizer for free.
3. VEED
Veed is a powerful podcast audio visualizer. It is a simple, easy-to-use, and cost-effective tool. It is designed so that even newbies can go with this software.
It has single-click features like animation templates, auto subtitles, transitions, and translations. All you need is basic knowledge, and you are ready to go.
Why Do We Regard The Software Best For Podcast Visualizers?
- It offers customizable sound waves in podcast visualizers.
- It supports various audio formats.
- It supports up to 4K export quality.
- It has the option to add auto subtitles.
Limitations While Using
- The free version only allows a podcast visualizer for 10 minutes.
- Transitions effects in the podcast visualizer do not blend in smoothly.
- Its subtitle feature is available with the paid plan only.
- There is no mobile app for this software.
Ratings and User Reviews
The Veed team’s efforts are appreciable. Many user-review websites talk about its excellency as a podcast visualizer. It scored 9.0 out of 10 on TrustRadius and is declared an ideal tool for teams on G2 .
| User Media | Remarks |
|---|---|
| User review at TrustRadius | “We use VEED to create branded short videos, podcast episodes, and short clips for marketing social media and snackable content for teaching purposes. VEED is a simple and easy-to-use platform for all your video production needs, and it’s easy to collaborate with other people to produce videos.” |
| User review at G2 | “Easy to use and includes many features that would be difficult to implement or considered an add-on.” |
| User review at Trustpilot | “Great service - I have used Veed for various projects, and it’s easy to use, effective and can filter for different screen sizes. Customer service was beneficial too.” |
Steps to Use Veed to Create a Podcast Visualizer
Step1 Uploading the Files
- Open the Veed Sign up and upload your video. You can also use it without signing up and clicking “Create your first video.”
- Now it’s time to upload the video and audio you want to choose for your project.

- You can use video or audio of the podcasts to go with the project. For audio files, they will ask for a background image as well.
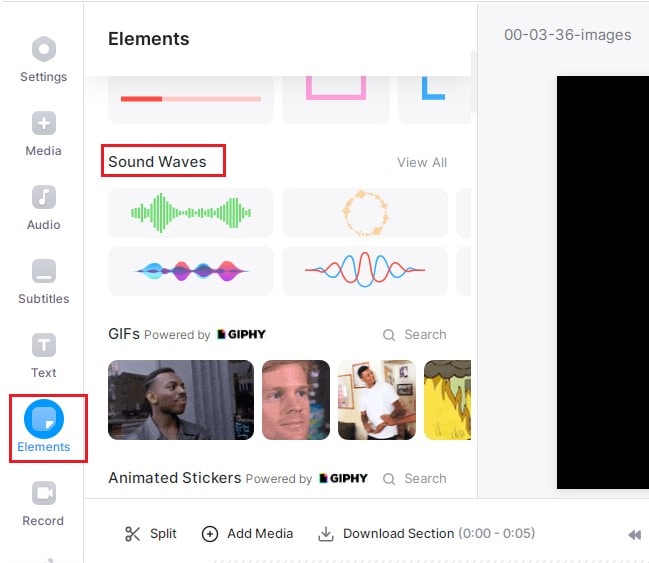
Step2 Adding Sound Waves to the Audio
- For the audio visualizer, go to the left side of the page and select “Elements.”
- After clicking “Effects,” click “Sound waves.” It will visualize waves to your audio on the project.
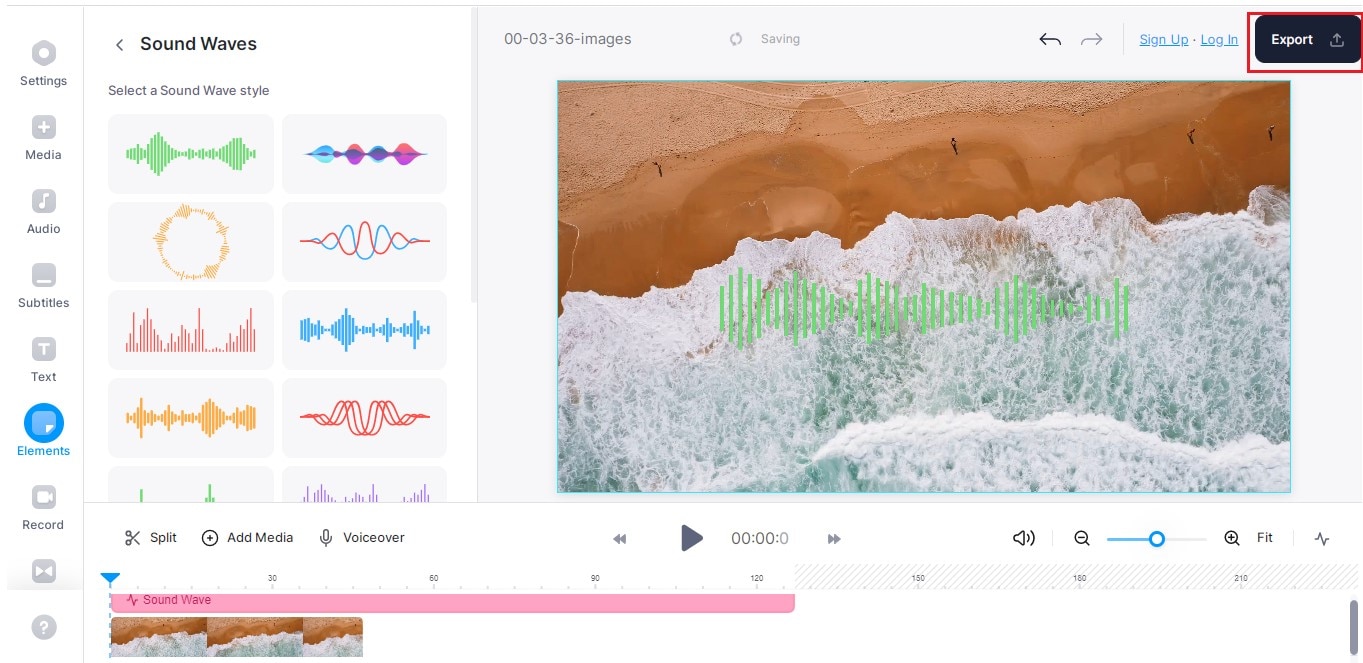
Step3 Editing of Sound Waves
- You can further edit the sound waves’ design, style, size, and opacity.
- After editing sound waves, it’s time to export the project. Click “Export” on the top right corner of the page.
Step4 Use Advanced Settings for Export
- You can also use the advanced settings provided by Veed. For example, you can choose your choice’s framerate limit, resolution, quality, and compression.
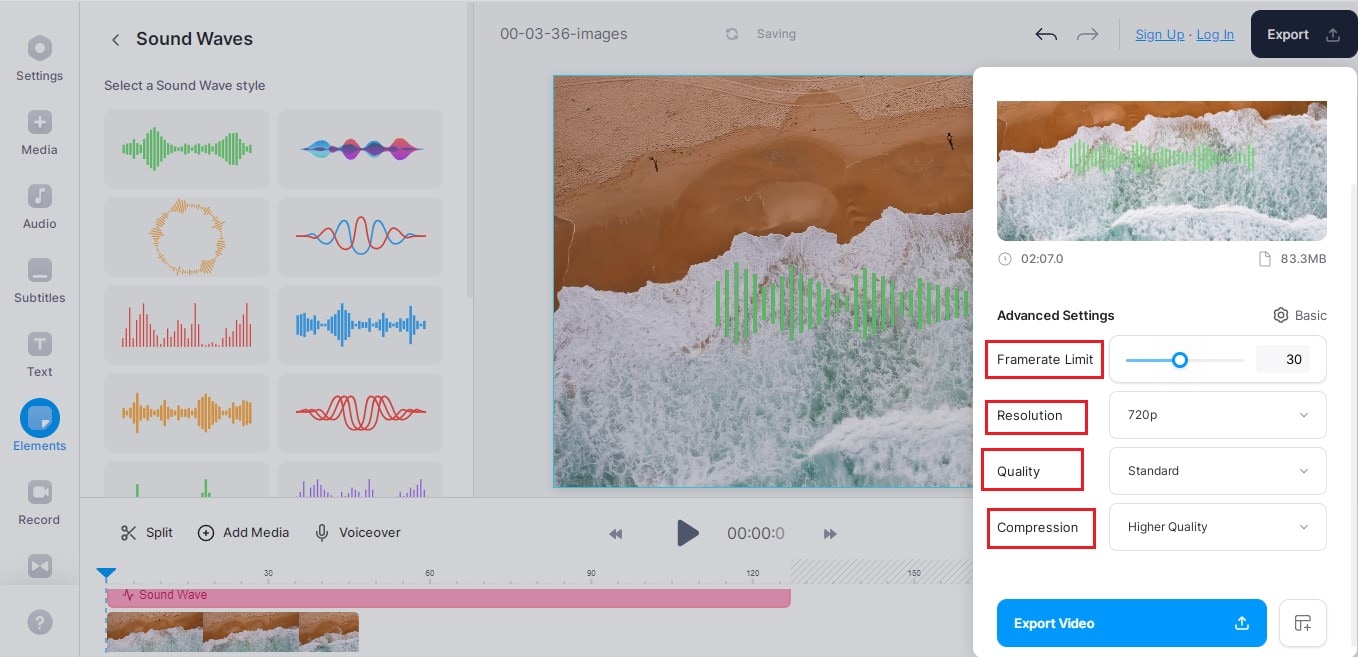
- In the end, export the video and download it.
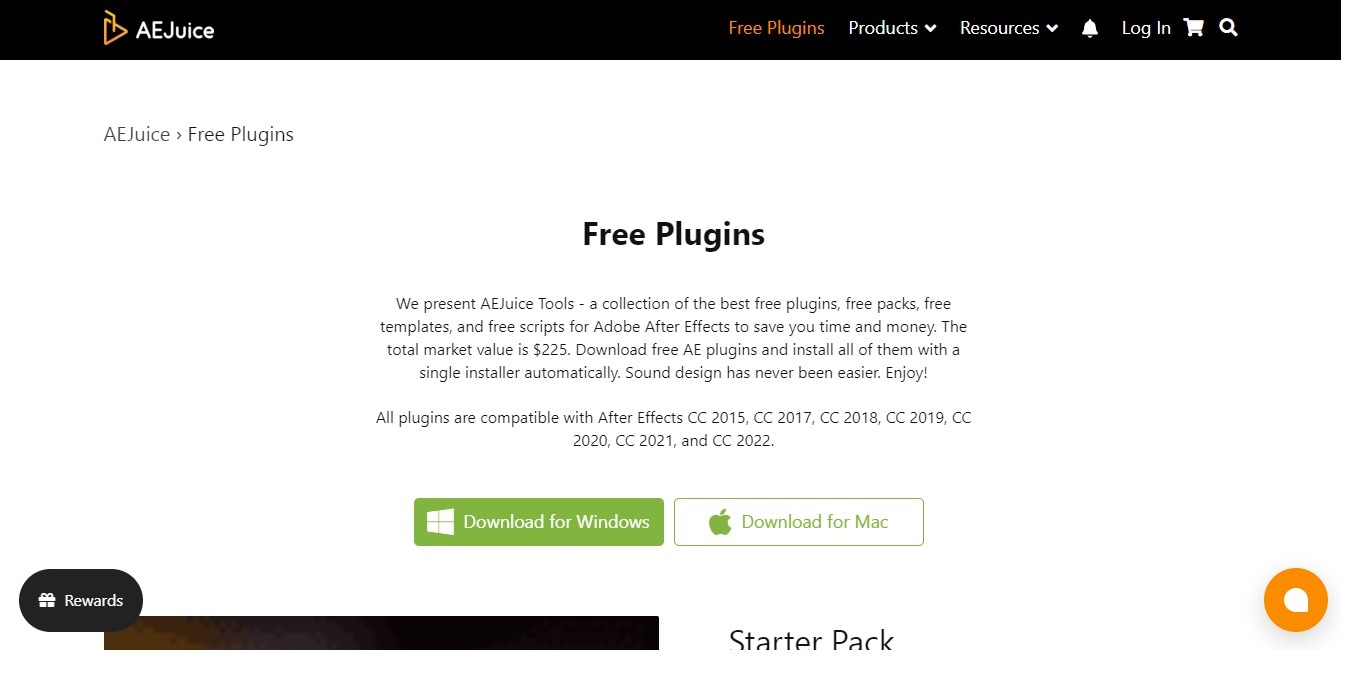
4. AEJuice
AEJuice is a motion graphics company that provides advanced animation tools. Professionals use these animation tools to improve editing skills. It comes up with 130+ sound effects for motion graphic videos. In addition, it has easy-to-use plugins and presets that can be added to your Adobe After Effects, Adobe Premiere Pro, and Standalone.
AEJuice is a pack of graphic motions that get your editing skills to a pro level. In addition, they provide a large number of plugins that will assist you in creating some exciting effects.
Why Do We Regard The Software Best For Podcast Visualizers?
- Doesn’t slow down your computer.
- Easily replicate complicated effects made by professionals.
- All the animation effects are fully customizable.
- It offers a full refund if some plugin is incompatible with the PC.
Limitations While Using
- Some plugins are considered to be expensive
- Some plugins may not be compatible with your PC.
- Sound effects don’t auto-preview.
User Reviews
AEJuice is the finest of pack managers used for podcast visualizers. It is regarded as the best product at AEJuice .
| User Media | Remarks |
|---|---|
| User review at AEJuice | “Very useful for editing music videos.” |
| User review at AEJuice | “a must-have!! Super easy and comfortable finding your stuff from the AEjuice window among lots of choices.” |
| User review at AEJuice | “Questions I have are answered quickly. I have access to the features I wanted and more. It also helps me get ideas out to more clients faster. This product is amazing!” |
Steps to Use AEJuice to Add a Podcast Visualizer
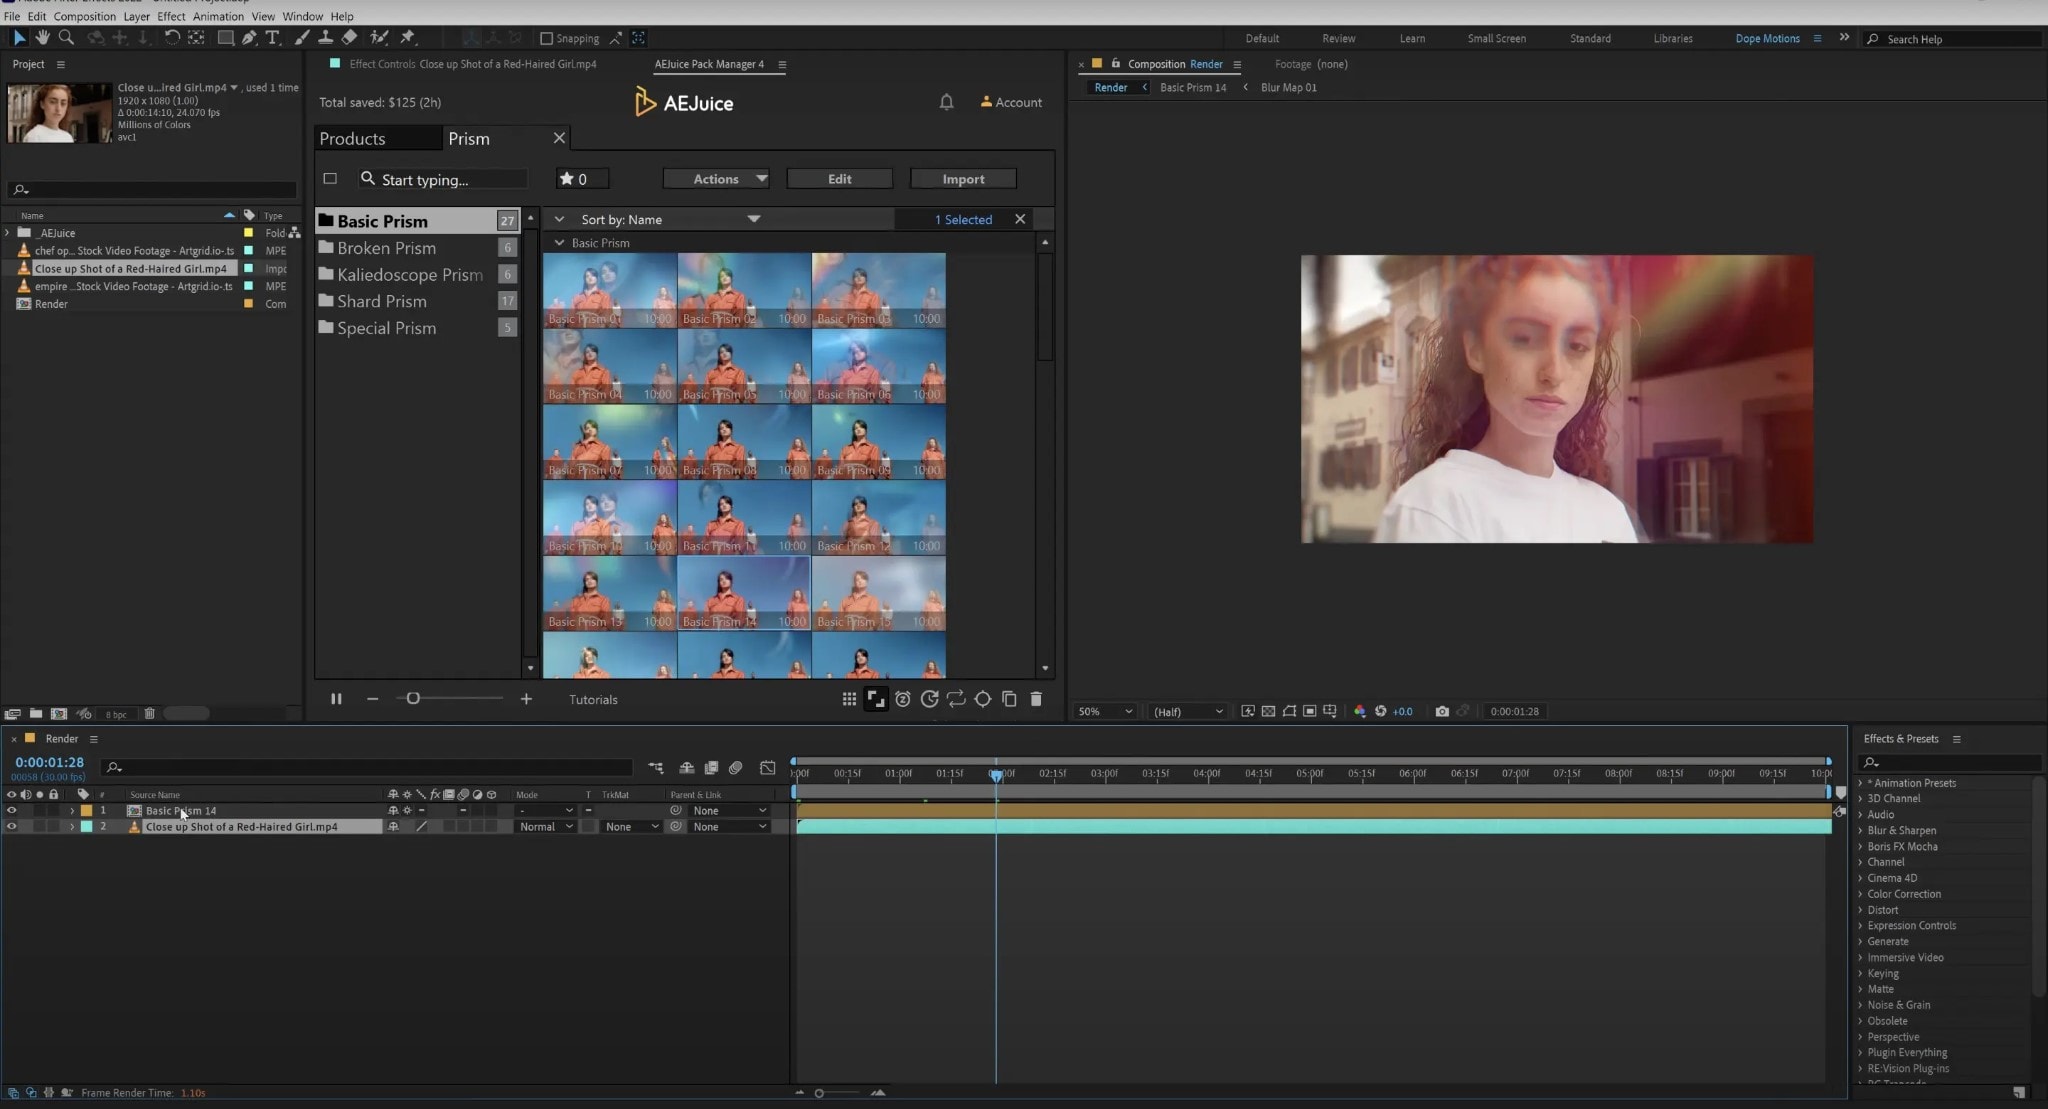
Step1 AEJuice Pack Manager in Adobe After Effects
- Download the plugin from the website.
- Click on the “Free Plugin” and download the plugin using your email ID.
- Now open Adobe After Effects. Next, click “Windows” and select “AEJuice Pack Manager.”
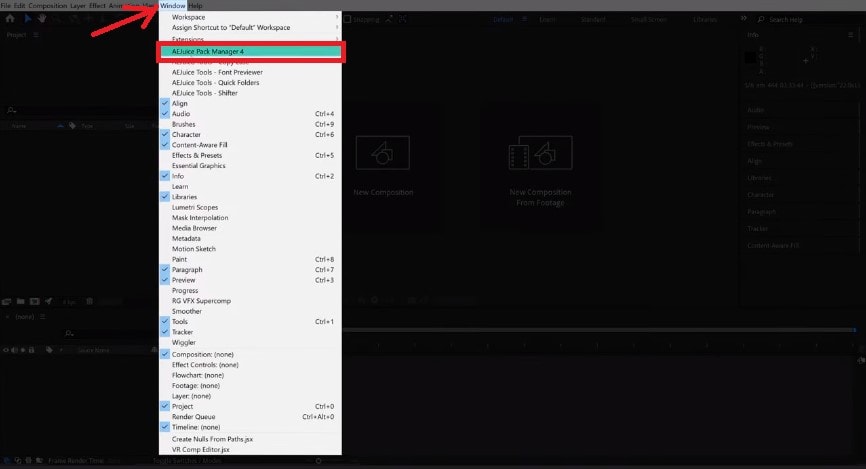
- After logging in, click on the box to download the package you bought. The download will begin.
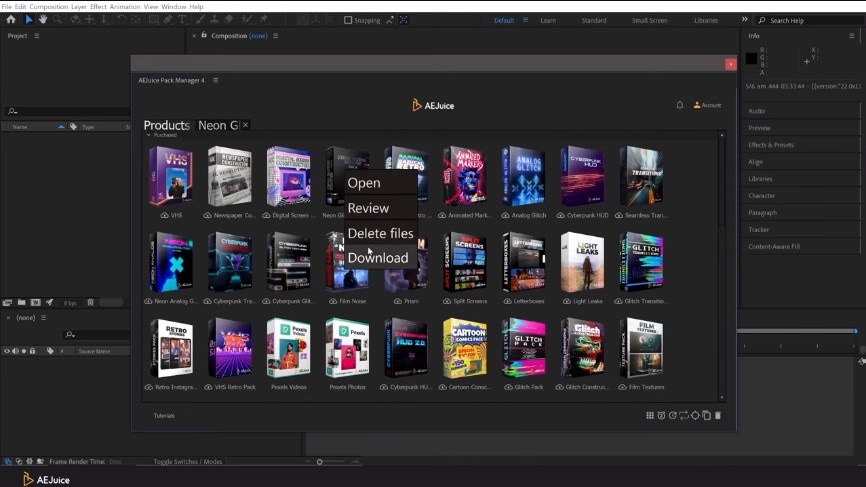
- You can now use all the animations of the box in your projects.
Step2 AEJuice Pack Manager in Adobe Premiere Pro
- After downloading the plugin from the official site, open Adobe Premiere Pro.
- Click on “Windows,” then “Extensions,” and select “AEJuice Pack Manager.”
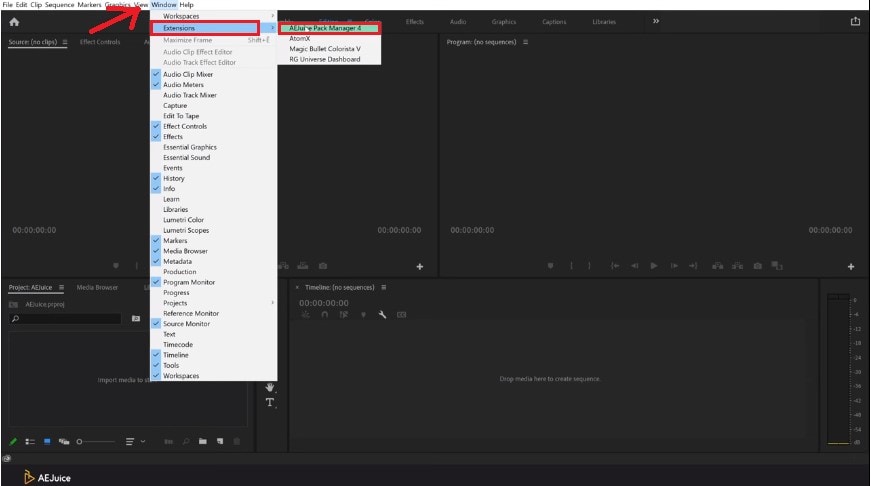
- Click on “Account” and select “Login.”
- Log in to the Pack Manager using your ID and password.
- Now Click on the box to download the package you have bought.
- Start using the animations of the box for the podcast visualizer.
Step3 AEJuice Pack Manager in Standalone
- Download plugins from the official website.
- Right-click on the AEJuice icon and select “Open Standalone.”
- Click on “Account” and select “Login.”
- Log in to the Pack Manager using your ID and password.
- Now Click on the box to download the package you have bought. The download will begin.
- You can now use all the animations of the box in your projects.
5. Canva
Canva is an excellent web designing and video editing tool. You can use Canva for many purposes, like presentations, graphic designing, and podcast visualizers.
It works on the browser, so you don’t need to install anything on your system. It also provides support for mobile applications for Android and iOS devices. You can also sign up for a free account.
Why Do We Regard The Software Best For Podcast Visualizers?
- Robust free plan with no limits on monthly downloads.
- The Pro plan is feature-packed.
- Social scheduling feature at no additional cost.
- Super easy to use and learn.
Limitations While Using
- It has abundant features that make it difficult to use.
- Sometimes, it gets slowed down without warning.
- You have to pay for specific fonts.
Ratings and User Reviews
Makers of Canva are putting a lot of effort into making video editors’ lives easier. The review websites are filled with reviews from users and experts for using it for podcast visualizers. It has a 9/10 rating on TrustRadius and is marked as a career builder in marketing corporation on G2 .
| User Media | Remarks |
|---|---|
| User review at TrustRadius | “Canva was a godsend in helping us bridge gaps in creating social media assets - quick & easy - when we needed professional-looking items, fast!” |
| User review at G2 | “Drag and drop elements are the best parts of canva. The size of the elements increases and decreases, and there are lots and lots of templates in the template collection they have. So it was beneficial when you didn’t know how to create some posts.” |
| User review at Trustpilot | “Perfect tool. I can show up like a professional graphic designer with a pro subscription. Although I don’t know about graphic design, Canva is a lifesaver.” |
Steps to Use Canva Applying Podcast Visualizers
Step1 Selection of Template
- Log in to Canva and select a template. Canva provides an extensive library of built-in templates that you can use for your podcast branding. In addition, there are plenty of options for different social media platforms. Make sure to choose the right one.

- You can also go “Search” option and select the templates for your podcast visualizer.
Step2 Designing of Background Photo
- Now it’s time to do some editing on the background.
- Go to “Elements” and find the stickers, graphics, or photos suitable for your podcast visualizer.
- You can also use sound waves by clicking the “Video” button.
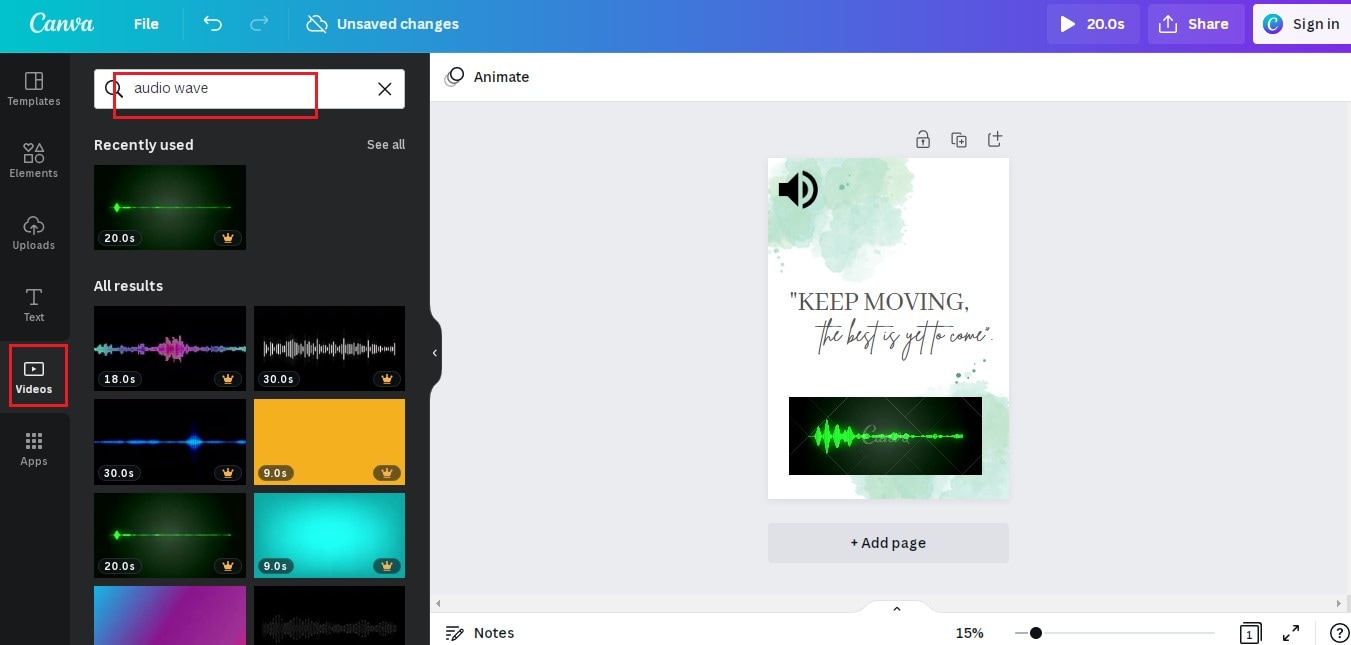
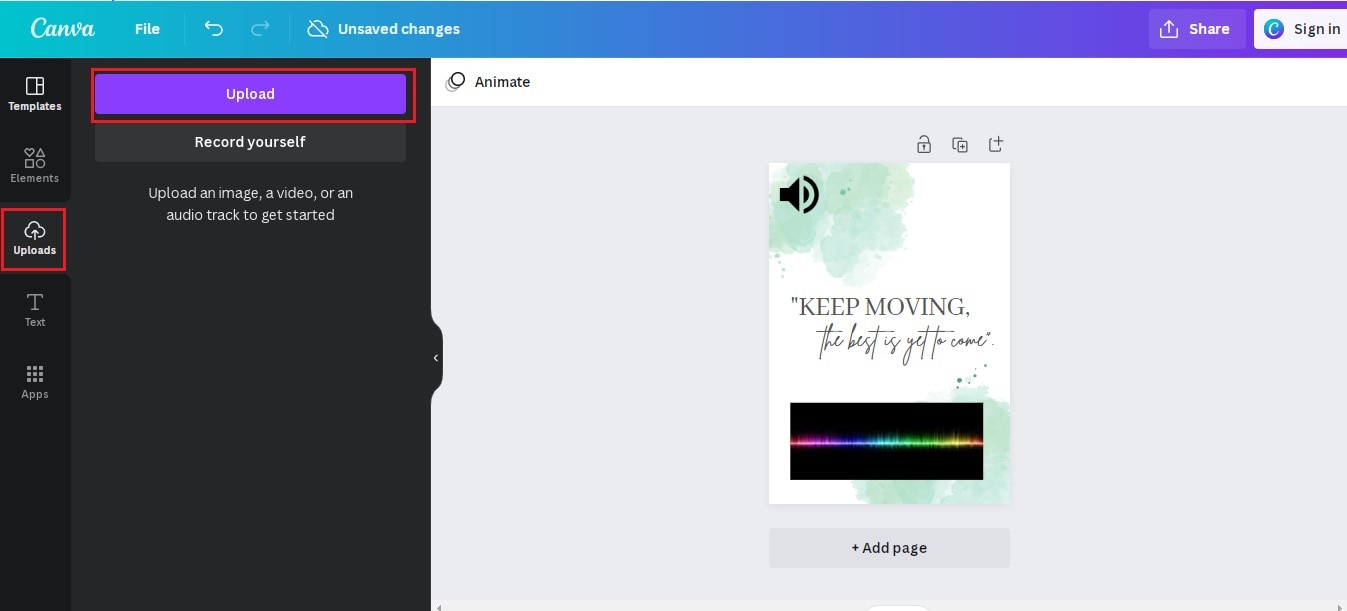
Step3 Upload Audio File
- Go to “Uploads” and import your audio file.
- Once imported, drag your audio file to the background photo to add it.
Step4 Download the Audio Visualizer
- Finally, press the “Share” button and select the “Download” button.
- Make sure to download it in mp4 format.
Conclusion
The popularity of podcasts is evident in why people are into this business. However, if you want a professional look at your podcasts, podcast visualizers are the key. We have discussed in detail the best podcast visualizer. We hope you have found the one.
If you find this article helpful, let us know in the comment section. Also, please share this article with your friends and colleagues.
Part 1. What Is a Podcast Visualizer?
A podcast visualizer can convert your podcast into animated, engaging videos to promote on social media. It is in the form of spectrums, lines, shapes, and animated blobs. A visualizer follows the rhythm, loudness, and frequency of the audio.
Most of the visualizers were developed back in the mid-70s for music. That was when there was no correlation between audio and video components.
So what they do is to get a visual life to the audio files. For example, the blobs of colors dance around the screen and stop dancing at the end of the audio. In this way, users can work on different input voices simultaneously. Here are a few critical factors by which we picked the best podcast visualizers.
Part 2. How We Tested and Picked Out the Best Podcast Visualizer?
We kept a few key factors in mind to list the best podcast visualizers. The main key factors are discussed below.
- Interface: the editing process becomes much easier with a user-friendly interface. Not only that but also the modernity of the interface also matters. A user should enjoy using the software.
- Animations: The output of the editing process is mainly dependent upon the usage of animations. Animation tools are always supportive of enhancing the overall output result. Stickers, sound waves, and texts are crucial when making a podcast visualizer.
- Pricing: Pricing of software matters a lot. We made sure to include all the software worth spending on and give value-added features.
- Customer Service: Customer service matters significantly in buying software. Quick response from the company makes it easier for the users to solve their problems.
- Free Plans and Trials: the software that provides free plans and trials are trustworthy. So before buying software, you know pre hand what features you will buy.
- User Reviews and Ratings: Much of the online market is based on the reviews and ratings of current users. It helps us make up our minds to buy a product.
Keeping these critical factors in mind, we have listed the five best podcast visualizers for you.
- Adobe After Effects
- Filmora
- VEED
- AEJuice
- Canva
Part 3. Comparison Chart of the Top 5 Podcast Visualizers
| | Adobe After Effects | Filmora | VEED | AEJuice | Canva | |
| ————————– | —————————— | ———————————————————— | —————————————————————– | ——————————————————– | ————————————— |
| Supported Platform | Windows and Mac | iPhone, Android, Windows, and Mac | Online | Windows 10 or higher and Mac OS X 10.14 or higher M1, M2 | iOS, Android, Windows, Mac |
| Third-Party Plugins | Yes | Yes | Yes | No | Yes |
| Maximum Minutes | 3 hours | No limit | 10 minutes on the Free version and 2 hours for the Pro version | 3 hours | 10 minutes |
| Batch Export | Yes | Yes | Yes | Yes | Yes |
| Animations | Yes | Yes | Yes | Yes | Yes |
| Skill Level | Intermediate to Expert | Beginner to Intermediate | Beginner to Intermediate | Beginners to Experts | Beginner to Intermediate |
| Modern Interface | Yes | Yes | Yes | Yes | Yes |
| Pricing | $20.99 per month | $19.99 Monthly | Free and Paid Plans (see below)Basic: $12 MonthlyPro: $24 Monthly | $200 one-time paid plan | Free and Paid PlansPro: $54.99 Yearly |
| Other highlights | Create virtual reality effects | Built-in stock media - a massive library of creative effects | Auto subtitles | Auto resolution support | Excellent tool for educational purposes |
We will now dive into the details of each podcast visualizer.
Part 4. Round-Up Review for the 5 Best Podcast Visualizers
1. Adobe After Effects
Adobe After Effects is a creative animation program for designers and podcasters. This tool helps to create many visual effects. Using this, you can create high-level products.
It allows you to animate and customize your motion graphics and video effects. It will enable you to create 2D and 3D images with a motion that visualizers can use for marketing, entertainment, and education.
Why Do We Regard The Software Best For Podcast Visualizers?
- It sets texts and graphics in motion.
- You can control the transparency of any layer by setting any other layer in your composition.
- It has a customizable user interface and workspace for placing panels
- Speed Up the Animation Process Using Expressions.
Limitations While Using
- It needs to be faster in exporting larger files.
- It takes a considerable amount of time while previewing a video.
- Adobe After Effects is not for beginners.
Ratings and User Reviews
Adobe after effects is one of the finest software made by the makers. We can get the idea from well-known user review sites, like creating podcast visualizers. It has a rating of 8.8 out of 10 on TrustRadius , and its motion graphics are well appreciated at G2 .
| User Media | Remarks |
|---|---|
| User review at TrustRadius | “The Production department in my organization is using it. It addresses visualizing eye-catching and supporting graphics for our courses.” |
| User review at G2 | “The software is mostly good, and some of our team members use it daily. They are far behind in making them collaborative and browser-based, though.” |
| User review at Trustpilot | “Crooks! They charge you a FULL year if you cancel the service after 14 days. The T&C says you can cancel at any moment. That is simply untrue.” |
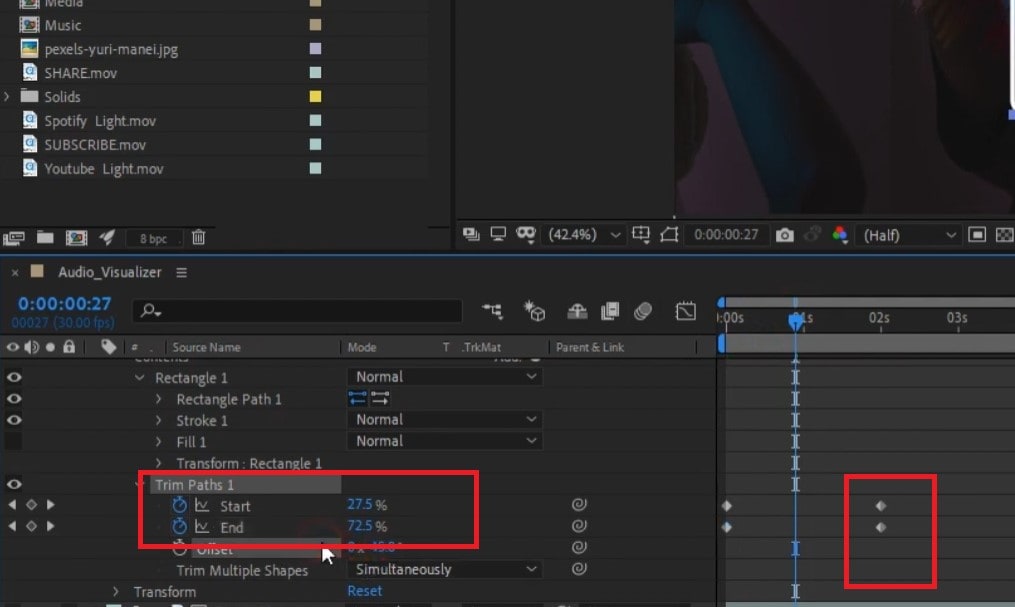
Steps to Use Adobe After Effects to Make a Podcast Visualizers
Step1 Creating New Compositions and Importing Files
- Always create a new composition and save the project.
- Import your files. Imported files will appear on the “Project” tab.
- Drag the files from the “Project” tab to the “Timeline” tab.
Step2 Adding Layers to Composition
- Alter the appearance of files and set the hierarchy from above downwards.
- Adjust the timelines of the layers and trim them if needed.
- Shrink, expand and rotate the layers to convert them into 2D and 3D layers.
- Apply parent function to the layers, which allows them to gel together.
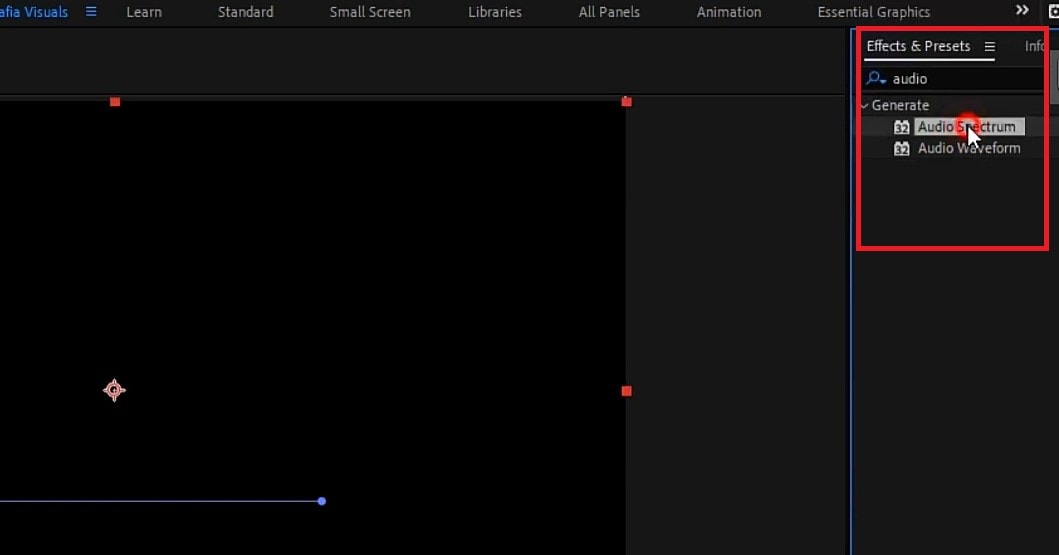
Step3 Addition of Animations, Effects, and Presets
- Add “Keyframes” to the layers. It allows you to start movements in a particular layer at the exact point.
- Now, animate your keyframes accordingly.
- Now apply “Effects and Presets” to the layers.
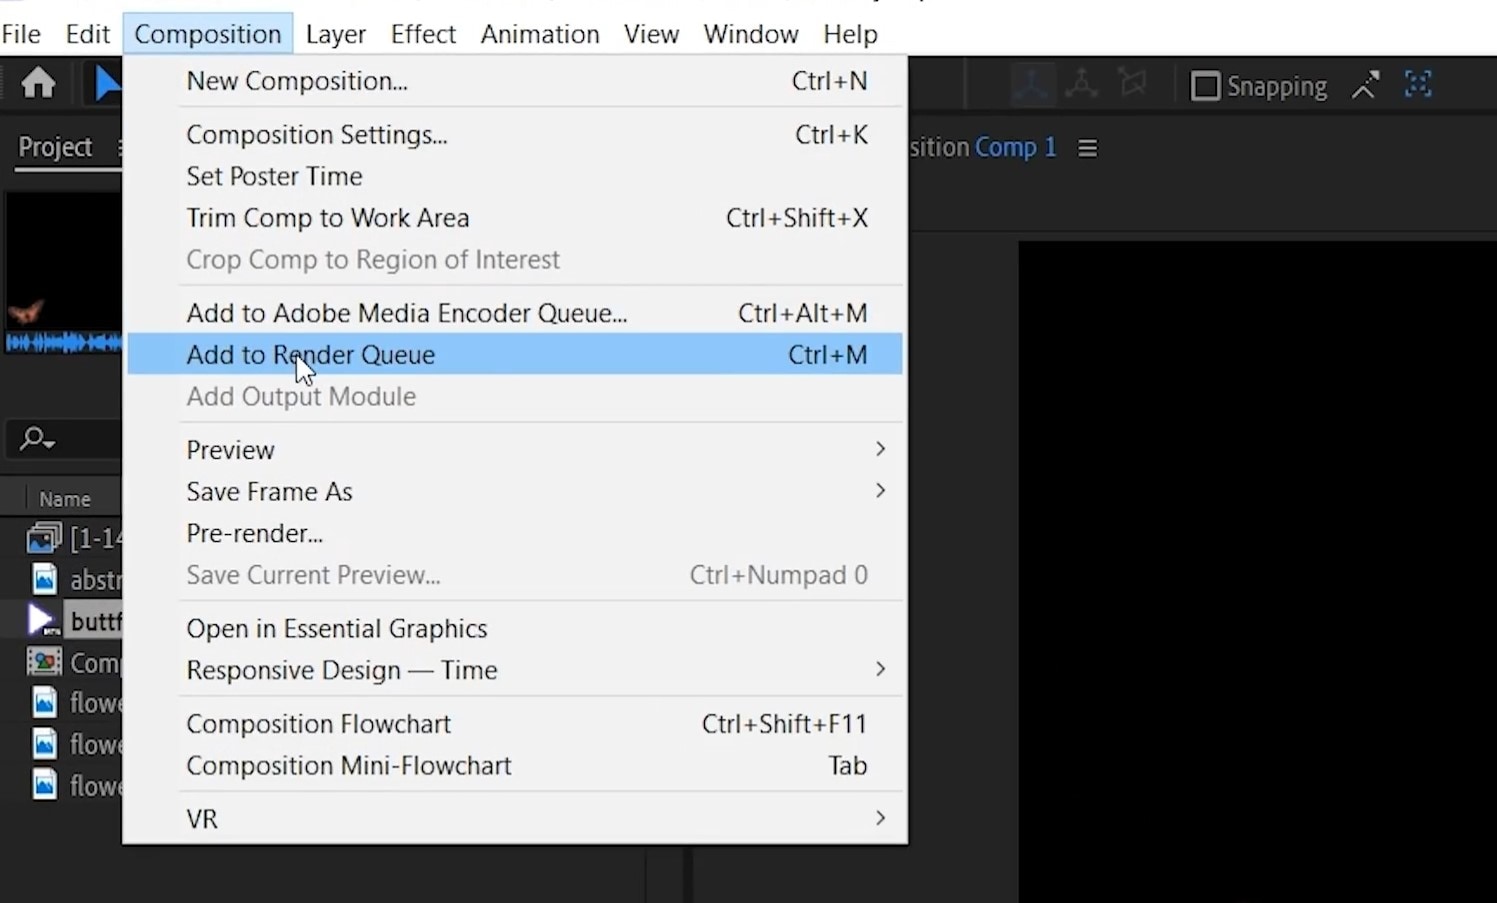
Step4 Previewing and Rendering of Your Composition
- Now preview your composition to see the rough draft.
- Make some alterations if you find any mistakes.
- In the end, export your project to the render queue.
- Set the render settings to have the final video on your device.
2. Wondershare Filmora
Second on the list of best podcast audio visualizers is Filmora. It comes with impressive features to enrich your video with an audio-visualizer effect. In addition, users get multiple options to style and add animation effects to their videos.
It allows you to add overlays, animations, and texts. In addition, Filmora can automatically add audio-visual effects to match the sound of your video.
Why Do We Regard The Software Best For Podcast Visualizers?
- There is no time limit when you apply a visualizer to your audio.
- It makes your video come alive on PC.
- It will match the sound of your video with dynamic effects.
- It also offers 50+ royalty-free music for using it in your podcast visualizer.
Limitations While Using
- Advanced features like “Speed Ramping” and “Key Frame,” frequently used in podcast visualizers, are not in trial versions.
- There is a watermark in the free versions.
Ratings and User Reviews
Wondershare Filmora makes it easier for editors to use it as a podcast visualizer. In addition, there are well-known websites for reviews to collect enough information about it. It scored 8.0 out of 10 on TrustRadius and is labeled a professional tool on G2 .
Free Download For Win 7 or later(64-bit)
Free Download For macOS 10.14 or later
| User Media | Remarks |
|---|---|
| User review at TrustRadius | “I take advantage of it regularly and make YouTube movies for my shoppers. Simple to create eye-catching movies.” |
| User review at G2 | “It is easy to use. I have so many features to edit videos and photos. Easy to access. It provides greater editing effects and awesome output. It supports a plethora of file formats which is very great.” |
| User review at Trustpilot | “I am pleased and excited about new updates that help make the videos more beautiful. Thanks, filmora!” |
Steps to Use Filmora to Make a Podcast Visualizers
Step1 Downloading Filmora and Importing Files
- Download and install Wodershare Filmora on your PC or Mac.
- Start making your “New Project.”
- Import your files. Filmora will display imported files on your project.
Step2 Making Layers to the Timeline
- Add your music to “Timeline.”
- Now drag the background image to the timeline. And increase its duration to that of the audio file.
Step3 Adding Effects to the Layers
- Select the “Effects” button. Next, click “AudioEffects” and choose the “Audio Visualizer” category.
- Bring any visualizer of your choice to the timeline.
- Double-click on the visualizer to adjust color settings.
- Now bring your portrait photo to the timeline and adjust its size.
- Go to the “Audio Visualizer” again and bring any visualizer to the timeline.
- Go the the “Mask” settings and change it according to your wish.
Step4 Adding Text to the Project
- You can add text to the layer by clicking the “Title” button. Add it to the timeline. By double-clicking on the title, you can add text.
- You are ready to go with your audio podcast visualizer for free.
3. VEED
Veed is a powerful podcast audio visualizer. It is a simple, easy-to-use, and cost-effective tool. It is designed so that even newbies can go with this software.
It has single-click features like animation templates, auto subtitles, transitions, and translations. All you need is basic knowledge, and you are ready to go.
Why Do We Regard The Software Best For Podcast Visualizers?
- It offers customizable sound waves in podcast visualizers.
- It supports various audio formats.
- It supports up to 4K export quality.
- It has the option to add auto subtitles.
Limitations While Using
- The free version only allows a podcast visualizer for 10 minutes.
- Transitions effects in the podcast visualizer do not blend in smoothly.
- Its subtitle feature is available with the paid plan only.
- There is no mobile app for this software.
Ratings and User Reviews
The Veed team’s efforts are appreciable. Many user-review websites talk about its excellency as a podcast visualizer. It scored 9.0 out of 10 on TrustRadius and is declared an ideal tool for teams on G2 .
| User Media | Remarks |
|---|---|
| User review at TrustRadius | “We use VEED to create branded short videos, podcast episodes, and short clips for marketing social media and snackable content for teaching purposes. VEED is a simple and easy-to-use platform for all your video production needs, and it’s easy to collaborate with other people to produce videos.” |
| User review at G2 | “Easy to use and includes many features that would be difficult to implement or considered an add-on.” |
| User review at Trustpilot | “Great service - I have used Veed for various projects, and it’s easy to use, effective and can filter for different screen sizes. Customer service was beneficial too.” |
Steps to Use Veed to Create a Podcast Visualizer
Step1 Uploading the Files
- Open the Veed Sign up and upload your video. You can also use it without signing up and clicking “Create your first video.”
- Now it’s time to upload the video and audio you want to choose for your project.
- You can use video or audio of the podcasts to go with the project. For audio files, they will ask for a background image as well.
Step2 Adding Sound Waves to the Audio
- For the audio visualizer, go to the left side of the page and select “Elements.”
- After clicking “Effects,” click “Sound waves.” It will visualize waves to your audio on the project.
Step3 Editing of Sound Waves
- You can further edit the sound waves’ design, style, size, and opacity.
- After editing sound waves, it’s time to export the project. Click “Export” on the top right corner of the page.
Step4 Use Advanced Settings for Export
- You can also use the advanced settings provided by Veed. For example, you can choose your choice’s framerate limit, resolution, quality, and compression.
- In the end, export the video and download it.
4. AEJuice
AEJuice is a motion graphics company that provides advanced animation tools. Professionals use these animation tools to improve editing skills. It comes up with 130+ sound effects for motion graphic videos. In addition, it has easy-to-use plugins and presets that can be added to your Adobe After Effects, Adobe Premiere Pro, and Standalone.
AEJuice is a pack of graphic motions that get your editing skills to a pro level. In addition, they provide a large number of plugins that will assist you in creating some exciting effects.
Why Do We Regard The Software Best For Podcast Visualizers?
- Doesn’t slow down your computer.
- Easily replicate complicated effects made by professionals.
- All the animation effects are fully customizable.
- It offers a full refund if some plugin is incompatible with the PC.
Limitations While Using
- Some plugins are considered to be expensive
- Some plugins may not be compatible with your PC.
- Sound effects don’t auto-preview.
User Reviews
AEJuice is the finest of pack managers used for podcast visualizers. It is regarded as the best product at AEJuice .
| User Media | Remarks |
|---|---|
| User review at AEJuice | “Very useful for editing music videos.” |
| User review at AEJuice | “a must-have!! Super easy and comfortable finding your stuff from the AEjuice window among lots of choices.” |
| User review at AEJuice | “Questions I have are answered quickly. I have access to the features I wanted and more. It also helps me get ideas out to more clients faster. This product is amazing!” |
Steps to Use AEJuice to Add a Podcast Visualizer
Step1 AEJuice Pack Manager in Adobe After Effects
- Download the plugin from the website.
- Click on the “Free Plugin” and download the plugin using your email ID.
- Now open Adobe After Effects. Next, click “Windows” and select “AEJuice Pack Manager.”
- After logging in, click on the box to download the package you bought. The download will begin.
- You can now use all the animations of the box in your projects.
Step2 AEJuice Pack Manager in Adobe Premiere Pro
- After downloading the plugin from the official site, open Adobe Premiere Pro.
- Click on “Windows,” then “Extensions,” and select “AEJuice Pack Manager.”
- Click on “Account” and select “Login.”
- Log in to the Pack Manager using your ID and password.
- Now Click on the box to download the package you have bought.
- Start using the animations of the box for the podcast visualizer.
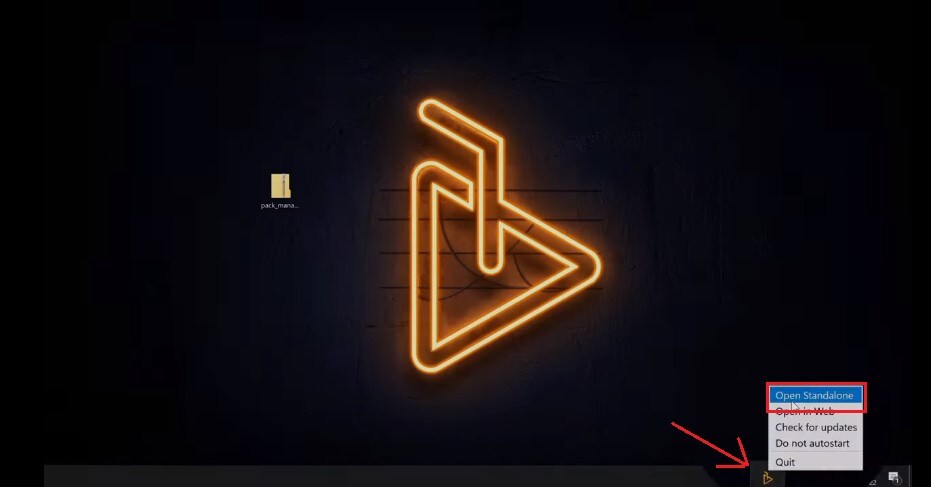
Step3 AEJuice Pack Manager in Standalone
- Download plugins from the official website.
- Right-click on the AEJuice icon and select “Open Standalone.”
- Click on “Account” and select “Login.”
- Log in to the Pack Manager using your ID and password.
- Now Click on the box to download the package you have bought. The download will begin.
- You can now use all the animations of the box in your projects.
5. Canva
Canva is an excellent web designing and video editing tool. You can use Canva for many purposes, like presentations, graphic designing, and podcast visualizers.
It works on the browser, so you don’t need to install anything on your system. It also provides support for mobile applications for Android and iOS devices. You can also sign up for a free account.
Why Do We Regard The Software Best For Podcast Visualizers?
- Robust free plan with no limits on monthly downloads.
- The Pro plan is feature-packed.
- Social scheduling feature at no additional cost.
- Super easy to use and learn.
Limitations While Using
- It has abundant features that make it difficult to use.
- Sometimes, it gets slowed down without warning.
- You have to pay for specific fonts.
Ratings and User Reviews
Makers of Canva are putting a lot of effort into making video editors’ lives easier. The review websites are filled with reviews from users and experts for using it for podcast visualizers. It has a 9/10 rating on TrustRadius and is marked as a career builder in marketing corporation on G2 .
| User Media | Remarks |
|---|---|
| User review at TrustRadius | “Canva was a godsend in helping us bridge gaps in creating social media assets - quick & easy - when we needed professional-looking items, fast!” |
| User review at G2 | “Drag and drop elements are the best parts of canva. The size of the elements increases and decreases, and there are lots and lots of templates in the template collection they have. So it was beneficial when you didn’t know how to create some posts.” |
| User review at Trustpilot | “Perfect tool. I can show up like a professional graphic designer with a pro subscription. Although I don’t know about graphic design, Canva is a lifesaver.” |
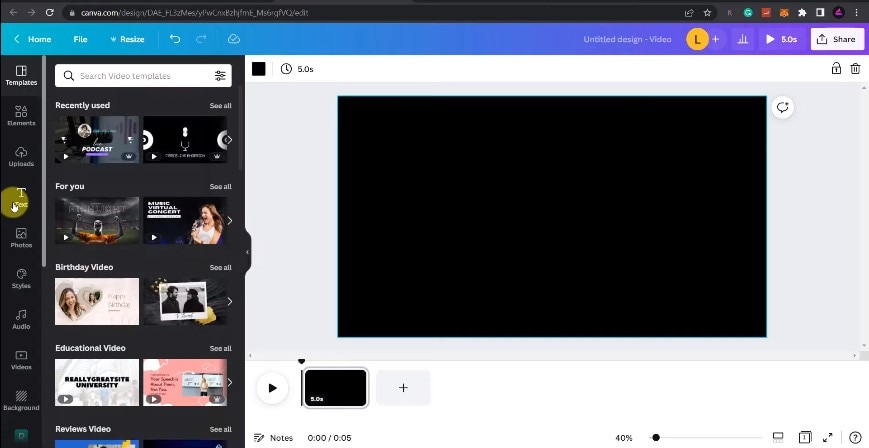
Steps to Use Canva Applying Podcast Visualizers
Step1 Selection of Template
- Log in to Canva and select a template. Canva provides an extensive library of built-in templates that you can use for your podcast branding. In addition, there are plenty of options for different social media platforms. Make sure to choose the right one.
- You can also go “Search” option and select the templates for your podcast visualizer.
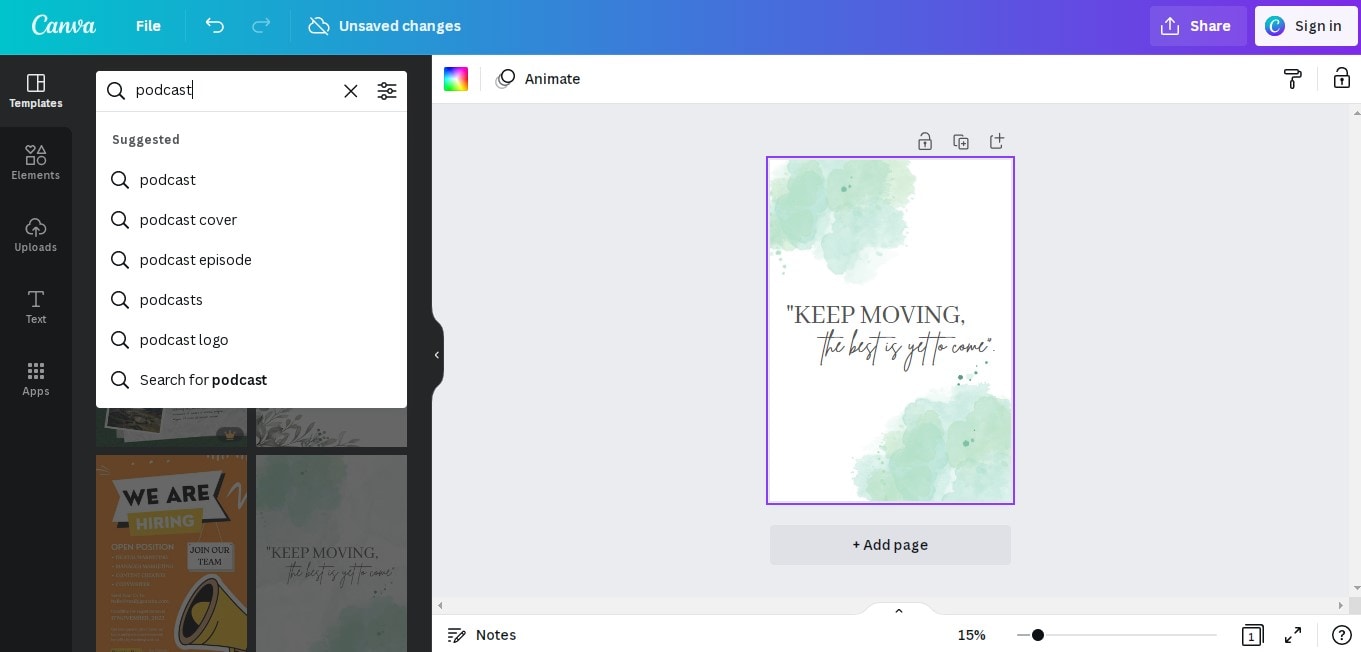
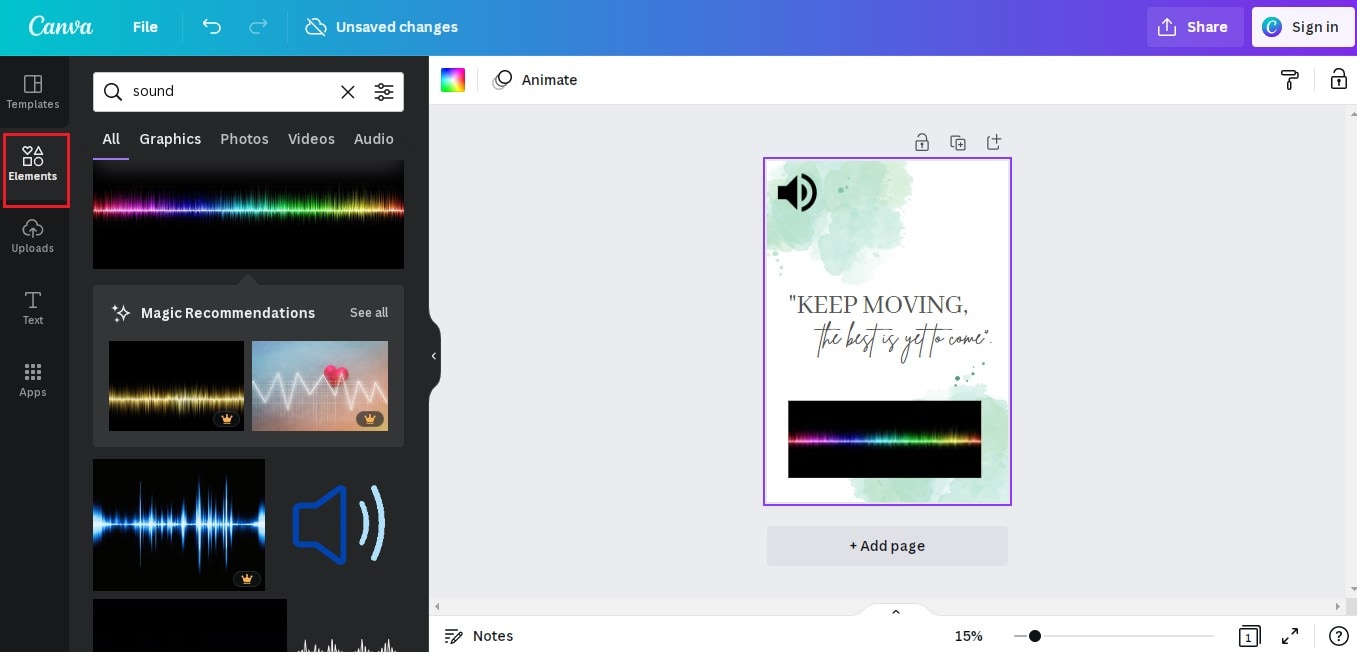
Step2 Designing of Background Photo
- Now it’s time to do some editing on the background.
- Go to “Elements” and find the stickers, graphics, or photos suitable for your podcast visualizer.
- You can also use sound waves by clicking the “Video” button.
Step3 Upload Audio File
- Go to “Uploads” and import your audio file.
- Once imported, drag your audio file to the background photo to add it.
Step4 Download the Audio Visualizer
- Finally, press the “Share” button and select the “Download” button.
- Make sure to download it in mp4 format.
Conclusion
The popularity of podcasts is evident in why people are into this business. However, if you want a professional look at your podcasts, podcast visualizers are the key. We have discussed in detail the best podcast visualizer. We hope you have found the one.
If you find this article helpful, let us know in the comment section. Also, please share this article with your friends and colleagues.
Also read:
- No-Cost Memes Made Simple Our Meme Kit
- Best Camera Stabilizers for YouTubers for 2024
- Reactivate and Enhance Photo Viewing with Ease (Win 11)
- [New] Aerial Device Typologies
- The First Steps to Creating a Successful Online Stream
- Wowza Review and Alternative
- Whip Up Witty Cartoons
- 14 Top Metaverse Initiatives Revealing Potential Futures for 2024
- Breakthrough Vloggers Reviewed The Best 15 YouTube Channels for Product Reviews
- 2024 Approved Building Your Brand on Instagram The Top 9 Actions of Industry Stars
- Mastering Shades Core Methods for PHOTOS
- Strategies for Stabilizing Drone Footage
- 2024 Approved Budget-Savvy Shoppers' Guide to Panoramic Recording Tech
- Unraveling the Mystery of Non-Exporting SRT in Premiere
- Online Image Enhancement Melodic Twist
- In 2024, Appreciation Roundup Premium/Free Outro Templates
- A Step-by-Step Journey to Revamping Your Win11 Look
- Navigating the Free Path of FCP
- [New] Compilation of Top Mobile Photo & Film Editors
- Pinnacle Gold Text Rendering in Top 8 3D Web Spaces
- Top 8 Criteria When Expanding Your 4K Setup
- 2024 Approved Beginner's Bounty Understanding Screen Clarity in Digital Media
- Top Screen Picks for Professional Image Enhancers
- Unlocking Windows 11'S Visual Capabilities with Auto HDR Mode Activation
- The Ultimate Blueprint to Fullscreen Brilliance in Adobe Premiere
- Grab Tailor-Made, Cost-Free Outro Videos
- Ultimate Guide - Top 10 Blenders Transforming Home Podcast Studios
- PowerDirector 2024 In-Depth Guidebook
- 2024 Approved Best 20 Anime Openers' Anthems in Order
- In 2024, Beyond the Screen Top Periscope Substitutes for Smartphones
- Harnessing iPhone's Power for Dynamic Range Shots
- [New] Boxed Bliss Reinventing the Art of First Contacts
- Mastermakers Ranking the Top 5 Digital Titling Pros
- 2024 Approved Comprehensive Guide to Drone Visuals
- Mastering Digital Compositing A Complete Kinemaster Green Screen Tutorial
- [Updated] Blast From the Past Top 1980S VHS Techniques to Infect Your Edits with Flair
- In 2024, Conveniently Altering Resolution on iOS Devices
- Hubsan X4 Quadcopter Examination An In-Depth Guide
- Audio Aficionados' Quandary Pick Between Podcast and YouTube for 2024
- Mastering the Skies with Xiaomi's 4K Drone
- Become an Audio Trailblazer – Exclusive Vocal Change Techniques in Free Fire (Free) for 2024
- Reveal the True Colors Top 10 Apps that Cleanse Blurry Shots
- FFmpeg's Capabilities for Unaltered Audio Extraction
- Headset Face-Off Google's Simplicity and Samsung's Complexity
- [New] Combining YouTube Tunes and Film Vectors
- 2024 Approved Accelerated Windows Content Verification
- In 2024, Capture Natural Motion Blur for Pics
- Digital Pioneers Exploring the Six Surging in NFT Arts
- Speedy Fixes for Slow-Mo Videos in a Flash
- [Updated] Bringing YouTube Home to Your Instagram Story
- In 2024, A Complete Guide To OEM Unlocking on Vivo Y100i
- Here Are Some Reliable Ways to Get Pokemon Go Friend Codes For Vivo V27 | Dr.fone
- How to Loop Video in Canva for 2024
- How to Get and Use Pokemon Go Promo Codes On Oppo K11x | Dr.fone
- In 2024, Detailed guide of ispoofer for pogo installation On Samsung Galaxy Z Fold 5 | Dr.fone
- [Updated] IOS’s Best PS2 Emulation Software Guide
- In 2024, Top-Rated Online Aspect Ratio Calculators for Easy Conversion
- 2024 Approved Speedy Conversion of Insta Videos to Audio Files (Mp3)
- 2024 Approved Phone-Friendly Design The Importance of Aspect Ratio Considerations
- How to view MOV files on Galaxy A24 ?
- Unlock Nokia C12 Pro Phone Password Without Factory Reset Full Guide Here
- Updated 2024 Approved Best Free Video Special Effects Apps iOS & Android
- In 2024, Full Guide to Bypass OnePlus Nord CE 3 5G FRP
- 2024 Approved The Ultimate Blueprint for Assembling Engaging TikTok Videos
- How to Retrieve deleted photos on Infinix Note 30i
- [New] In 2024, Premier Platform Pictograms Captivating Evolve
- In 2024, Fixing Foneazy MockGo Not Working On Honor Magic 5 Lite | Dr.fone
- In 2024, Transform YouTube Live with These Must-Know Secrets
- Insta Zoom Mastery In and Out for Clearer Selfies for 2024
- Top Tools for Silencing Unwanted Sound in Podcasts and Recordings
- New Insights From the Top-Rated OGG Converters for 2024
- In 2024, Preparation to Beat Giovani in Pokemon Go For Nokia G310 | Dr.fone
- All About Factory Reset, What Is It and What It Does to Your Oppo Reno 9A? | Dr.fone
- [Updated] Navigating the New World of Facebook Updates for 2024
- [Updated] Step by Step Guide to Creating Compelling, Multi-Picture Insta Stories
- [Updated] Reimagine Virtual Participation Google Meet's Customizable Screenscape
- In 2024, What Does Jailbreaking Apple iPhone 12 Pro Max i Do? Get Answers here
- Ultimate Guide to the Best 10 Spotify Music Recorder Apps
- [New] In 2024, From Camera to Feed Instagram Video Upload on Desktop
- Enhancing Social Media Reach A Deep Dive Into Instagram & OBS Streaming
- Rhythm Reduction Techniques Efficiently Extracting Percussion From Songs Digitally
- [Updated] Navigating Instagram's Restrictions for Larger Posts for 2024
- Here Are Some Reliable Ways to Get Pokemon Go Friend Codes For Vivo Y36i | Dr.fone
- [New] Leading the Field in Remotely Recorded Content Creation for 2024
- 8 Solutions to Solve YouTube App Crashing on Vivo Y28 5G | Dr.fone
- New 2024 Approved How to Change Quicktime Player Speed on Mac?
- Updated 2024 Approved Achieve Film-Quality Video A Step-by-Step Guide to Final Cut Pro X
- In 2024, Unlock the Potential of Facebook Livestreams with Professional Wirecast
- In 2024, Remove the Lock Screen Fingerprint Of Your Motorola G24 Power
- What You Want To Know About Two-Factor Authentication for iCloud From your Apple iPhone 14 Pro
- In 2024, Ultimate Guide to Catch the Regional-Located Pokemon For Apple iPhone 14 Pro | Dr.fone
- [New] 2024 Approved Delight in These Top 10 Insta Memes That Spark Joy & Sobs
- A Complete Guide To OEM Unlocking on Oppo Reno 10 Pro 5G
- Streamline Your Gameplay Memory with These 6 Steps
- Title: Exploring Today's Best Podcast Animators
- Author: Mark
- Created at : 2024-05-24 09:19:24
- Updated at : 2024-05-25 09:19:24
- Link: https://extra-lessons.techidaily.com/exploring-todays-best-podcast-animators/
- License: This work is licensed under CC BY-NC-SA 4.0.
