In 2024, Assessing 64GB for Video File Storing Power
Assessing 64GB for Video File Storing Power
Memory cards and storage devices come in many sizes, just as grocery store bags come in various sizes for transporting customers’ food, and each user will choose which size to purchase. Each user will consider various criteria while making this decision, including the size of the videos they intend to save on the SD card.
How much video can 64GB hold?
Based on the normal video resolution of 4k at 60fps, a 64GB storage device can keep more than 1 hour and 20 minutes of video time.
A 64GB storage device can hold more than 1 hour and 37 minutes of video at a resolution of 2.7k at 120fps. On a 64GB memory card, recording at a resolution of 1080p at 60fps allows for around 5 hours of video time.
 Forex Robotron Basic Package
How much video can 128GB hold?
A 128GB memory card may carry about 75 or 76 videos if each film is only 3 minutes long.
The data rate of movies is generally influenced by the format and codec of the videos. When this happens, the time it takes for a memory card of that capacity to fill up can be affected. A normal 128GB memory card should be able to hold up to 24 hours of video at 1080p HD. That data rate must be 8.85MB/s for this to happen.
A normal 128GB memory card should be able to hold up to 24 hours of footage at 1080p at 4k resolution. That data rate must be 8.85MB/s for this to happen. A standard 128GB memory card can hold up to 48 hours of film at 720p at 4k resolution. A data rate of roughly 4.42MB/s is also required.
How to save more video on 64GB/128GB space?
Try Wondershare Filmora if you wish to compress video files. It has the potential to be the greatest video shrinker on the market. It can play practically any video or music file format (Check the supported format list). It allows you to fast and easily reduce the size of large or high-resolution videos to match your device’s capacity or display screen. Now I’ll show you how to reduce the size of video files by altering video resolution, bit rate, and frame rate, among other factors. You may get this easy video editor right now and follow along.
 OtsAV TV Webcaster
Step 1: Import the file
Click the “Import” button in the top-left corner of Filmora to import the video you want, or drag it from your computer to the User’s Album. Then drag the newly added video from the User’s Album to the timeline’s video track.

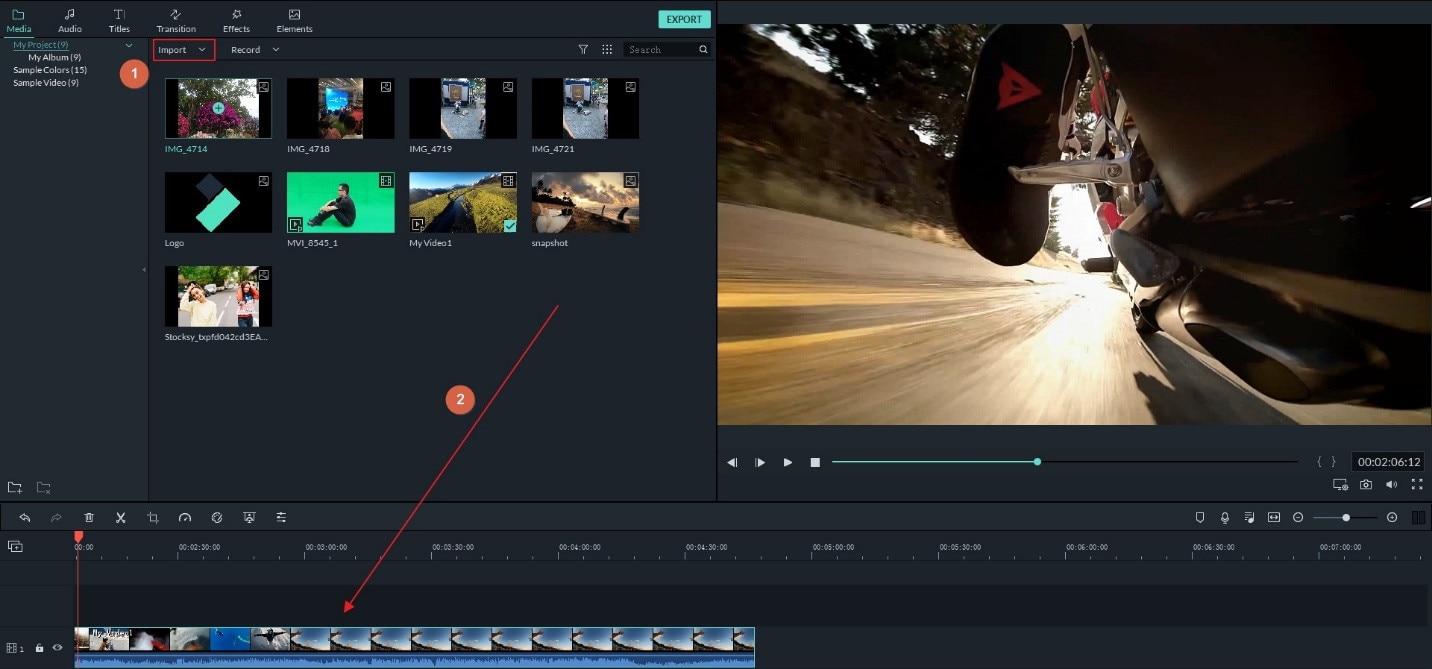
Step 2: Reduce file size
To open the output window of this video shrinker, click the “Export” button.
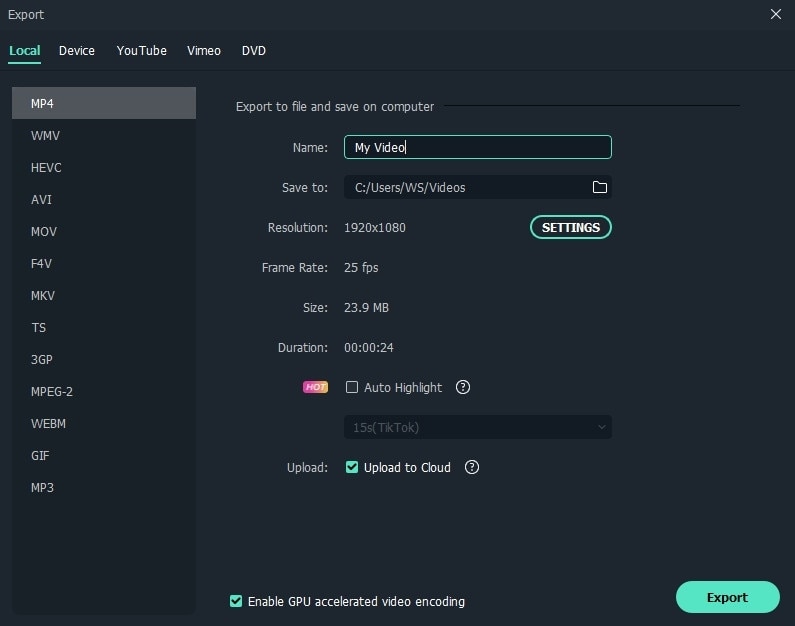
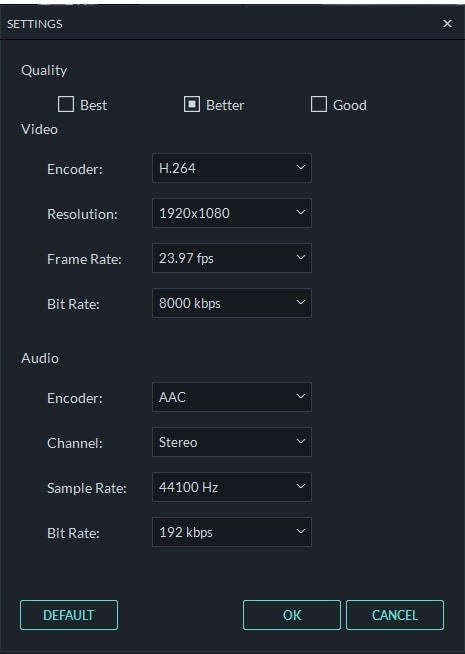
Go to the Format tab and set the output to the original video format. Then, in the “Settings” panel, click the triangle button below to downsize the video by selecting a lower video resolution, frame rate, or bit rate. If the video format is not important to you, you can choose from various formats such as FLV, MP4, and others, which produce lower files.
 SwifDoo PDF Perpetual (1 PC) Free upgrade. No monthly fees ever.
Step 3: Export the file
Now press the Export button to create a considerably smaller file. When it’s finished, click “find target” to acquire the compressed file, which you can then freely share with your friends.
The strategy described above is simply one way to reduce the size of a video file during Export. You can also crop out the video frame or change the frame scale to lower the video size.

More tools to make video smaller

1. Shotcut
Compatibility: Windows/Mac/Linux
Shotcut is another popular solution for consumers wishing to reduce the size of videos without spending any money. Shotcut is more of a video editor than a viewer, and it provides a lot of complex editing features.
You can easily compress video files with Shotcut.
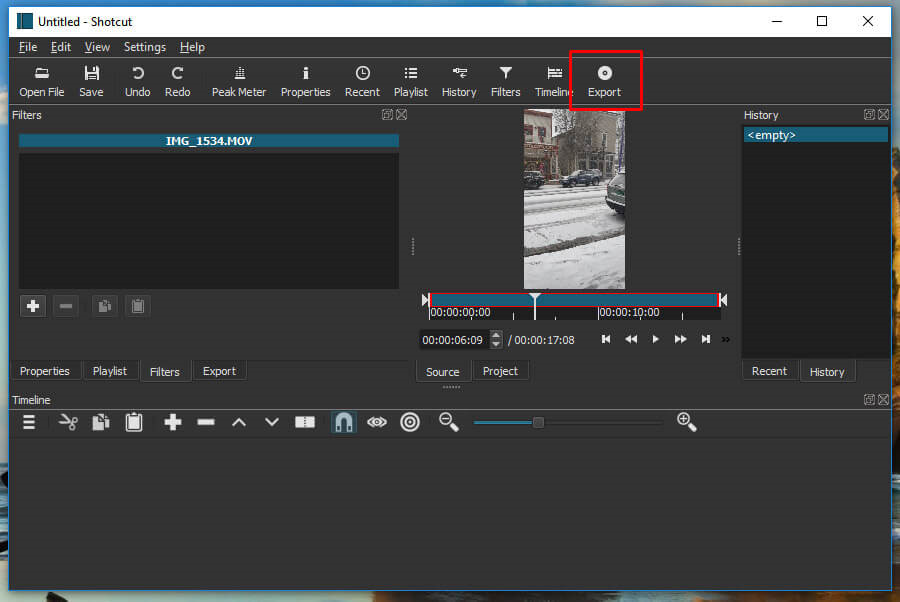
Step 1: Download Shotcut and import the file
Download and install Shotcut when you’re finished, open Shotcut, and choose Open File to view your video. Click Export in the window’s top-right corner to save it in a new file format.
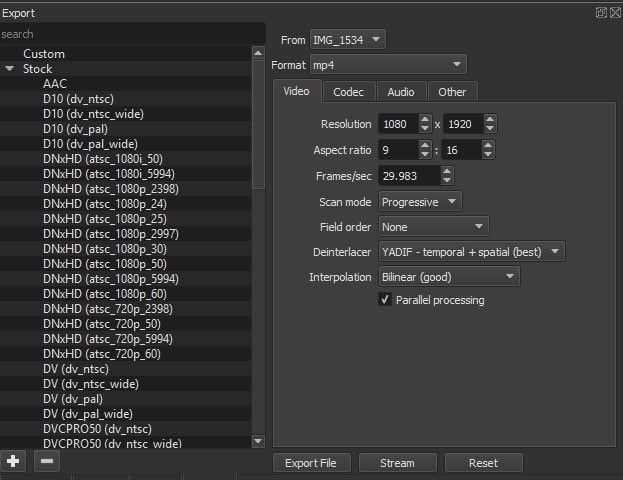
Step 2: Compress the file
You’ll then be presented with a long choice of compression options from which to choose.
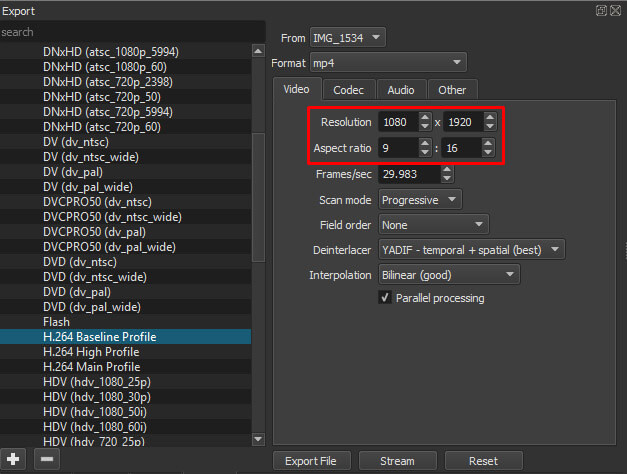
Baseline Profile is a decent choice in general. This format will most likely shrink your video without losing too much quality.
As you can see, there are a variety of compression settings. Feel free to experiment with some of them to see how small they can make your file. The baseline is your best bet in general.
Step 3: Adjust the resolution and Export the file.
You can change the resolution or aspect ratio variables to change the video’s size.

 Any DRM Removal for Win:Remove DRM from Adobe, Kindle, Sony eReader, Kobo, etc, read your ebooks anywhere.
2. Veed.io

Compatibility: Online
If you don’t want to install or use an app on your computer, many websites will allow you to submit a video file and compress it for you. Some of these services demand registration, others charge a monthly fee (or place a watermark on your movie), and others are free and only require a video file.
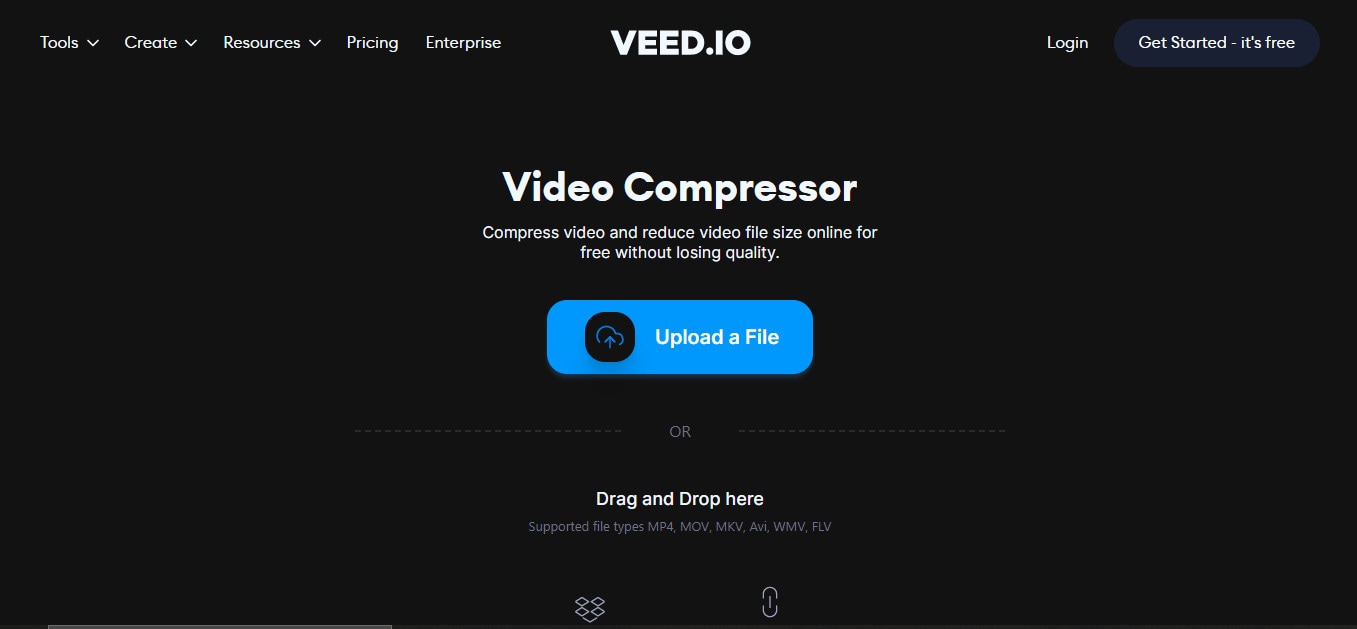
VEED.IO is the first service we’ll look at. VEED provides a simple video compression tool for free as part of its video editing tools. It works on both Windows and Mac, and it runs entirely within your browser, so no software is required.
Step 1: Import file:
Open the web browser and open the veed.io video compressor. Import the video file by clicking on ‘Upload a file.’
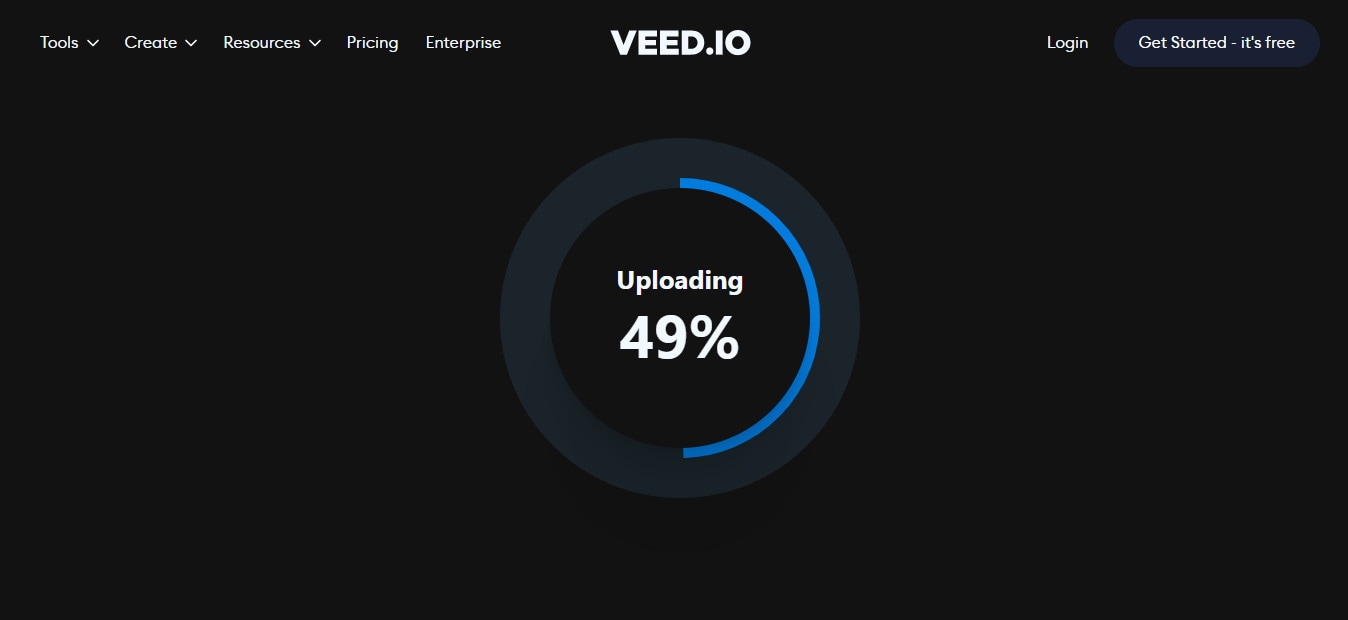
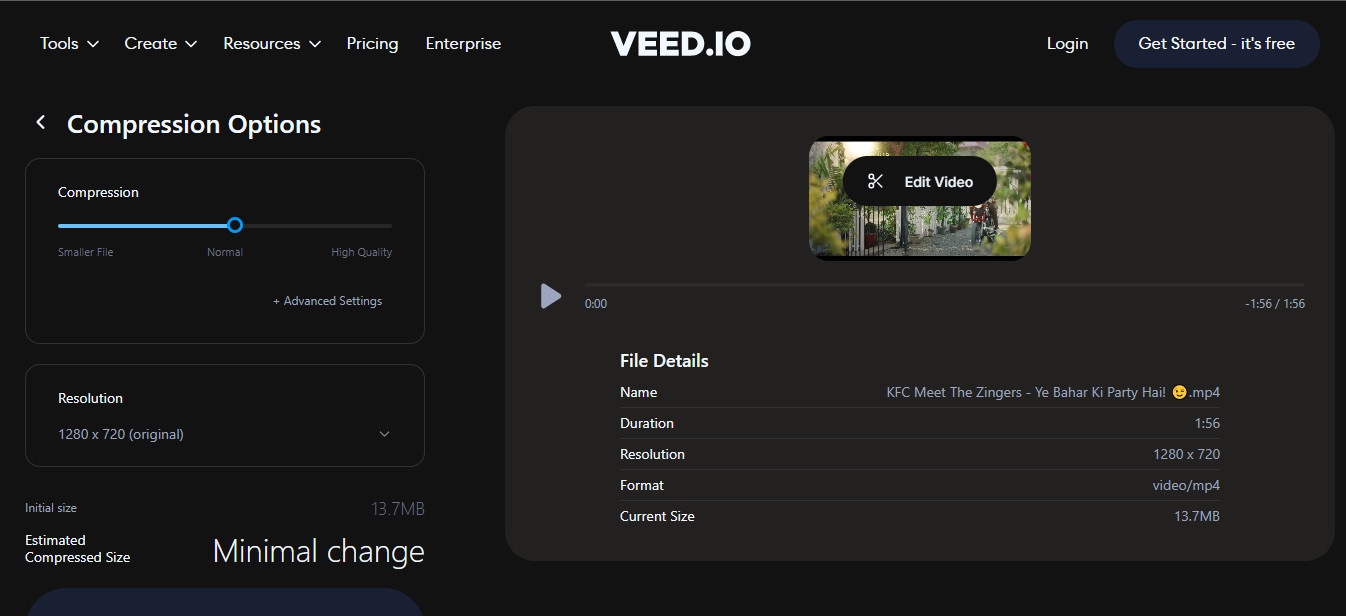
Step 2: Compress the file.
Once your video file is uploaded, you will see the file compressing options on the screen. You can compress the file to the size that you want.
It is to note that the video file size can be reduced to half depending on the length and quality of the video.
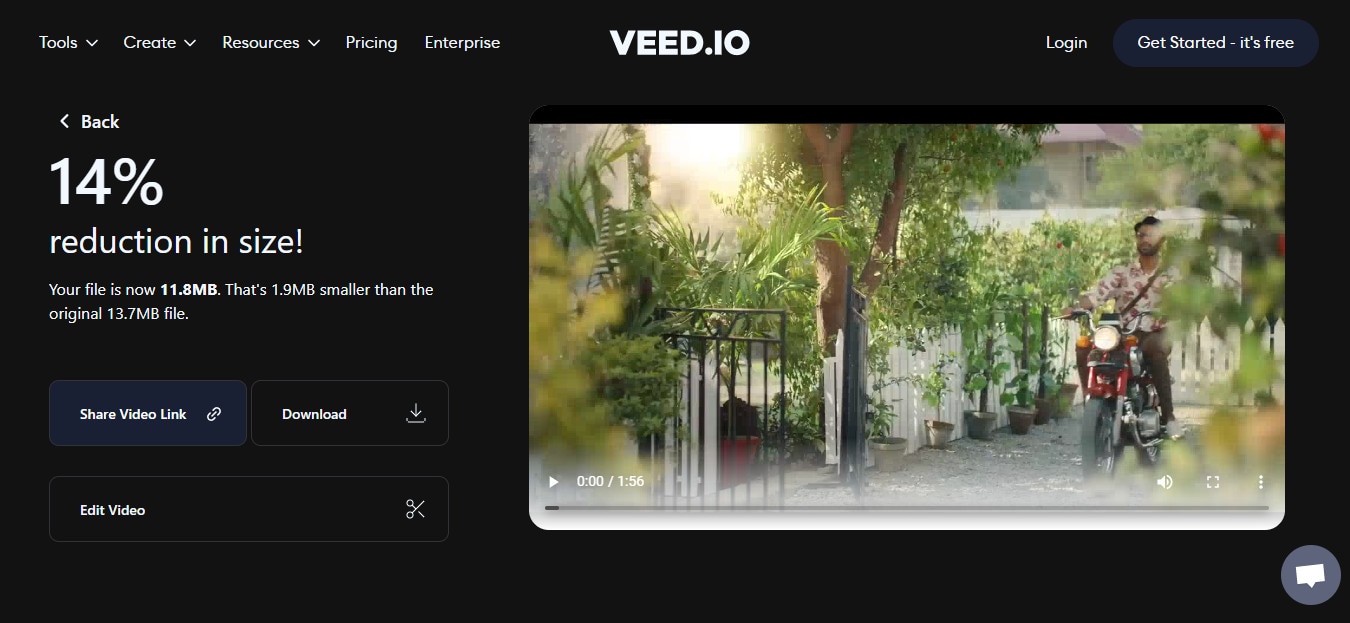
Step 3: Compress and export the file.
Click on ‘Compress file’ and wait until the video file is compressed to your preferred size. You can export the file by sharing the video link or downloading the video on your device.

Note: The compression time might vary depending on the quality and size of the file. Also, you might have to compromise on video quality to compress the video file using veed.io.
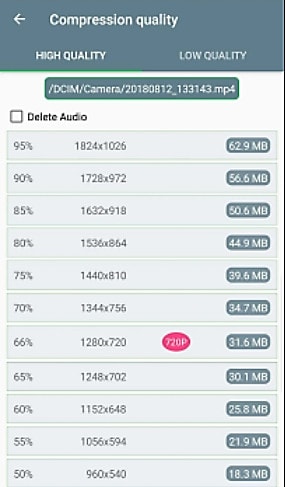
3. Video Compressor
Compatibility: Android
Last but not least, the Fast Video Compressor can compress both videos and photos. This tool compresses low, normal, or high-quality files in batches. You can compress a folder or a single file. Aside from that, this tool allows you to trim videos, extract MP3 files from them, and share them. Furthermore, its user interface is simple and basic.
Step 1: Download the app.
Open the Google Play Store on Android, download the video compressor, and install it.
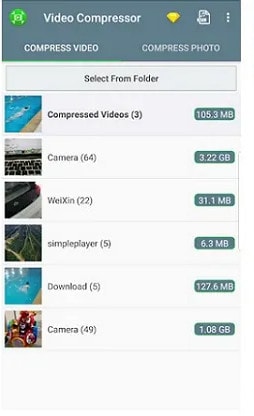
Step 2: Click on “Select on Folder” on the top to import the file.
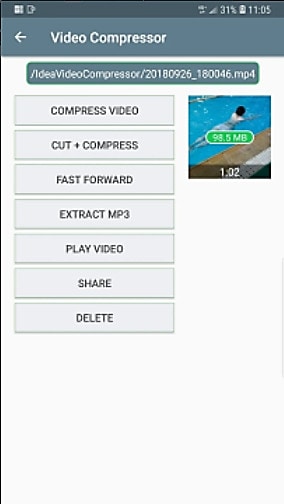
Step 3: Once you have imported the video file you want to compress, select the percentage and quality of the video you prefer.
Step 4: You can export the compressed file by clicking on the option in the top-left corner of the screen.
 vMix 4K - Software based live production. vMix 4K includes everything in vMix HD plus 4K support, PTZ control, External/Fullscreen output, 4 Virtual Outputs, 1 Replay, 4 vMix Call, and 2 Recorders.
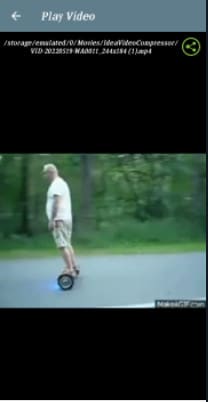
A wide range of softwares and applications help with video compressing features for free. Choose the right that is compatible with your device.

Step 1: Import the file
Click the “Import” button in the top-left corner of Filmora to import the video you want, or drag it from your computer to the User’s Album. Then drag the newly added video from the User’s Album to the timeline’s video track.
Step 2: Reduce file size
To open the output window of this video shrinker, click the “Export” button.
Go to the Format tab and set the output to the original video format. Then, in the “Settings” panel, click the triangle button below to downsize the video by selecting a lower video resolution, frame rate, or bit rate. If the video format is not important to you, you can choose from various formats such as FLV, MP4, and others, which produce lower files.
Step 3: Export the file
Now press the Export button to create a considerably smaller file. When it’s finished, click “find target” to acquire the compressed file, which you can then freely share with your friends.
The strategy described above is simply one way to reduce the size of a video file during Export. You can also crop out the video frame or change the frame scale to lower the video size.
More tools to make video smaller
1. Shotcut
Compatibility: Windows/Mac/Linux
Shotcut is another popular solution for consumers wishing to reduce the size of videos without spending any money. Shotcut is more of a video editor than a viewer, and it provides a lot of complex editing features.
You can easily compress video files with Shotcut.
Step 1: Download Shotcut and import the file
Download and install Shotcut when you’re finished, open Shotcut, and choose Open File to view your video. Click Export in the window’s top-right corner to save it in a new file format.
Step 2: Compress the file
You’ll then be presented with a long choice of compression options from which to choose.
Baseline Profile is a decent choice in general. This format will most likely shrink your video without losing too much quality.
As you can see, there are a variety of compression settings. Feel free to experiment with some of them to see how small they can make your file. The baseline is your best bet in general.
Step 3: Adjust the resolution and Export the file.
You can change the resolution or aspect ratio variables to change the video’s size.
2. Veed.io
Compatibility: Online
If you don’t want to install or use an app on your computer, many websites will allow you to submit a video file and compress it for you. Some of these services demand registration, others charge a monthly fee (or place a watermark on your movie), and others are free and only require a video file.
VEED.IO is the first service we’ll look at. VEED provides a simple video compression tool for free as part of its video editing tools. It works on both Windows and Mac, and it runs entirely within your browser, so no software is required.
Step 1: Import file:
Open the web browser and open the veed.io video compressor. Import the video file by clicking on ‘Upload a file.’


Step 2: Compress the file.
Once your video file is uploaded, you will see the file compressing options on the screen. You can compress the file to the size that you want.
It is to note that the video file size can be reduced to half depending on the length and quality of the video.

Step 3: Compress and export the file.
Click on ‘Compress file’ and wait until the video file is compressed to your preferred size. You can export the file by sharing the video link or downloading the video on your device.
Note: The compression time might vary depending on the quality and size of the file. Also, you might have to compromise on video quality to compress the video file using veed.io.
3. Video Compressor
Compatibility: Android
Last but not least, the Fast Video Compressor can compress both videos and photos. This tool compresses low, normal, or high-quality files in batches. You can compress a folder or a single file. Aside from that, this tool allows you to trim videos, extract MP3 files from them, and share them. Furthermore, its user interface is simple and basic.
Step 1: Download the app.
Open the Google Play Store on Android, download the video compressor, and install it.
Step 2: Click on “Select on Folder” on the top to import the file.
Step 3: Once you have imported the video file you want to compress, select the percentage and quality of the video you prefer.

Step 4: You can export the compressed file by clicking on the option in the top-left corner of the screen.
A wide range of softwares and applications help with video compressing features for free. Choose the right that is compatible with your device.
Step 1: Import the file
Click the “Import” button in the top-left corner of Filmora to import the video you want, or drag it from your computer to the User’s Album. Then drag the newly added video from the User’s Album to the timeline’s video track.

Step 2: Reduce file size
To open the output window of this video shrinker, click the “Export” button.
 ZoneAlarm Pro Antivirus + Firewall NextGen
Go to the Format tab and set the output to the original video format. Then, in the “Settings” panel, click the triangle button below to downsize the video by selecting a lower video resolution, frame rate, or bit rate. If the video format is not important to you, you can choose from various formats such as FLV, MP4, and others, which produce lower files.

Step 3: Export the file
Now press the Export button to create a considerably smaller file. When it’s finished, click “find target” to acquire the compressed file, which you can then freely share with your friends.
The strategy described above is simply one way to reduce the size of a video file during Export. You can also crop out the video frame or change the frame scale to lower the video size.
More tools to make video smaller
1. Shotcut
Compatibility: Windows/Mac/Linux
Shotcut is another popular solution for consumers wishing to reduce the size of videos without spending any money. Shotcut is more of a video editor than a viewer, and it provides a lot of complex editing features.
You can easily compress video files with Shotcut.
Step 1: Download Shotcut and import the file
Download and install Shotcut when you’re finished, open Shotcut, and choose Open File to view your video. Click Export in the window’s top-right corner to save it in a new file format.
Step 2: Compress the file
You’ll then be presented with a long choice of compression options from which to choose.
Baseline Profile is a decent choice in general. This format will most likely shrink your video without losing too much quality.
As you can see, there are a variety of compression settings. Feel free to experiment with some of them to see how small they can make your file. The baseline is your best bet in general.
Step 3: Adjust the resolution and Export the file.
You can change the resolution or aspect ratio variables to change the video’s size.
 OtsAV DJ Pro
2. Veed.io
Compatibility: Online
If you don’t want to install or use an app on your computer, many websites will allow you to submit a video file and compress it for you. Some of these services demand registration, others charge a monthly fee (or place a watermark on your movie), and others are free and only require a video file.
VEED.IO is the first service we’ll look at. VEED provides a simple video compression tool for free as part of its video editing tools. It works on both Windows and Mac, and it runs entirely within your browser, so no software is required.
Step 1: Import file:
Open the web browser and open the veed.io video compressor. Import the video file by clicking on ‘Upload a file.’
Step 2: Compress the file.
Once your video file is uploaded, you will see the file compressing options on the screen. You can compress the file to the size that you want.
It is to note that the video file size can be reduced to half depending on the length and quality of the video.
Step 3: Compress and export the file.
Click on ‘Compress file’ and wait until the video file is compressed to your preferred size. You can export the file by sharing the video link or downloading the video on your device.
Note: The compression time might vary depending on the quality and size of the file. Also, you might have to compromise on video quality to compress the video file using veed.io.

3. Video Compressor
Compatibility: Android
Last but not least, the Fast Video Compressor can compress both videos and photos. This tool compresses low, normal, or high-quality files in batches. You can compress a folder or a single file. Aside from that, this tool allows you to trim videos, extract MP3 files from them, and share them. Furthermore, its user interface is simple and basic.
Step 1: Download the app.
Open the Google Play Store on Android, download the video compressor, and install it.
Step 2: Click on “Select on Folder” on the top to import the file.
Step 3: Once you have imported the video file you want to compress, select the percentage and quality of the video you prefer.

Step 4: You can export the compressed file by clicking on the option in the top-left corner of the screen.
A wide range of softwares and applications help with video compressing features for free. Choose the right that is compatible with your device.
 vMix Basic HD - Software based live production. vMix Basic HD includes 4 inputs, 3 cameras, streaming, recording, playlist.
Step 1: Import the file
Click the “Import” button in the top-left corner of Filmora to import the video you want, or drag it from your computer to the User’s Album. Then drag the newly added video from the User’s Album to the timeline’s video track.
 EmEditor Professional (Lifetime License, non-store app)
Step 2: Reduce file size
To open the output window of this video shrinker, click the “Export” button.
Go to the Format tab and set the output to the original video format. Then, in the “Settings” panel, click the triangle button below to downsize the video by selecting a lower video resolution, frame rate, or bit rate. If the video format is not important to you, you can choose from various formats such as FLV, MP4, and others, which produce lower files.
Step 3: Export the file
Now press the Export button to create a considerably smaller file. When it’s finished, click “find target” to acquire the compressed file, which you can then freely share with your friends.
The strategy described above is simply one way to reduce the size of a video file during Export. You can also crop out the video frame or change the frame scale to lower the video size.
More tools to make video smaller
1. Shotcut
Compatibility: Windows/Mac/Linux
Shotcut is another popular solution for consumers wishing to reduce the size of videos without spending any money. Shotcut is more of a video editor than a viewer, and it provides a lot of complex editing features.
You can easily compress video files with Shotcut.
Step 1: Download Shotcut and import the file
Download and install Shotcut when you’re finished, open Shotcut, and choose Open File to view your video. Click Export in the window’s top-right corner to save it in a new file format.
 PCDJ DEX 3 for Windows & MAC is the total entertainment DJ software solution, offering audio, video, and karaoke mixing ability. Automatic beat-sync, smart looping, 4 decks, DJ MIDI controller support, Karaoke Streaming and much more.
Step 2: Compress the file
You’ll then be presented with a long choice of compression options from which to choose.

Baseline Profile is a decent choice in general. This format will most likely shrink your video without losing too much quality.
As you can see, there are a variety of compression settings. Feel free to experiment with some of them to see how small they can make your file. The baseline is your best bet in general.
Step 3: Adjust the resolution and Export the file.
You can change the resolution or aspect ratio variables to change the video’s size.
2. Veed.io
 Lyric Video Creator Professional Version
Compatibility: Online
If you don’t want to install or use an app on your computer, many websites will allow you to submit a video file and compress it for you. Some of these services demand registration, others charge a monthly fee (or place a watermark on your movie), and others are free and only require a video file.
VEED.IO is the first service we’ll look at. VEED provides a simple video compression tool for free as part of its video editing tools. It works on both Windows and Mac, and it runs entirely within your browser, so no software is required.
Step 1: Import file:
Open the web browser and open the veed.io video compressor. Import the video file by clicking on ‘Upload a file.’
Step 2: Compress the file.
Once your video file is uploaded, you will see the file compressing options on the screen. You can compress the file to the size that you want.
It is to note that the video file size can be reduced to half depending on the length and quality of the video.
Step 3: Compress and export the file.
Click on ‘Compress file’ and wait until the video file is compressed to your preferred size. You can export the file by sharing the video link or downloading the video on your device.
Note: The compression time might vary depending on the quality and size of the file. Also, you might have to compromise on video quality to compress the video file using veed.io.

3. Video Compressor
Compatibility: Android
Last but not least, the Fast Video Compressor can compress both videos and photos. This tool compresses low, normal, or high-quality files in batches. You can compress a folder or a single file. Aside from that, this tool allows you to trim videos, extract MP3 files from them, and share them. Furthermore, its user interface is simple and basic.
Step 1: Download the app.
Open the Google Play Store on Android, download the video compressor, and install it.
Step 2: Click on “Select on Folder” on the top to import the file.

Step 3: Once you have imported the video file you want to compress, select the percentage and quality of the video you prefer.
Step 4: You can export the compressed file by clicking on the option in the top-left corner of the screen.
A wide range of softwares and applications help with video compressing features for free. Choose the right that is compatible with your device.
- Title: In 2024, Assessing 64GB for Video File Storing Power
- Author: Mark
- Created at : 2024-07-26 19:53:22
- Updated at : 2024-07-27 19:53:22
- Link: https://extra-lessons.techidaily.com/in-2024-assessing-64gb-for-video-file-storing-power/
- License: This work is licensed under CC BY-NC-SA 4.0.