
"IPhone/iPad Masterclass Crafting Engaging Interview and Exploration Podcasts"
IPhone/iPad Masterclass: Crafting Engaging Interview and Exploration Podcasts
Record a Podcast on the iPhone is the solution to your problems. The best way to come in front of an audience with your videos is all set in this article.
You will find the best app to record podcasts with affordable equipment in this blog. Then you can enjoy your next with your audience.
In the ongoing lines, you’ll learn about hidden tips and tricks to record a podcast on iPhone and iPad with video explanations. So please stick with us to the end!
But First: Getting Equipped Before Recording a Podcast on an iPhone
Have you decided to record a podcast? Then to create a fantastic podcast, you don’t need a professional studio or bundle of recording equipment. Your iPhone or iPad is special recording equipment if you’re new to podcasting. It is also a super-compact setup during traveling. Ensure that you are equipped with all mentioned in the checklist below:
External Microphone
Every phone has an inbuilt microphone that can be used to record audio for your podcast if you are in a hurry. Unfortunately, it can’t record sound in high definition, even in a medium like podcasting. When audio is the main focus, listeners will rapidly stop listening if your recording is subpar.
Using an external microphone when recording into an iPhone or iPad is the most effective approach to improve your audio. However, several options in the RØDE series connect directly to your phone and give crystal-clear music.
Are you looking for more versatile options? Then check below the list of External Microphones:
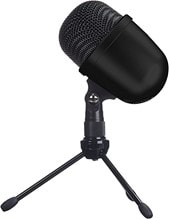
Amazon Basics Mini USB Condenser Microphone for Podcast is a Desktop mini microphone with a unidirectional pick-up pattern. It can achieve excellent sound quality and Works with Skype, Messages, FaceTime, Twitch, and YouTube.
Features
- USB connectivity and connector type
- Low weight (0.5 pounds)
- Include a 3-legged adjustable desktop stand
What you will get
- Polar pattern: Unidirectional
- Microphone form: Mini
- USB cable: 4.9 foot
- Price: $38.69 Amazon
2. Elgato Wave:3 USB condenser Microphone
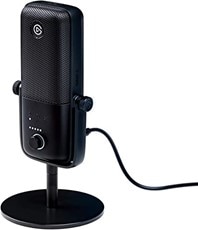
Elgato Wave:3 is a premium microphone and digital mixing company that provides plug-and-play convenience with broadcast-grade circuitry. Speech is precisely recorded using this microphone’s condenser capsule with a crisp cardioid polar pattern. It can be easily attached to iPhones and iPad.
Features
- Auxiliary and USB connectivity
- Provided USB Type C connector
- Up to 24-bit / 96kHz analog to digital conversion provides extraordinary details.
- Unidirectional polar pattern
What you will get
- Additional components: Wave:3, USB-C Cable, Desktop Stand, Boom Arm Adapter, Quick Start Guide
- Audio sensitivity: 15 dB
- Technology: Clipguard technology gives distortion virtually impossible
- Price: $149.99 Amazon
3. Saramonic Lavalier Microphone
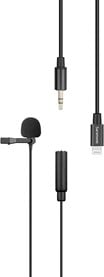
Saramonic has been Specialising in High-Quality Musical Instruments for the last ten years. It provides an Ultra-compact clip-on lavalier microphone that records rich, broadcast-quality sound and connects straight to the Lightning connector of an Apple iPhone or iPad.
Features
- The omnidirectional pickup pattern captures the sound equally in each direction.
- A detachable lightning adapter with a male 3.5mm plug
- Includes a foam windshield to muffle wind noise and an alligator-style microphone clip that firmly fastens to collars and other clothes.
What you will get
- Connector: Present in all devices with Lightning ports that support iOS 10 or later
- Connectivity: Auxiliary
- Additional items:
- 1 x LavMicro U1A Lavalier Microphone with 6.56’ (2m) Cable
- Gold-Plated Female 3.5mm Connector
- 1 x LavMicro U1 (SR-C2000) Gold-Plated
- 5mm Male to Lightning Male Adapter 9” (230mm)
- 1 x Alligator-Style Mic Clip
- 1 x Foam Windscreen
- 1 x Storage Pouch with Locking Drawstring
- 1 x Reusable Cable Strap
- Audio sensitivity: 40 dB
- Price: $18.99 Amazon
Accessories
After selecting microphones, it’s time to check out how to manage with all other podcast accessories in an affordable range.
How do you check that you sound faint? The only accessory you need to check your sound, which will be delivered to your audience, is the Headphones. The given below are unique and top-quality headphones. Check out!
1. Audio Technica ATH-M20X Headphones
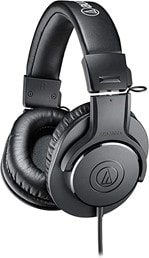
Audio Technica can expand the limits of audio technology, modifying an ever-changing purity of sound. It is modernly developed and engineering techniques designed for tracking and mixing in a studio. Also, it can improve low-frequency performance through tuning.
Features
- The circumaural design curves around the ears, providing superior sound isolation.
- 40-millimeter drivers with copper-clad aluminum wire voice coils and rare earth magnets
What you will get
- Connectivity Technology: Wired
- Form Factor: Over-Ear
- Simple single-side cable exit magnet Neodymium Designed for studio tracking and mixing.
- Price: $49.00 Amazon
You next need to adjust and place the microphone for good-quality audio capture. For this, a tabletop or tripod microphone is a fantastic option. Check out the below with extensive details!
2. Pyle Tabletop Microphone Stand

With its sturdy U-shaped die-casting iron base, the Pyle mic stand will offer stability and exact balance and prevent falling. As a result, it is an ideal professional mic stand for iPad applications.
Features
- Stable tripod leg base
- Convenient design for recording
- Have MIC holder
- Handheld Style
- Dimensions: 2 x 3 x 8.75 inches
- Price: $12.00 Amazon
Recording Software
After achieving all the accessories, selecting the best recording software is the right time. Choosing the best software might be confusing since many options exist for creating, editing, and publishing podcasts. Here is the list of the top 4 Recording apps for iPhone and iPad. Select which will fulfill your demands:
1. Voice Memos
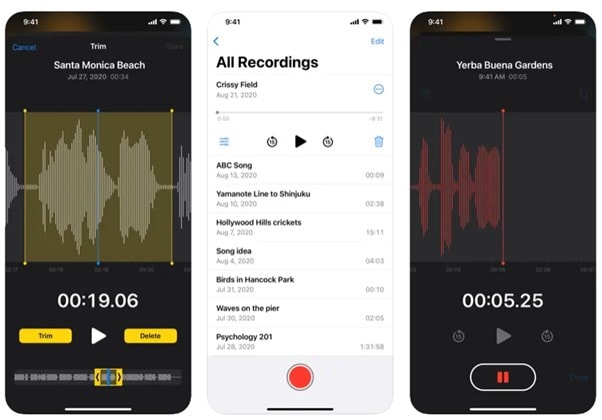
With Voice Memos, you can easily record and share podcasts on your iPhone or iPad. You may polish your recordings using editing tools like trim and replace. Additionally, with iCloud compatibility, you may record audio while on the road using an iOS device, then transfer the recordings to your Mac to further process them.
Features
- Record
- Use the internal microphone, a Bluetooth headset, or an external microphone that is suitable for recording.
- Decide if you want compressed or uncompressed audio formats.
- Edit
- Pinch-to-zoom for finer editing control.
- Trim your recordings so that you only save what you need.
- Replace and continue to edit your recordings with only one tap.
- Lower ambient noise and room reverberation efficiently.
- Organize
- Easily locate recordings using the search function.
- Using folders to arrange your recordings is simple.
- Add recordings to your favorite list so you can easily find them later.
- Listen and share
- Change the speed at which your recordings are played back, or leap 15 seconds forward or back.
- By analyzing your recordings, Skip Silence automatically fills in silences in your audio.
- Distribute numerous recordings simultaneously via AirDrop, Mail, Messages, and another service
2. GarageBand
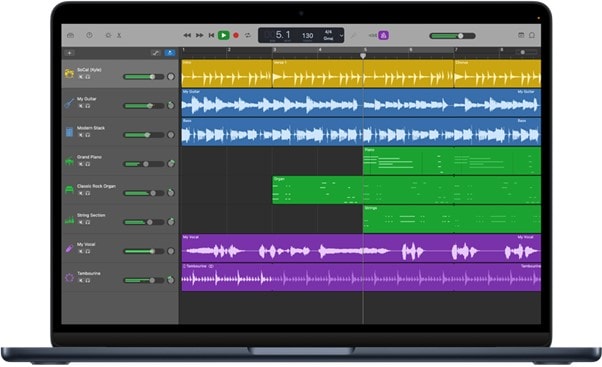
Regardless of where you are, playing, recording, and sharing music is simple with GarageBand for iOS.
Use a variety of instruments from across the globe. Additionally, you may explore and download from a sizable library of free sounds, loops, and samples compiled by some of the top producers in the world using the ever-expanding Sound Library.
Features
- A whole recording facility: Use any combination of loops, audio recordings, and Touch Instruments to create a whole podcast on GarageBand.
- Share through iCloud: You may load musical ideas into iCloud Drive, develop them on your Mac, and then share the completed product across your devices.
- The old tracks and the new ones you created in GarageBand are all present when you import the project back into Logic Pro.
- Share your podcast: You can easily share on social media platforms like YouTube, Instagram, or SoundCloud.
- Using AirDrop, you may even wirelessly share with someone nearby. Additionally, you have access to even more project-sharing possibilities through third-party developers thanks to built-in support for iOS 16 and the Files app.
If you own an iPhone or iPad, here are the third-party applications you should have for hidden voice recording.
Awesome Voice Recorder
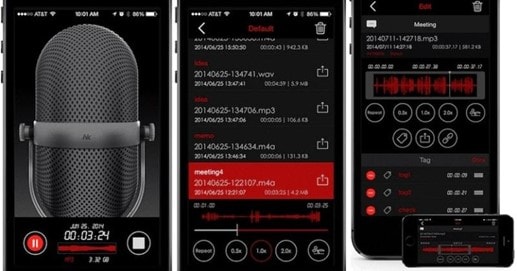
This one is the most incredible hidden voice recorder app for iPhone and iPad. It can record covertly in the background and has excellent recording quality. Moreover, the recordings can be saved in various audio file formats.
When the battery is low, there isn’t enough storage, or there are unexpected calls, the program safely stops recording. These are Awesome Voice Record’s main distinguishing characteristics.
Features
It is possible to record in the background while using other programs.
- Choose a recording format (mono or stereo) and the audio quality.
- It easily creates ringtones and displays a wave analyzer.
- It can minimize recording noise.
- It is organized well for simple searches.
- It is supported by Bluetooth, several varieties of file types, and Safe halt.
- Records should be kept on cloud platforms.
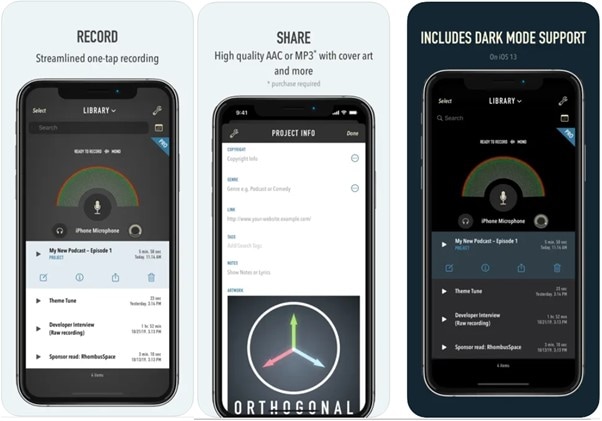
Ferrite is the multi-award-winning tool you need for recording podcasts. It combines a flexible multi-track editing studio with the simplicity of a “voice note“ audio recorder.
Vital tools like automation and effects are available when you need them. People worldwide are migrating to Ferrite because of its time-saving features and user interface that is intended to be unobtrusive.
● Recording streamlined
Tap the open Ferrite to start recording. It won’t cause a fuss or get hot, even during lengthy workouts. Just make sure you have enough free space on your device!
● The Snip of Editing
Full multi-track editing is available in Ferrite, from short edits to creating a finished podcast or broadcast package. Zoom out to quickly observe hours or zoom in to examine individual samples.
How To Record a Podcast on iPhone or iPad
You are all set and choose the best recording software. Now you will record a podcast on iPhone or an iPad. The ongoing lines will teach you from A-Z, and you’ll get an extraordinary result.
1. Record a Podcast in GarageBand
GarageBand is unquestionably the best program for you to use to create your podcast. But, unfortunately, there isn’t a portable, user-friendly workstation that you can always have with you.
Additionally, it includes every functionality required to satisfy podcasters’ demands. It’s doubtful that GarageBand won’t provide you with everything you need to record your complete podcast because so many podcast hosts use it frequently!
You can check out the video below if you face any bugs regarding the Recording of podcasts on iPhone or iPad by GarageBand. Because sometimes, watching is more precisely working than just reading lines.
2. How To Set up GarageBand
Step1 First of all, Setting Up Your GarageBand Project

Step2 Startup GarageBand. If this is your first time using it, choose “Empty Project” from the list of available project templates.
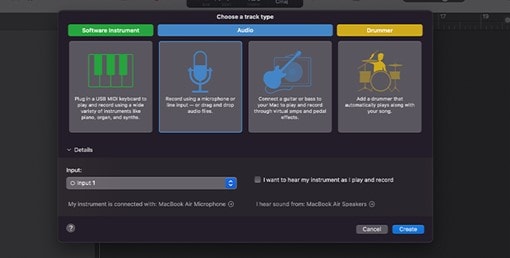
Step3 Then, a window asks what audio track you’ll be recording in the following step. Click “Create“ after selecting “Microphone“ and selecting the mic’s input. You will receive one audio track as a result.
![]()
Note: you are ready to start recording if you are utilizing one microphone. But let’s imagine you need to record with more than one microphone simultaneously (let’s say you’re the podcast presenter and you have a co-host or a guest). In that situation, you’ll need to create numerous tracks and choose the appropriate input for each. Each track should be for a different external microphone that you’re using.
● Podcast Recording in GarageBand
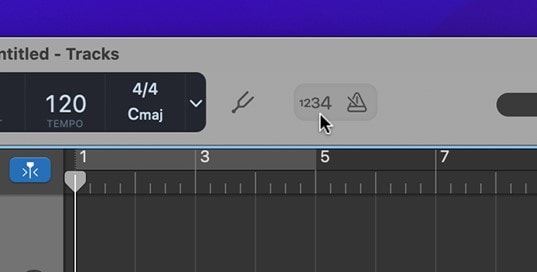
The project window will immediately dismiss when everything is prepared, and the workspace’s home page will appear. Be careful to disable the metronome and count-in features at the top before beginning to record podcasts.
- To ensure you maintain your settings and won’t modify them accidentally later, I suggest saving your settings before pressing the record button.
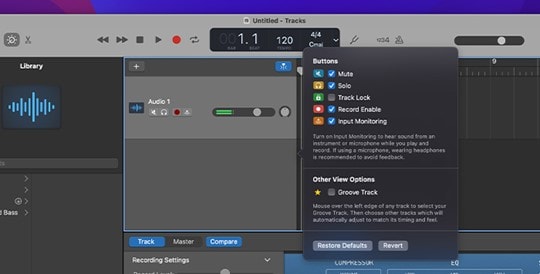
- You must adjust various audio track settings if you record podcasts using multiple microphones. Go to “Track / Configure Track Header” in the menu bar and choose “Record Enable.” You won’t need to do anything if you use one microphone to record podcasts.
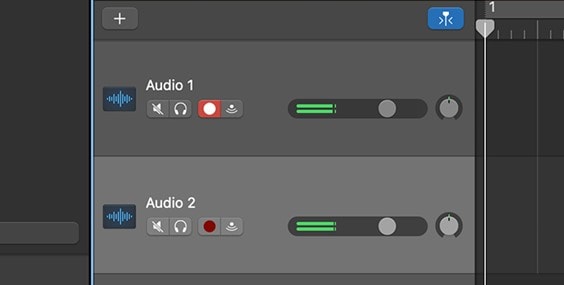
- Once everything is ready, choose each audio track used for recording by checking the record-enable box. That will become red when you press the record button in the menu bar, indicating that the tracks are prepared to capture your voice.
Top Tips For Podcasting With An iPhone
There is nothing much better than recording efficiently without any bugs. You’ll obviously be at the top position if you are consistent on your podcast. Now, it’s time to reveal top-secret tips for Podcasting with an iPhone. Don’t miss any points!
1. Turn on Airplane Mode or do not disturb mode
To record a podcast, you have to focus entirely on what you are doing. In this aspect, you have to cut off entirely from the externals. That’s why putting your iPhone or iPad in “Do not disturb’’ mode is essential. The “Airplane mode‘’ is also helpful in this regard.
Turning off these features will not affect any podcast steps.
2. Turn off Notifications
The distraction of any notification will disturb your recording tracks, increasing your recording time and causing bugs. That’s why putting your iPhone or iPad on “Turning Off Notifications” is the only way to get an efficient podcast.
3. Mount your iPhone to keep it secure
Holding your phone while recording may cause bumps, vibrations, or knocks to be picked up by the microphone and heard in your podcast. To keep your phone steady, we advise utilizing a tripod and grip.
4. Test your audio before
To determine how your audience will hear your podcast, test the audio on several speakers before recording the podcast. So, if you face any bugs, sort them out at the start so that you will get a refined podcast at the end.
5. Record in a quiet place
Recording your podcast in a room with less background noise is ideal, but it should not be required. This includes noise from air conditioners, fans, music, or noisy roommates, as well as traffic or pedestrian noise.
Additionally, pick a space with few reflecting surfaces since too much reflection will give your music an unpleasant, distant, echo-like feel. Reduce these reflections using carpets, rugs, drapes, and bookshelves to improve the quality of your podcast.
Final Words
You have it now! Recording a podcast at the start is not much difficult if you are following all the tips mentioned above and tricks.
This guide gives you every nook of information and the best-detailing equipment too. So if you are already recording a podcast and come to this article, switch these tricks and get the most effective result compared to the prior one.
All the equipment mentioned above is available at Amazon, and you should grab the features of GarageBand to get a fantastic podcast.
Free Download For Win 7 or later(64-bit)
Free Download For macOS 10.14 or later
2. How To Set up GarageBand
Step1 First of all, Setting Up Your GarageBand Project
Step2 Startup GarageBand. If this is your first time using it, choose “Empty Project” from the list of available project templates.
Step3 Then, a window asks what audio track you’ll be recording in the following step. Click “Create“ after selecting “Microphone“ and selecting the mic’s input. You will receive one audio track as a result.
![]()
Note: you are ready to start recording if you are utilizing one microphone. But let’s imagine you need to record with more than one microphone simultaneously (let’s say you’re the podcast presenter and you have a co-host or a guest). In that situation, you’ll need to create numerous tracks and choose the appropriate input for each. Each track should be for a different external microphone that you’re using.
● Podcast Recording in GarageBand
The project window will immediately dismiss when everything is prepared, and the workspace’s home page will appear. Be careful to disable the metronome and count-in features at the top before beginning to record podcasts.
- To ensure you maintain your settings and won’t modify them accidentally later, I suggest saving your settings before pressing the record button.
- You must adjust various audio track settings if you record podcasts using multiple microphones. Go to “Track / Configure Track Header” in the menu bar and choose “Record Enable.” You won’t need to do anything if you use one microphone to record podcasts.
- Once everything is ready, choose each audio track used for recording by checking the record-enable box. That will become red when you press the record button in the menu bar, indicating that the tracks are prepared to capture your voice.
Top Tips For Podcasting With An iPhone
There is nothing much better than recording efficiently without any bugs. You’ll obviously be at the top position if you are consistent on your podcast. Now, it’s time to reveal top-secret tips for Podcasting with an iPhone. Don’t miss any points!
1. Turn on Airplane Mode or do not disturb mode
To record a podcast, you have to focus entirely on what you are doing. In this aspect, you have to cut off entirely from the externals. That’s why putting your iPhone or iPad in “Do not disturb’’ mode is essential. The “Airplane mode‘’ is also helpful in this regard.
Turning off these features will not affect any podcast steps.
2. Turn off Notifications
The distraction of any notification will disturb your recording tracks, increasing your recording time and causing bugs. That’s why putting your iPhone or iPad on “Turning Off Notifications” is the only way to get an efficient podcast.
3. Mount your iPhone to keep it secure
Holding your phone while recording may cause bumps, vibrations, or knocks to be picked up by the microphone and heard in your podcast. To keep your phone steady, we advise utilizing a tripod and grip.
4. Test your audio before
To determine how your audience will hear your podcast, test the audio on several speakers before recording the podcast. So, if you face any bugs, sort them out at the start so that you will get a refined podcast at the end.
5. Record in a quiet place
Recording your podcast in a room with less background noise is ideal, but it should not be required. This includes noise from air conditioners, fans, music, or noisy roommates, as well as traffic or pedestrian noise.
Additionally, pick a space with few reflecting surfaces since too much reflection will give your music an unpleasant, distant, echo-like feel. Reduce these reflections using carpets, rugs, drapes, and bookshelves to improve the quality of your podcast.
Final Words
You have it now! Recording a podcast at the start is not much difficult if you are following all the tips mentioned above and tricks.
This guide gives you every nook of information and the best-detailing equipment too. So if you are already recording a podcast and come to this article, switch these tricks and get the most effective result compared to the prior one.
All the equipment mentioned above is available at Amazon, and you should grab the features of GarageBand to get a fantastic podcast.
Free Download For Win 7 or later(64-bit)
Free Download For macOS 10.14 or later
Also read:
- [New] Boost Your Sales Opening Plans
- [New] Craft a Compelling Metaverse Presence with These Tools
- [New] In 2024, Guide to Streamlined Subscription Links for Video Channels
- [New] Unveiling the Most Accessible, High-Quality Video Modification Sites
- [Updated] Personalize Your Viewing Experience Building a Google Cardboard VR Setup for 2024
- [Updated] Top Techniques for Professional-Looking IG Video Content for 2024
- 2024 Approved Adopting Inshot The Path to Improved Laptop Edits
- 2024 Approved Top Tier Photographic Archives
- Aural Alchemy Transforming iMovie Videos with Music for 2024
- Compare Metaverse Vs. Omniverse An Ultimate Guide
- Discover Your Preferred Music Experience - Top 6 Android Music Video Apps
- Gestionando Archivos AV1 en Premiere Pro: ¿Importación E Intercambio Exitosos?
- Immersive Home Theater Choosing the Best 3D Players
- In 2024, Best Wearable Action Cameras For Extreme Sport
- In 2024, How To Use Allshare Cast To Turn On Screen Mirroring On Honor 90 GT | Dr.fone
- P2715Q 4K Display Unveiled A Comprehensive Analysis
- Resolving Issues When physxloader.dll File Is Unavailable
- Troubleshooting Display Errors: Is Your Video Card to Blame for Color Glitches? | Tech Insights by YL Software
- Unveiling LG's Full HD, 27-Inch Monitor Features
- Title: IPhone/iPad Masterclass Crafting Engaging Interview and Exploration Podcasts
- Author: Mark
- Created at : 2024-12-08 18:22:08
- Updated at : 2024-12-14 18:59:25
- Link: https://extra-lessons.techidaily.com/iphoneipad-masterclass-crafting-engaging-interview-and-exploration-podcasts/
- License: This work is licensed under CC BY-NC-SA 4.0.