
"Photo-HDR Excellence Tips From the Pros"
Photo-HDR Excellence: Tips From the Pros
There’s no doubt HDR/High dynamic range images are now the latest trend amongst photographers. And as a result of that, the demand for HDR image creation/editing tools has become very massive.
Photoshop is one of the top HDR image creation/editing tools out there that offers quality assistance to photographers looking to create HDR images. However, not everyone is familiar with how to use the tool. Are you one of such folks? If yes, then this post is for you.
Today, we will walk you through the simple process of how to create HDR images in Photoshop without requiring technical knowledge. So, without wasting much of your time, let’s dive in to find out more.
- How to Create an Impressive HDRI in Photoshop
- Video guide to creating HDR images in Photoshop
- Best Photoshop HDR Alternatives to Create HDR images
Part 1: What is HDR Photoshop?
Photoshop is a very popular HDR image creation/editing tool that has been in the industry for quite a long time. This software provides users with efficient tools that can always come in handy to create, edit, and do lots more on HDR images seamlessly.
Designers and photographers can utilize Photoshop to create quality images as it offers advanced tools that they can utilize to improve their craft. Besides, the tool supports lots of rich image editing features that can not only be used to create HDR images, but also add drawings, effects, filters, and lots more to images without compromising output quality.
Photoshop Main Key Features for HDR
Color Channels
Photoshop supports a color channel tab where users can view shades added to images. Yes, there’s the RGB Mode (which consists of red, green, and blue) and other options including Lab or CYMK.
Layers
Users can execute drawing/design operations by using layers to draw different elements of the design. Then merge each layer according to the display. There’s even a pen tool that can be used to draw any shape. Thus allowing the designer to have full control over his/her flow of the design.
Hue & Saturation
Another notable feature in Photoshop is ‘Hue & Saturation. With this feature, users adjust image Hue and Saturation color, alter the richness of color, and maintain good intensity. This allows the image to look more natural and realistic.
Retouching Tools
The retouching tools on Photoshop comprise different tools including a redeye tool, healing tool, pattern stamp tool, spot healing tool, and lots more than can be used to correct images at an initial stage.
Having known the key features of Photoshop, let’s proceed to see how to create an impressive HDRI with it.
Part 2: How to Create an Impressive HDRI in Photoshop
Creating an impressive HDRI in Photoshop is not a difficult task. You don’t need any technical knowledge. Just follow the steps illustrated below to complete the action.
Step1 Download and install the Photoshop software on your computer.
Step2 Launch Photoshop and import the images which you want to use to create HDRI. Navigate to ‘File’ and select Automate from the dropdown, then click ‘HDR PRO’.
Step3 Now Photoshop will display your images along with two dialog boxes. The first dialog box is 32-bit, while the second one is ‘16-bit’. Select the dialog box with 32-bit to proceed.
 Greeting Card Builder
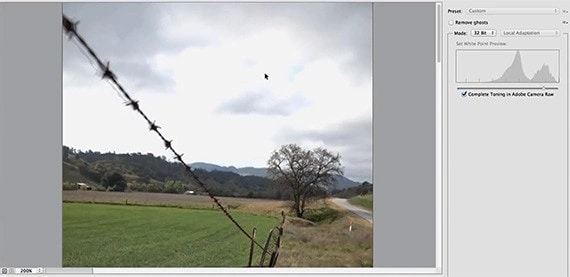
Step4 Click on ‘Remove Ghosts’ to remove any kind of ghosting between the images.
 Epubor Audible Converter for Win: Download and convert Audible AAXC/AA/AAX to MP3 with 100% original quality preserved.
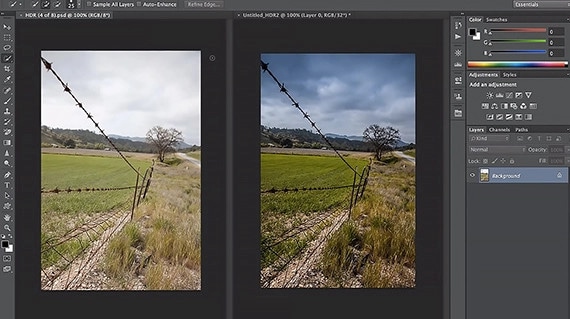
Step5 Adjust exposures, add warmth, open shadows, and apply other settings according to your requirements. Then save the newly created HDR image to a preferred location on your PC.

Part 3: Video guide to creating HDR images in Photoshop
To save you from unwanted stress, this video guide is also very helpful for you to understand the in-depth editing aspects to create HDR images perfectly. Don’t hesitate to check the video and learn more about using HDR Photoshop
YouTube Video Link; https://youtu.be/-Yf6VVdE798
Part 4: Best Photoshop HDR Alternatives to Create HDR images
The HDR Photoshop tool is not a bad tool by any means. But, lately, there have been complaints from users that the ‘Merge to HDR Pro’ feature is not working. This has become very common for many folks who haven’t upgraded their Photoshop version. If you’re in the same situation, then there are Photoshop HDR alternatives that you can count on to create HDR images efficiently.
Here are Photoshop HDR Alternatives;
- Aurora HDR
- Luminance HDR
- Lightroom HDR
1. Aurora HDR (Most Powerful HDR Tool)

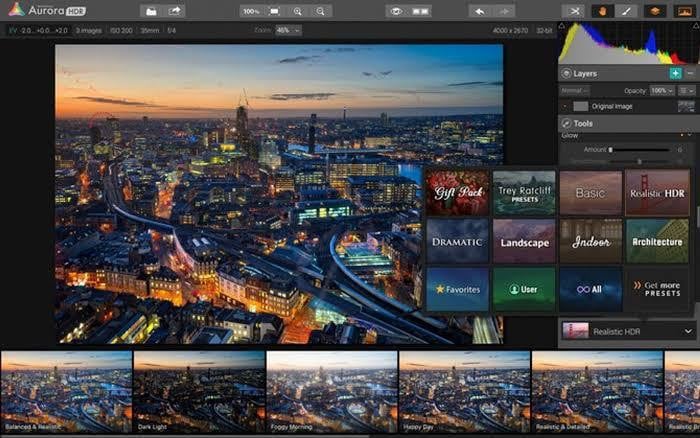
Popularly referred to as the most powerful HDR software in the game, Aurora HDR is a great tool that has a wide array of rich AI features with robust tone-mapping technology for creating and editing HDR images like a pro.
The interesting aspect about Aurora HDR is you can not only use it as a stand-alone tool, but can also integrate it with other tools Apple Photos, Lightroom, and Photoshop itself to access more advanced photo editing features. Besides, Aurora HDR is not just limited to creating and editing HDR images but also supports effective photo editing functions that can be used to crop photos, boost contrast, reduce noise, and do lots more in photos without requiring advanced knowledge.
The flexibility facilitates easy workflow for photographers and honestly, it’s worth trying.
Pros & Cons of Aurora HDR
Pros
- It’s great for creative photography.
- Its high flexibility makes it easy for users to customize all features without requiring technical knowledge.
- Works effectively as a plugin or stand-alone app.
- Offers a wide range of tone and color settings.
Cons
- No free trial and you need to pay to access advanced features.
- Unavailability of lens correction profile.
- The HDR merging process usually takes time.
2. Luminance HDR (Best Free HDR Tool)

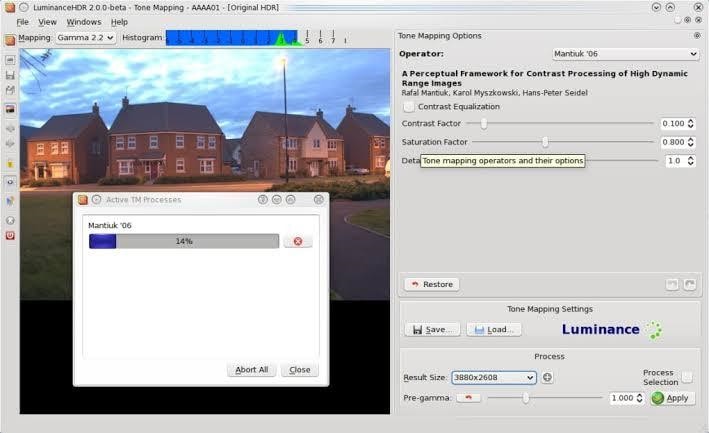
Luminance HDR is another popular software that any user can count on for seamless HDR image creation. Despite being a free tool, Luminance HDR supports efficient features that can be used for both basic and advanced HDR image creation/editing tasks.
From advanced photo blending algorithms to batch HDR merging and lots more, this tool offers a plethora of functionalities that can be really helpful to users. You can even rotate, resize, and crop images with Luminance HDR without compromising their quality.
That being said, the big drawback of Luminance HDR is that some of its features can be really confusing. But aside from that, the tool is really worth having on your computer. Besides, unlike Aurora HDR, it’s 100% free.
Pros & Cons of Luminance HDR
Pros
- It’s 100% free and safe to use.
- It offers a plethora of functionalities.
- Read different types of formats smoothly.
- Merge more than one HDR image efficiently.
Cons
- Some features are quite confusing.
- No reliable support service.
3. Lightroom HDR
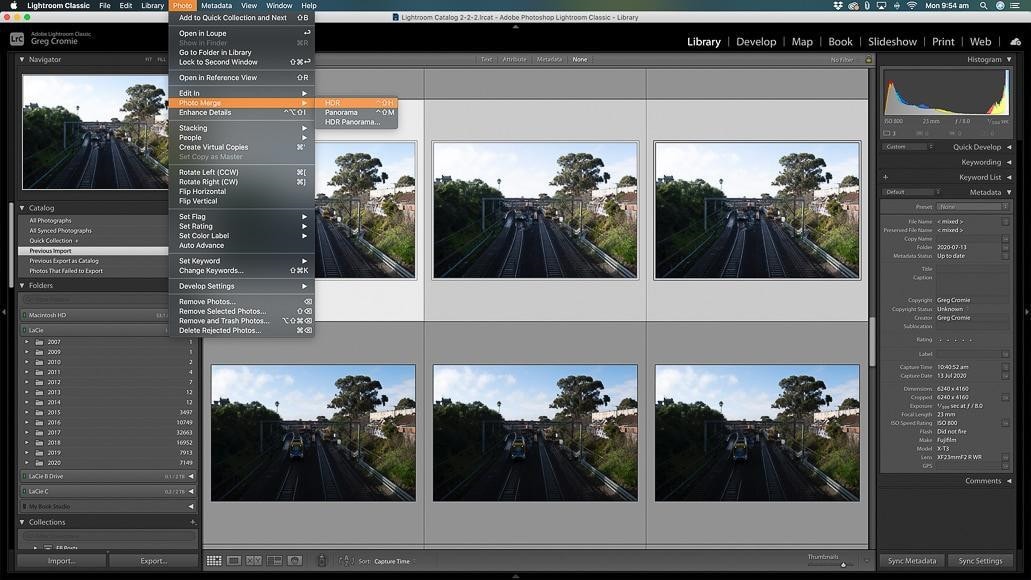
Another reliable tool that can come in handy as an alternative to Photoshop HDR is the Adobe Lightroom HDR. Just like the other tools mentioned, Lightroom HDR facilitates easy HDR creation and editing. With this tool, you’ll have access to a plethora of professional photo editing tools that can allow you to perform any kind of photography-related operation, it doesn’t matter if you’re a novice or an expert. Besides, there are lots of helpful tutorials and community features that can be used to facilitate the process of creating HDR.
In all, Lightroom HDR has all you need to create a satisfying HDR image, and you typically don’t require any technical knowledge to employ the tool in getting the job done.
Pros & Cons of Luminance HDR
Pros
- Supports a lot of powerful asset management tools.
- It’s very easy to operate.
- Boasts lots of tutorials and community helpful features.
- Edited photos can be synced to cloud storage for easy access on other devices.
Cons
- You cannot use the tool for free and the cost of purchasing its license is quite expensive.
- Sharing options are limited.
- It doesn’t support layer editing.
Bonus Tip: How to Enhance Your HDR video like a Pro
Although HDR Photoshop does HDR image creation and editing work efficiently, you cannot use it to enhance your HDR video. In this case, you need an effective HDR video editing software like the Wondershare Filmora Video Editor.
Filmora is a top video editing software that can always come in handy to help you enhance your HR video like a pro without requiring any technical knowledge. With this tool, you can execute both simple and advanced video editing operations on Mac or Windows computers seamlessly. All it takes is a few clicks.
Free Download For Win 7 or later(64-bit)
Free Download For macOS 10.14 or later
Key Features
- Export edited videos in various formats without affecting quality.
- Offers a wide variety of transitions, effects, and graphical elements.
- The interface is very easy to operate ti the extent that even someone with no technical knowledge can navigate his/her way around easily.
- It boasts a really robust timeline that is effective for rearranging videos, photos, and audio.
How to use Filmora Video Editor to Edit HDR Videos
Step1 Download & Install Filmora
Firstly, you need to download and install the latest version of Filmora video editor software on your Mac/Windows PC.
Step2 Launch Filmora
Start the Filmora program by double clicking the icon. Click ‘New Project’ and click the drop-down icon under ‘Select Project Aspect Ratio’ to choose the aspect ratio for your video.
Step3 Import HDR Video
Click ‘Import’ from the top left corner of your PC screen and upload the HDR video whose quality you want to enhance.

You can also employ the ‘Import with Instant Cutter Tool’ option to trim the HDR video.
Step4 Edit HDR Video
Locate and click on the ‘Register’ button > click ‘File’ at the top bar and select ‘Project Settings’ from the drop-down menu.
Click on the ‘Color Space’ drop-down and choose ‘HDR Parameter Value’. You’ll see the default HDR value of your video as SDR - Rec.709. Just select another option to enhance the HDR video quality.
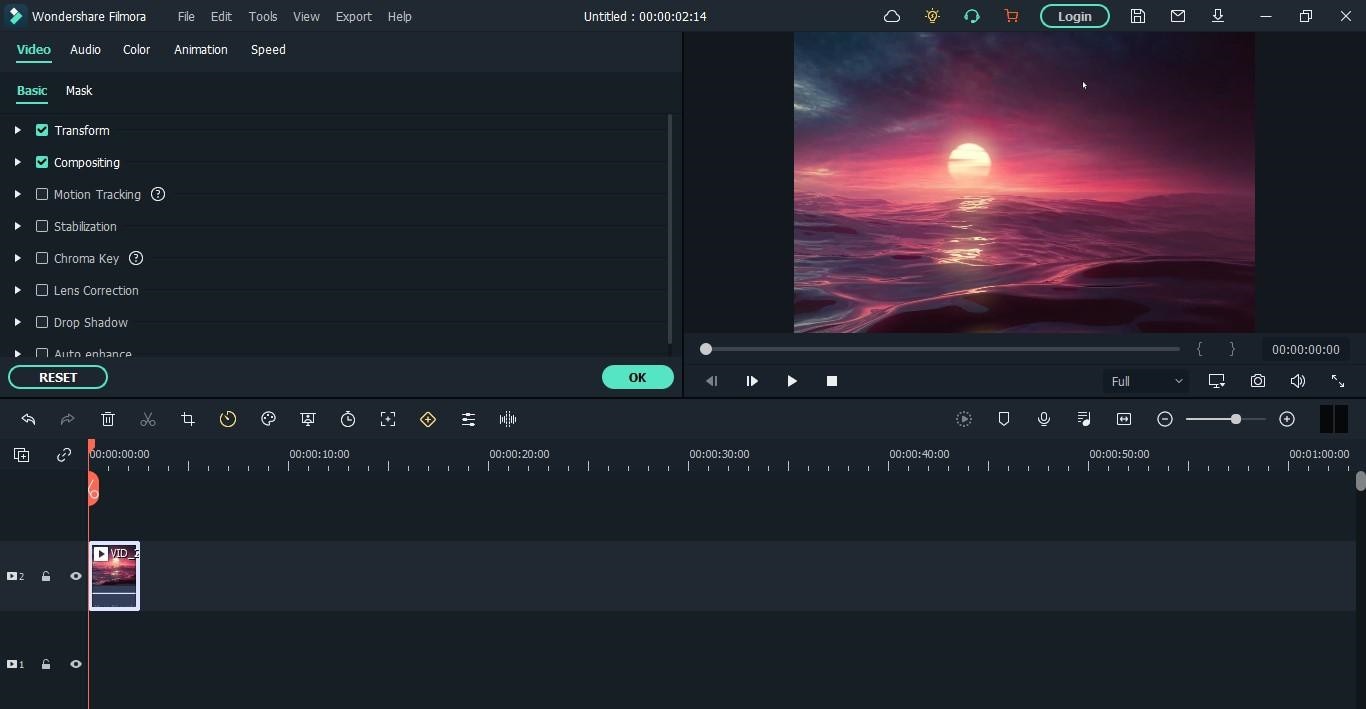
After you’ve enhanced your HDR video, you can also perform other types of video editing operations like cutting, trimming, application of effects, etc.
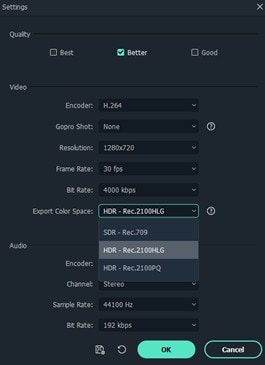
Step5 Share & Export Edited HDR Video
Once you’re done with the editing operation, click on ‘Export’ > select the video format for your output file in the Output window, choose ‘Quality’, select storage location, and edit other settings to complete the operation.
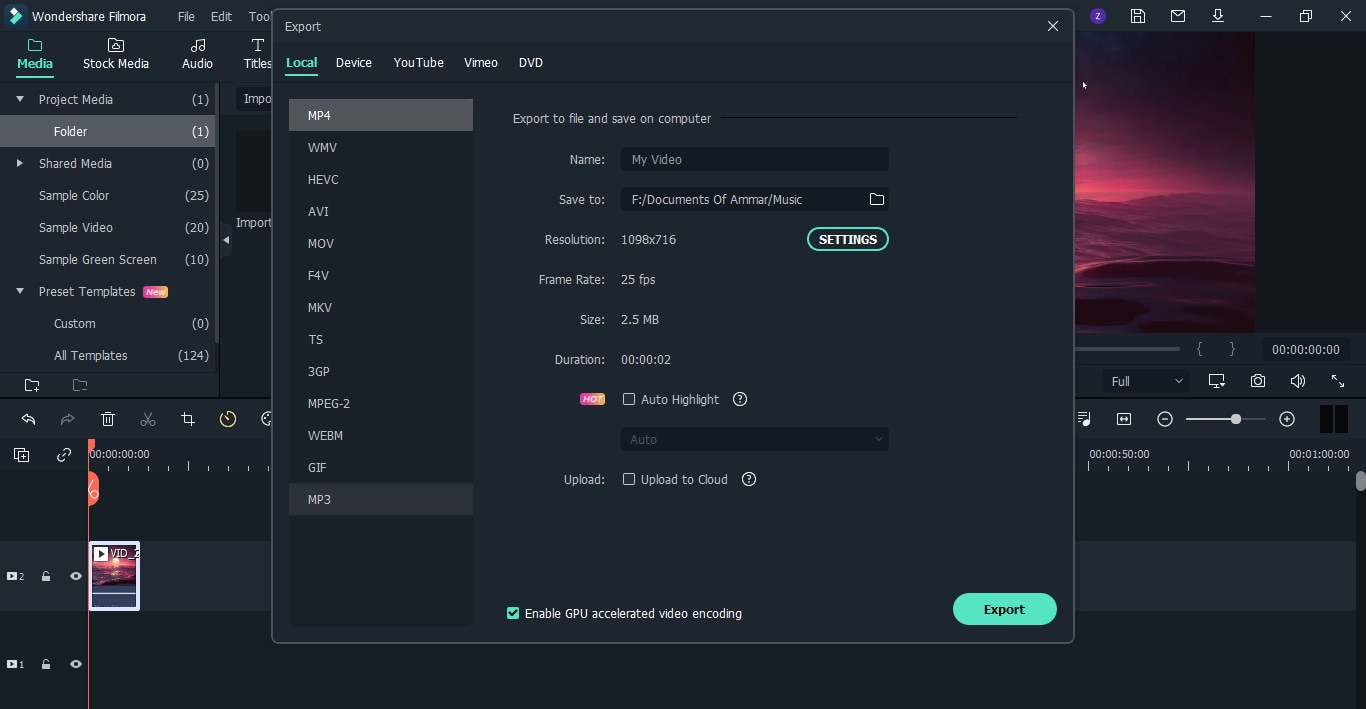
You can also click on the ‘Export Color Space’ drop/down icon to verify your HDR video output quality. Click the ‘OK’ button once you’re done to complete the action. It’s as simple as A, B, C!
Final Words
If you’re looking to create HDR images in Photoshop, this article has explained how you can complete the action in just a few clicks.
We’ve also explained the different key features of Photoshop, and if perhaps you’re not satisfied with the quality delivered by Photoshop tool, there are other alternatives like Aurora HDR, Lightroom HDR, etc that you can surely rely on to create HDR images. But what if you want to create HDR videos? Then need Filmora video editing software for a seamless operation.
- Aurora HDR (Most Powerful HDR Tool)
- Luminance HDR (Best Free HDR Tool)
- Lightroom HDR
- Bonus Tip: How to Enhance Your HDR video like a Pro
Part 1: What is HDR Photoshop?
Photoshop is a very popular HDR image creation/editing tool that has been in the industry for quite a long time. This software provides users with efficient tools that can always come in handy to create, edit, and do lots more on HDR images seamlessly.
Designers and photographers can utilize Photoshop to create quality images as it offers advanced tools that they can utilize to improve their craft. Besides, the tool supports lots of rich image editing features that can not only be used to create HDR images, but also add drawings, effects, filters, and lots more to images without compromising output quality.
Photoshop Main Key Features for HDR
Color Channels
Photoshop supports a color channel tab where users can view shades added to images. Yes, there’s the RGB Mode (which consists of red, green, and blue) and other options including Lab or CYMK.
Layers
Users can execute drawing/design operations by using layers to draw different elements of the design. Then merge each layer according to the display. There’s even a pen tool that can be used to draw any shape. Thus allowing the designer to have full control over his/her flow of the design.
Hue & Saturation
Another notable feature in Photoshop is ‘Hue & Saturation. With this feature, users adjust image Hue and Saturation color, alter the richness of color, and maintain good intensity. This allows the image to look more natural and realistic.
Retouching Tools
The retouching tools on Photoshop comprise different tools including a redeye tool, healing tool, pattern stamp tool, spot healing tool, and lots more than can be used to correct images at an initial stage.
Having known the key features of Photoshop, let’s proceed to see how to create an impressive HDRI with it.

Part 2: How to Create an Impressive HDRI in Photoshop
Creating an impressive HDRI in Photoshop is not a difficult task. You don’t need any technical knowledge. Just follow the steps illustrated below to complete the action.
Step1 Download and install the Photoshop software on your computer.
Step2 Launch Photoshop and import the images which you want to use to create HDRI. Navigate to ‘File’ and select Automate from the dropdown, then click ‘HDR PRO’.
Step3 Now Photoshop will display your images along with two dialog boxes. The first dialog box is 32-bit, while the second one is ‘16-bit’. Select the dialog box with 32-bit to proceed.
Step4 Click on ‘Remove Ghosts’ to remove any kind of ghosting between the images.
 Power Tools add-on for Google Sheets, Lifetime subscription
Step5 Adjust exposures, add warmth, open shadows, and apply other settings according to your requirements. Then save the newly created HDR image to a preferred location on your PC.
Part 3: Video guide to creating HDR images in Photoshop
To save you from unwanted stress, this video guide is also very helpful for you to understand the in-depth editing aspects to create HDR images perfectly. Don’t hesitate to check the video and learn more about using HDR Photoshop
YouTube Video Link; https://youtu.be/-Yf6VVdE798

Part 4: Best Photoshop HDR Alternatives to Create HDR images
The HDR Photoshop tool is not a bad tool by any means. But, lately, there have been complaints from users that the ‘Merge to HDR Pro’ feature is not working. This has become very common for many folks who haven’t upgraded their Photoshop version. If you’re in the same situation, then there are Photoshop HDR alternatives that you can count on to create HDR images efficiently.
Here are Photoshop HDR Alternatives;
- Aurora HDR
- Luminance HDR
- Lightroom HDR
 CollageIt Pro
1. Aurora HDR (Most Powerful HDR Tool)
Popularly referred to as the most powerful HDR software in the game, Aurora HDR is a great tool that has a wide array of rich AI features with robust tone-mapping technology for creating and editing HDR images like a pro.
The interesting aspect about Aurora HDR is you can not only use it as a stand-alone tool, but can also integrate it with other tools Apple Photos, Lightroom, and Photoshop itself to access more advanced photo editing features. Besides, Aurora HDR is not just limited to creating and editing HDR images but also supports effective photo editing functions that can be used to crop photos, boost contrast, reduce noise, and do lots more in photos without requiring advanced knowledge.
The flexibility facilitates easy workflow for photographers and honestly, it’s worth trying.
Pros & Cons of Aurora HDR
Pros
- It’s great for creative photography.
- Its high flexibility makes it easy for users to customize all features without requiring technical knowledge.
- Works effectively as a plugin or stand-alone app.
- Offers a wide range of tone and color settings.
Cons
- No free trial and you need to pay to access advanced features.
- Unavailability of lens correction profile.
- The HDR merging process usually takes time.
2. Luminance HDR (Best Free HDR Tool)

Luminance HDR is another popular software that any user can count on for seamless HDR image creation. Despite being a free tool, Luminance HDR supports efficient features that can be used for both basic and advanced HDR image creation/editing tasks.
From advanced photo blending algorithms to batch HDR merging and lots more, this tool offers a plethora of functionalities that can be really helpful to users. You can even rotate, resize, and crop images with Luminance HDR without compromising their quality.
That being said, the big drawback of Luminance HDR is that some of its features can be really confusing. But aside from that, the tool is really worth having on your computer. Besides, unlike Aurora HDR, it’s 100% free.
Pros & Cons of Luminance HDR
Pros
- It’s 100% free and safe to use.
- It offers a plethora of functionalities.
- Read different types of formats smoothly.
- Merge more than one HDR image efficiently.
Cons
- Some features are quite confusing.
- No reliable support service.
3. Lightroom HDR
Another reliable tool that can come in handy as an alternative to Photoshop HDR is the Adobe Lightroom HDR. Just like the other tools mentioned, Lightroom HDR facilitates easy HDR creation and editing. With this tool, you’ll have access to a plethora of professional photo editing tools that can allow you to perform any kind of photography-related operation, it doesn’t matter if you’re a novice or an expert. Besides, there are lots of helpful tutorials and community features that can be used to facilitate the process of creating HDR.
In all, Lightroom HDR has all you need to create a satisfying HDR image, and you typically don’t require any technical knowledge to employ the tool in getting the job done.
Pros & Cons of Luminance HDR
Pros
- Supports a lot of powerful asset management tools.
- It’s very easy to operate.
- Boasts lots of tutorials and community helpful features.
- Edited photos can be synced to cloud storage for easy access on other devices.
Cons
- You cannot use the tool for free and the cost of purchasing its license is quite expensive.
- Sharing options are limited.
- It doesn’t support layer editing.
Bonus Tip: How to Enhance Your HDR video like a Pro
Although HDR Photoshop does HDR image creation and editing work efficiently, you cannot use it to enhance your HDR video. In this case, you need an effective HDR video editing software like the Wondershare Filmora Video Editor.
Filmora is a top video editing software that can always come in handy to help you enhance your HR video like a pro without requiring any technical knowledge. With this tool, you can execute both simple and advanced video editing operations on Mac or Windows computers seamlessly. All it takes is a few clicks.
Free Download For Win 7 or later(64-bit)
Free Download For macOS 10.14 or later
Key Features
- Export edited videos in various formats without affecting quality.
- Offers a wide variety of transitions, effects, and graphical elements.
- The interface is very easy to operate ti the extent that even someone with no technical knowledge can navigate his/her way around easily.
- It boasts a really robust timeline that is effective for rearranging videos, photos, and audio.
How to use Filmora Video Editor to Edit HDR Videos
Step1 Download & Install Filmora
Firstly, you need to download and install the latest version of Filmora video editor software on your Mac/Windows PC.
Step2 Launch Filmora
Start the Filmora program by double clicking the icon. Click ‘New Project’ and click the drop-down icon under ‘Select Project Aspect Ratio’ to choose the aspect ratio for your video.
Step3 Import HDR Video
Click ‘Import’ from the top left corner of your PC screen and upload the HDR video whose quality you want to enhance.
You can also employ the ‘Import with Instant Cutter Tool’ option to trim the HDR video.
Step4 Edit HDR Video
Locate and click on the ‘Register’ button > click ‘File’ at the top bar and select ‘Project Settings’ from the drop-down menu.
Click on the ‘Color Space’ drop-down and choose ‘HDR Parameter Value’. You’ll see the default HDR value of your video as SDR - Rec.709. Just select another option to enhance the HDR video quality.
 Forex Robotron Gold Package
After you’ve enhanced your HDR video, you can also perform other types of video editing operations like cutting, trimming, application of effects, etc.
Step5 Share & Export Edited HDR Video
Once you’re done with the editing operation, click on ‘Export’ > select the video format for your output file in the Output window, choose ‘Quality’, select storage location, and edit other settings to complete the operation.
You can also click on the ‘Export Color Space’ drop/down icon to verify your HDR video output quality. Click the ‘OK’ button once you’re done to complete the action. It’s as simple as A, B, C!
Final Words
If you’re looking to create HDR images in Photoshop, this article has explained how you can complete the action in just a few clicks.
We’ve also explained the different key features of Photoshop, and if perhaps you’re not satisfied with the quality delivered by Photoshop tool, there are other alternatives like Aurora HDR, Lightroom HDR, etc that you can surely rely on to create HDR images. But what if you want to create HDR videos? Then need Filmora video editing software for a seamless operation.
- Title: Photo-HDR Excellence Tips From the Pros
- Author: Mark
- Created at : 2024-07-26 17:59:14
- Updated at : 2024-07-27 17:59:14
- Link: https://extra-lessons.techidaily.com/photo-hdr-excellence-tips-from-the-pros/
- License: This work is licensed under CC BY-NC-SA 4.0.