
"Prove Your Skills Fast & Precise Video Edits on Windows 11"
Prove Your Skills: Fast & Precise Video Edits on Windows 11
How to Trim Video in Windows 10 Photos Easily

Shanoon Cox
Mar 27, 2024• Proven solutions
You have got your brand new Windows 10 computer and want to try your hands on video editing. But, you are unsure of using a built-in tool to do that or getting a third-party tool for that matter. Well, let us clear the air and confusion for you. If you want to trim the videos as well and chop off unwanted parts from them, you don’t have to download anything.
The in-built editor in Windows 10 Photos can do that for you. Through this article, we would introduce how to trim videos in Windows 10 Photos and another good news is we will add a bonus tip for you, i.e. trimming your video with VLC as well. So, cheers! Get ready to create amazing videos with this awesome tool.
Part 1: How to trim video in Windows 10 Photos
When you talk about video trimming apps on Windows 10 PC, Photos is the only built-in app capable of doing so. Whether you want to do away with the awkward starting of your video or want to club multiple video clips, get Photos on work for that. Basic level editing is possible with Photos, for additional video editing.
Here is how to trim videos in Windows 10 Photos –
Step 1: On your Windows 10 system, go to ‘File Explorer’ and find the desired video. Right-tap on the video and then choose ‘Open With’ the ‘Photos’ option. The alternative method includes going to the ‘Start’ menu and opening the ‘Photos’ app. Find the video and open it.
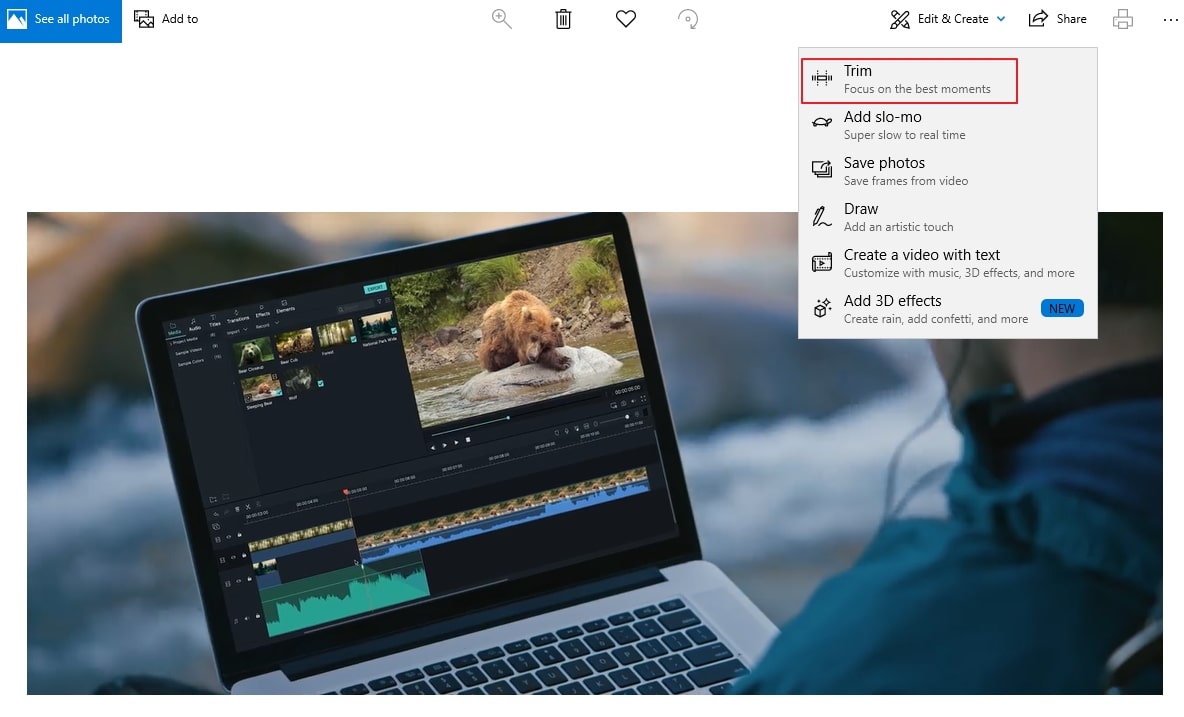
Step 2: Tap on the video to access the menu bar. Once the menu bar appears at the top hit the Edit and Create > Trim.
Step 3: On the bottom part of the screen, there are three circles. The start and end of the markers clips are represented by two small white circles. For chopping off the unwanted portions you need to drag and adjust the marker circles. The movement of markers shows a text denoting the total selected length of the clip over the marker. The larger marker represents the present spot of your video clip. Make sure to drag around and adjust the video for including all the important parts within the video.
Step 4: Once you are happy with the changes, hit the save icon from the top menu. The clip is saved as a copy without impacting your original video in your Windows computer.
Part 2: How to trim video in Windows 10 with VLC
Well, as we promised you in the beginning, it’s time for the bonus tip! You have understood how to trim videos in Windows 10 Photos, let’s explore VLC’s magic. When Windows 10 Photos allows you basic level easy trimming for advanced features you can try VLC . For operating systems other than Windows, such as Fedora, Ubuntu, or Mac you won’t be able to use Windows 10 Photos, so VLC is a good option for cross-platform video editing.
It is important to update VLC to the latest version to explore the complete features of this application. It supports a wide range of multimedia files for editing videos as well as streaming protocols and video discs.
Here comes the step by step guide to trim video in VLC –
- Once you update and install the latest version of the VLC media player on your Windows or another computer, launch it and go to the ‘View’ menu for activating the ‘Advanced controls’ option.

- Upon activation of the ‘Advanced controls’ option, four additional buttons appear over the VLC media player’s play/pause button. Now, you got to add the video by ‘Open File’. Well, you can also do that by dragging and dropping the video as well.
- Select the position from where you want to keep the video and hit the play and record button together.
- Now, tap the ‘Record’ button again where you want to stop the recording. This clip automatically gets saved as an MP4 media file. You can find it within the ‘Libraries/Videos’ folder if it’s a Windows 7 PC.
Note: You won’t be trimmed by cutting the video here, rather recording the desired part using the inbuilt VLC decoder. Using the ‘Frame by frame’ button found under the ‘Advanced control’ section (the last button from the left) move to the exact frame you wish to begin your recording.
Conclusion
From the above article, we found that trimming video in VLC and Windows 10 Photos has its own set of advantages. While in Windows 10 Photos, you get the ease of operation for trimming the clip, VLC is a bit time taking. But, when it comes to more features in video editing, VLC certainly has better brownie points. But finally, it’s your call to pick what suits you for your video editing needs. If you want to trim video easily, you can try Wondershare Filmora .


Shanoon Cox
Shanoon Cox is a writer and a lover of all things video.
Follow @Shanoon Cox
Shanoon Cox
Mar 27, 2024• Proven solutions
You have got your brand new Windows 10 computer and want to try your hands on video editing. But, you are unsure of using a built-in tool to do that or getting a third-party tool for that matter. Well, let us clear the air and confusion for you. If you want to trim the videos as well and chop off unwanted parts from them, you don’t have to download anything.
The in-built editor in Windows 10 Photos can do that for you. Through this article, we would introduce how to trim videos in Windows 10 Photos and another good news is we will add a bonus tip for you, i.e. trimming your video with VLC as well. So, cheers! Get ready to create amazing videos with this awesome tool.
Part 1: How to trim video in Windows 10 Photos
When you talk about video trimming apps on Windows 10 PC, Photos is the only built-in app capable of doing so. Whether you want to do away with the awkward starting of your video or want to club multiple video clips, get Photos on work for that. Basic level editing is possible with Photos, for additional video editing.
Here is how to trim videos in Windows 10 Photos –
Step 1: On your Windows 10 system, go to ‘File Explorer’ and find the desired video. Right-tap on the video and then choose ‘Open With’ the ‘Photos’ option. The alternative method includes going to the ‘Start’ menu and opening the ‘Photos’ app. Find the video and open it.
Step 2: Tap on the video to access the menu bar. Once the menu bar appears at the top hit the Edit and Create > Trim.
Step 3: On the bottom part of the screen, there are three circles. The start and end of the markers clips are represented by two small white circles. For chopping off the unwanted portions you need to drag and adjust the marker circles. The movement of markers shows a text denoting the total selected length of the clip over the marker. The larger marker represents the present spot of your video clip. Make sure to drag around and adjust the video for including all the important parts within the video.
Step 4: Once you are happy with the changes, hit the save icon from the top menu. The clip is saved as a copy without impacting your original video in your Windows computer.
Part 2: How to trim video in Windows 10 with VLC
Well, as we promised you in the beginning, it’s time for the bonus tip! You have understood how to trim videos in Windows 10 Photos, let’s explore VLC’s magic. When Windows 10 Photos allows you basic level easy trimming for advanced features you can try VLC . For operating systems other than Windows, such as Fedora, Ubuntu, or Mac you won’t be able to use Windows 10 Photos, so VLC is a good option for cross-platform video editing.
It is important to update VLC to the latest version to explore the complete features of this application. It supports a wide range of multimedia files for editing videos as well as streaming protocols and video discs.
Here comes the step by step guide to trim video in VLC –
- Once you update and install the latest version of the VLC media player on your Windows or another computer, launch it and go to the ‘View’ menu for activating the ‘Advanced controls’ option.
- Upon activation of the ‘Advanced controls’ option, four additional buttons appear over the VLC media player’s play/pause button. Now, you got to add the video by ‘Open File’. Well, you can also do that by dragging and dropping the video as well.
- Select the position from where you want to keep the video and hit the play and record button together.
- Now, tap the ‘Record’ button again where you want to stop the recording. This clip automatically gets saved as an MP4 media file. You can find it within the ‘Libraries/Videos’ folder if it’s a Windows 7 PC.
Note: You won’t be trimmed by cutting the video here, rather recording the desired part using the inbuilt VLC decoder. Using the ‘Frame by frame’ button found under the ‘Advanced control’ section (the last button from the left) move to the exact frame you wish to begin your recording.
Conclusion
From the above article, we found that trimming video in VLC and Windows 10 Photos has its own set of advantages. While in Windows 10 Photos, you get the ease of operation for trimming the clip, VLC is a bit time taking. But, when it comes to more features in video editing, VLC certainly has better brownie points. But finally, it’s your call to pick what suits you for your video editing needs. If you want to trim video easily, you can try Wondershare Filmora .
Shanoon Cox
Shanoon Cox is a writer and a lover of all things video.
Follow @Shanoon Cox
Also read:
- [New] 2024 Approved Green Filming Gurus on YT Transform Your Set with Greenscreens
- [Updated] Android's Best Free MP3 Extraction Tools
- 2024 Approved The Underdeveloped World of VR Experiences
- Create Digital Humor Kapwing's Meme Builder for 2024
- Education on Demand: A List of 9 Crucial Tech Tools Every Learner Needs
- Excellent Storage Upgrade for Sony A7S II Cameras
- High-Quality Hd Videos at a Tap Top 10 Android Choices for 2024
- Ideal Choices 7 Best Mac Video Apps
- In 2024, Complete Guide For iPhone 12 Pro Max Lock Screen | Dr.fone
- In 2024, Top 4 Ways to Trace Realme 12+ 5G Location | Dr.fone
- Instagram Sounds Policy Explained
- Leveraging Social Media Giants to Skyrocket Your Marketing Game
- The Ultimate Vlogging Battle GoPro Hero5 Black VS Sessions
- Tips and Tricks for Exceptional Steam Playback Footage for 2024
- Ultimate 8 Gratis 4K UHD Video Apps for PC/OS X
- Title: Prove Your Skills Fast & Precise Video Edits on Windows 11
- Author: Mark
- Created at : 2024-11-24 23:41:49
- Updated at : 2024-11-29 22:19:30
- Link: https://extra-lessons.techidaily.com/prove-your-skills-fast-and-precise-video-edits-on-windows-11/
- License: This work is licensed under CC BY-NC-SA 4.0.