
"Secrets to Successful Scrape Mass TikTok Videos"
Secrets to Successful Scrape: Mass TikTok Videos
Many creative creators have perfected the short video genre on TikTok. Everyone can immediately find a dozen engaging TikTok users with binge-worthy videos, regardless of age, sexuality, or background.
Suppose you plan to save and download a bunch of these fun videos. Then, 4K TokKit is the program to use if you want to download an entire TikTok album. Continue reading to find out how to download TikTok videos in bulk.
How To Mass Download TikTok Videos
TikTok has many entertaining and informative videos on a wide range of subjects. Every TikTok user has a few favorite videos that they repeat over and over again and share with their friends on TikTok and other social media platforms.
I want to help you save your favorite TikTok videos and share them with your friends. Thus, to make your desire possible, I prepared a list of software you may use to mass download TikTok videos you love. Read along as I show you these below:
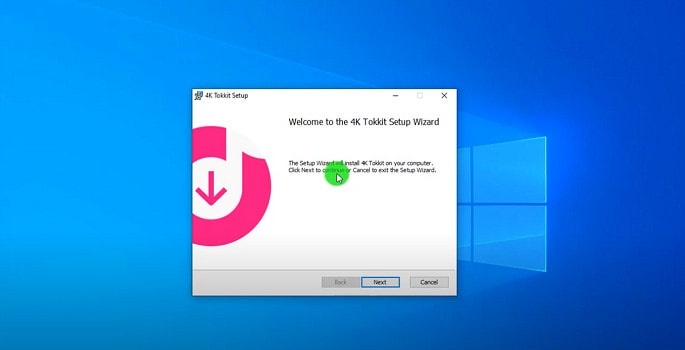
Software #1: 4K TokKit
It is available on Windows, Mac, and Linux.
4K TokKit is the ideal tool for downloading TikTok videos to save them for later and view them offline. To begin downloading, simply follow the simple steps below:
- Install TokKit 4K. It works on macOS, Windows, and Linux.
- Enter in the username of the TikTok account you’d want to save.
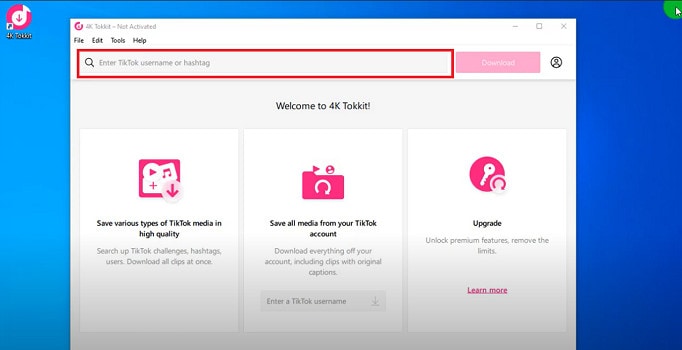
- Choose the most appropriate choice from the results page.
- To download, hit the Download button.
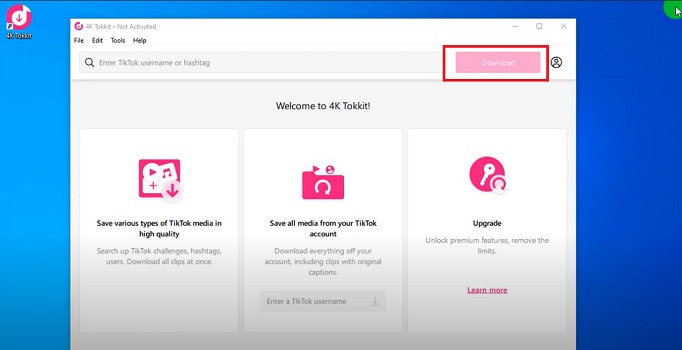
- That should do it! Every TikTok clip from that account will be stored on your device in minutes.
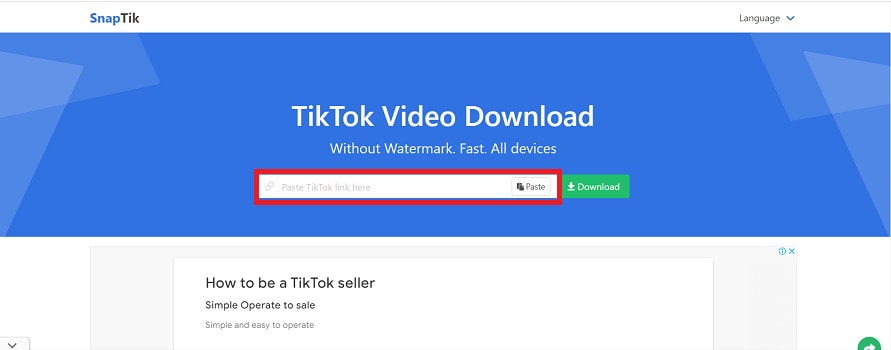
Software #2:SnapTik
It is available on Windows, Mac, Phone, and Online.
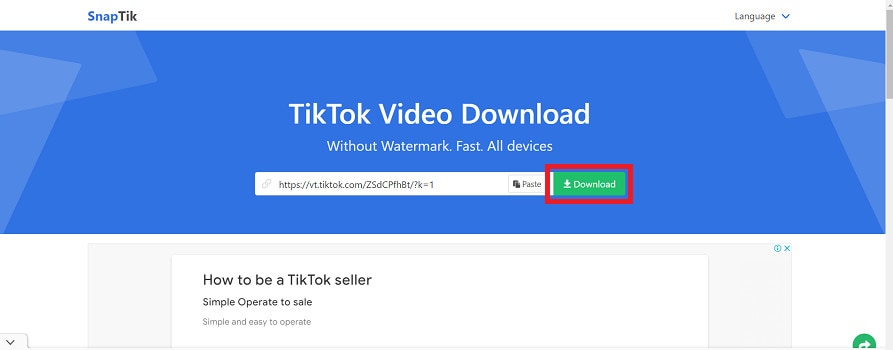
SnapTik is touted as the finest TikTok video downloader without a watermark. The most extraordinary thing about this software is that it doesn’t require you to download any apps or pay money to get TikTok videos. You’ll only need a browser and the video link you wish to save. Put the video URL in the search box and let the software do its magic with a watermark-free video.
You may follow the step-by-step guide below on how to download videos in TikTok using SnapTik:
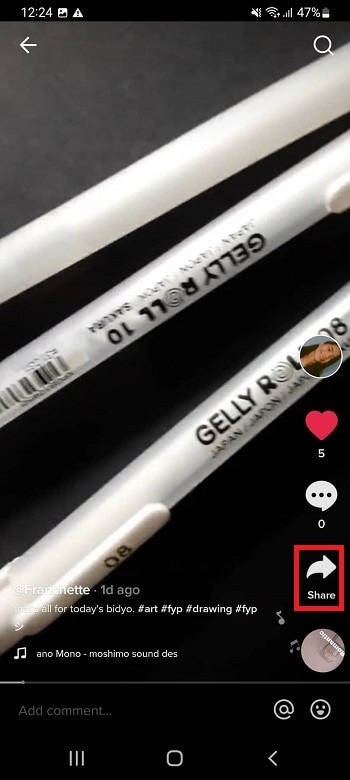
- Launch the TikTok app on your smartphone.
- Choose the video you wish to save.

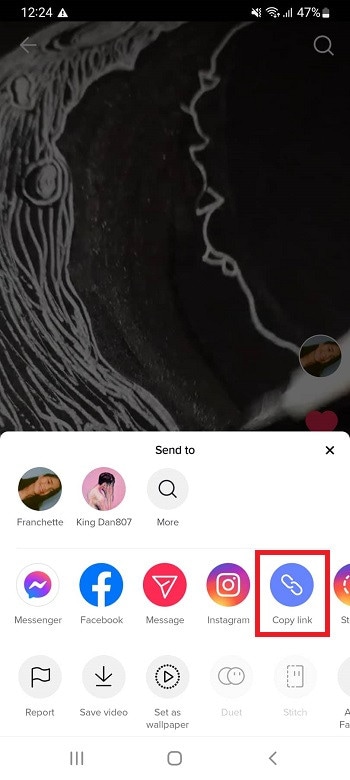
- At the bottom of the video, click the “Share” button.

- Choose “Copy Link.”
- Go to the SnapTik website or download the official SnapTik app from the Play Store.
- Paste the link.
- Then, press the “Download” button.
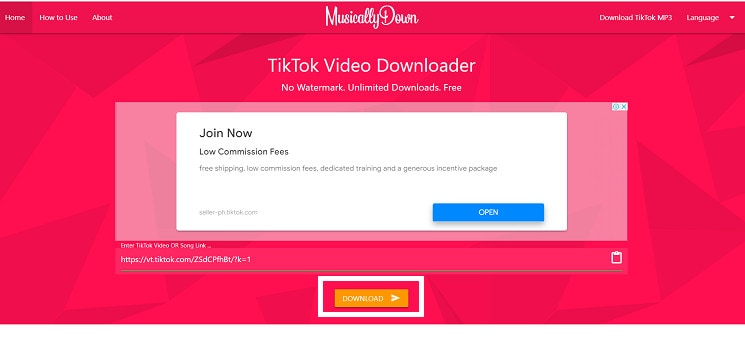
Software #3: MusicallyDown
It is available on Windows, Mac, Phone, and Online.
Musically Down is a powerful TikTok video downloader that allows you to download any TikTok video in moments. With no watermark, it can download anything from TikTok, including music and videos. It also works as a web app and does not require installation; simply go to the webpage and paste the video link you wish to download, and the program will handle the rest.
You will see steps on how to download your favorite TikTok videos using MusicallyDown down further:
- Launch the TikTok app on your smartphone.
- Choose the video you wish to save.

- At the bottom of the video, click the “Share” button.
- Choose “Copy Link.”

- Go to the Musically website.
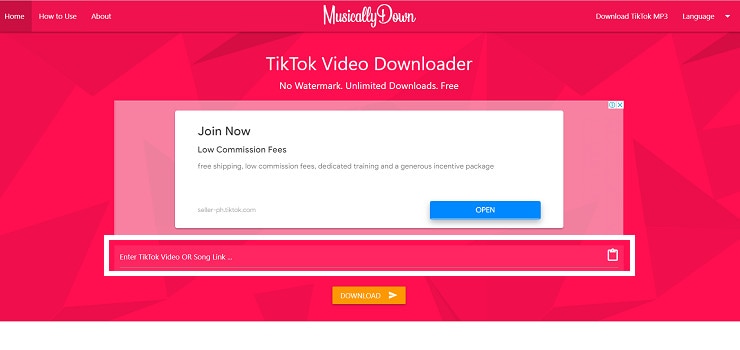
- Paste the link and then press the “Download” button.
Bonus Tip: How to Edit TikTok Video on Computer
Many TikTok video editing tools are on the market, and deciding which one to use to create a TikTok video might be difficult. A competent video editor will present you with a variety of high-quality editing capabilities that will improve the look and effectiveness of your video.
In this section, we’ll go over different TikTok video editors so you can make an informed decision:
How to Edit TikTok Video Using Wondershare Filmora
It is available on Windows and Mac.
Wondershare Filmora is one of the most favored TikTok video editors, offering a wide range of editing features and settings to help users make the best music and funny videos possible. It allows you to edit and make beautiful clips using DSLRs, action cameras, smartphone cameras, and other video recorders.
Go along with the steps below to begin making your TikTok video with Filmora:
Step #1: Open Filmora and Select an Aspect Ratio
When you’re prepared to get started on a new video, double-click Filmora’s desktop shortcut. The software’s opening screen will prompt you to start a new project or open an existing one. You can also select the aspect ratio here to save time when editing.
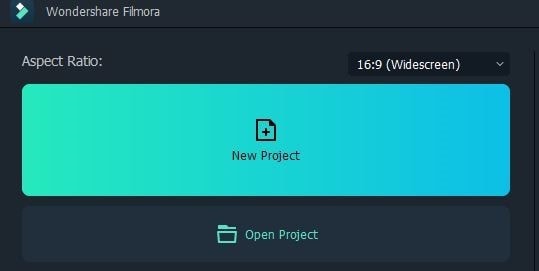
Step #2: Start a New Project
Wait for the editor to load after selecting New Project from the program’s welcome screen. To fully use Fillmora’s video editor, tap the Register icon and activate it.
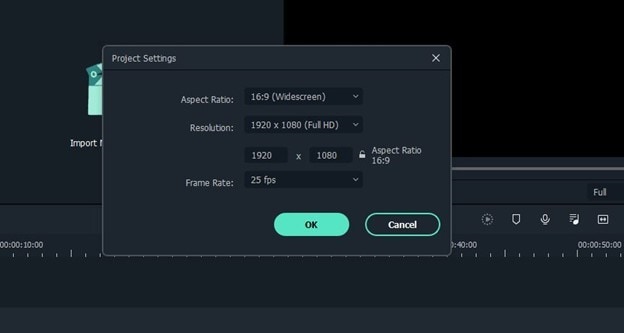
To establish the aspect ratio for your final film output, go to the File menu and select Project Settings. You’ll be able to choose between other aspect ratios, such as 16:9 or 4:3, the less popular 9:16 aspect ratio for vertically oriented films, and the 1:1 aspect ratio for square-shaped films. You can also alter the aspect ratio to meet your specific requirements.
Basically, you should use the 9:16 aspect ratio for TikTok videos.
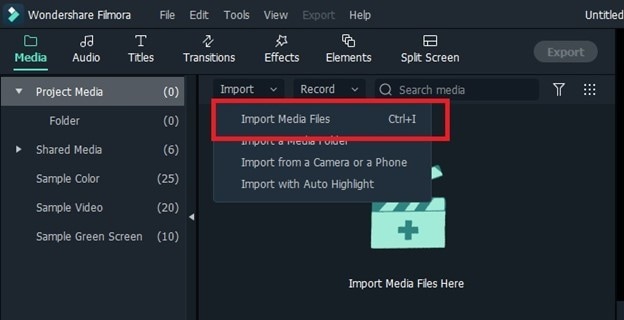
Step #3: Load Your Clips
You can find the Import button in the upper left corner of the film editor; pick Import Media Files from the drop-down menu. Next, navigate to the hard drive folder containing the item you wish to change. After selecting the video, audio, or photo files, you wish to utilize in your project, click the Import option.
Step #4: Sort Your Files into Filmora Albums
The files you upload into Filmora will save in the Media tab, which is accessible from the Load button. When browsing for videos and images to add to the timeline, working with several files in a single project becomes substantially more stressful. Create folders and arrange your files with the My Album feature to reduce clutter and frustration.
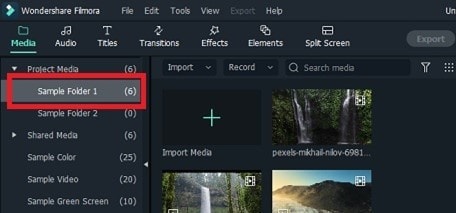
Click the Add a New Folder icon at the bottom of the “My Project” area in the window’s upper right corner. To boost your productivity and save time browsing through files, you can categorize the film numerically or in another way.
Step #5: Arrange the Clips on the Timeline
Since raw footage frequently contains incorrect parts that you don’t want in your video, simply drag them from the Media tab and place them on the timeline if you wish to remove or edit your videos. You can send countless clips as you wish, but you can only do it one at a time, and reordering them requires dragging the files to the appropriate spot on the timeline.
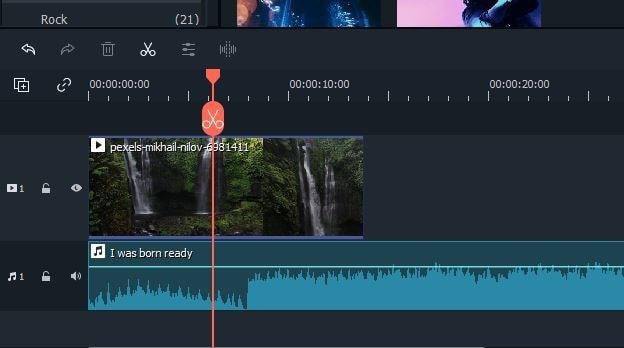
To inspect the video clips you’ve added to the timeline, press Play or use the Spacebar. You can utilize the playhead to jump to a certain point in the movie. Place the playhead at the start of the video section you want to cut, then do the same thing on the other end.
Step #6: Apply Some Effects
You may now split the audio and video files, add music, make transitions between segments, or use one of Filmora’s many graphic effects after removing all the useless pieces from your video clips.
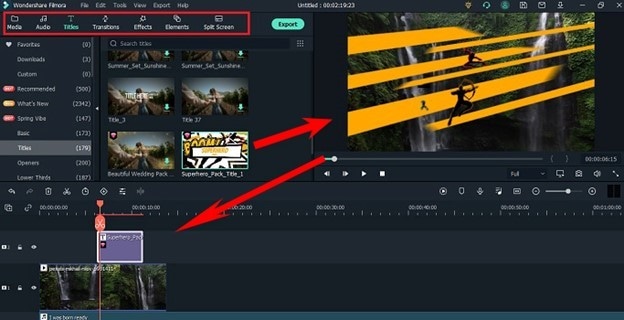
To add opening titles, end credits, or subtitles to your video, click the Text /Credit icon. There are different text templates in the software that you can use for various purposes. Drag and drop the theme you wish to use to the right spot on the timeline, then use the software’s preview box to add the needed text.
Step #7: Export Your TikTok Video
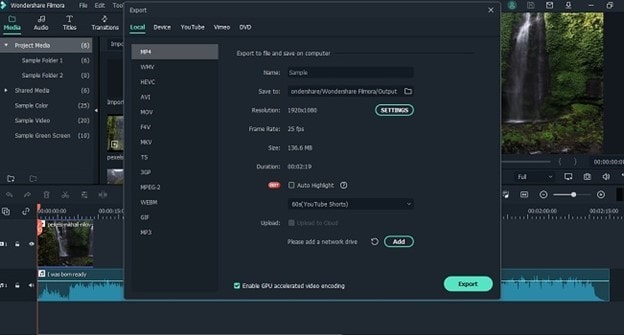
Click the Export button when you’re sure there’s nothing else you want to do with your project. Pick the format that best suits the project you’re working on from the Format menu, give the video a title, and choose its location on your storage device. You can adjust the video resolution, frame rate, and encoder by selecting the Settings option.
- Enter in the username of the TikTok account you’d want to save.
- Choose the most appropriate choice from the results page.
- To download, hit the Download button.
- That should do it! Every TikTok clip from that account will be stored on your device in minutes.
Software #2:SnapTik
It is available on Windows, Mac, Phone, and Online.
SnapTik is touted as the finest TikTok video downloader without a watermark. The most extraordinary thing about this software is that it doesn’t require you to download any apps or pay money to get TikTok videos. You’ll only need a browser and the video link you wish to save. Put the video URL in the search box and let the software do its magic with a watermark-free video.
You may follow the step-by-step guide below on how to download videos in TikTok using SnapTik:
- Launch the TikTok app on your smartphone.
- Choose the video you wish to save.
- At the bottom of the video, click the “Share” button.
- Choose “Copy Link.”
- Go to the SnapTik website or download the official SnapTik app from the Play Store.
- Paste the link.
- Then, press the “Download” button.
Software #3: MusicallyDown
It is available on Windows, Mac, Phone, and Online.
Musically Down is a powerful TikTok video downloader that allows you to download any TikTok video in moments. With no watermark, it can download anything from TikTok, including music and videos. It also works as a web app and does not require installation; simply go to the webpage and paste the video link you wish to download, and the program will handle the rest.
You will see steps on how to download your favorite TikTok videos using MusicallyDown down further:
- Launch the TikTok app on your smartphone.
- Choose the video you wish to save.
- At the bottom of the video, click the “Share” button.
- Choose “Copy Link.”
- Go to the Musically website.
- Paste the link and then press the “Download” button.
Bonus Tip: How to Edit TikTok Video on Computer
Many TikTok video editing tools are on the market, and deciding which one to use to create a TikTok video might be difficult. A competent video editor will present you with a variety of high-quality editing capabilities that will improve the look and effectiveness of your video.
In this section, we’ll go over different TikTok video editors so you can make an informed decision:
How to Edit TikTok Video Using Wondershare Filmora
It is available on Windows and Mac.
Wondershare Filmora is one of the most favored TikTok video editors, offering a wide range of editing features and settings to help users make the best music and funny videos possible. It allows you to edit and make beautiful clips using DSLRs, action cameras, smartphone cameras, and other video recorders.
Go along with the steps below to begin making your TikTok video with Filmora:
Step #1: Open Filmora and Select an Aspect Ratio
When you’re prepared to get started on a new video, double-click Filmora’s desktop shortcut. The software’s opening screen will prompt you to start a new project or open an existing one. You can also select the aspect ratio here to save time when editing.
Step #2: Start a New Project
Wait for the editor to load after selecting New Project from the program’s welcome screen. To fully use Fillmora’s video editor, tap the Register icon and activate it.
To establish the aspect ratio for your final film output, go to the File menu and select Project Settings. You’ll be able to choose between other aspect ratios, such as 16:9 or 4:3, the less popular 9:16 aspect ratio for vertically oriented films, and the 1:1 aspect ratio for square-shaped films. You can also alter the aspect ratio to meet your specific requirements.
Basically, you should use the 9:16 aspect ratio for TikTok videos.
Step #3: Load Your Clips
You can find the Import button in the upper left corner of the film editor; pick Import Media Files from the drop-down menu. Next, navigate to the hard drive folder containing the item you wish to change. After selecting the video, audio, or photo files, you wish to utilize in your project, click the Import option.
Step #4: Sort Your Files into Filmora Albums
The files you upload into Filmora will save in the Media tab, which is accessible from the Load button. When browsing for videos and images to add to the timeline, working with several files in a single project becomes substantially more stressful. Create folders and arrange your files with the My Album feature to reduce clutter and frustration.
Click the Add a New Folder icon at the bottom of the “My Project” area in the window’s upper right corner. To boost your productivity and save time browsing through files, you can categorize the film numerically or in another way.
Step #5: Arrange the Clips on the Timeline
Since raw footage frequently contains incorrect parts that you don’t want in your video, simply drag them from the Media tab and place them on the timeline if you wish to remove or edit your videos. You can send countless clips as you wish, but you can only do it one at a time, and reordering them requires dragging the files to the appropriate spot on the timeline.
To inspect the video clips you’ve added to the timeline, press Play or use the Spacebar. You can utilize the playhead to jump to a certain point in the movie. Place the playhead at the start of the video section you want to cut, then do the same thing on the other end.
Step #6: Apply Some Effects
You may now split the audio and video files, add music, make transitions between segments, or use one of Filmora’s many graphic effects after removing all the useless pieces from your video clips.
To add opening titles, end credits, or subtitles to your video, click the Text /Credit icon. There are different text templates in the software that you can use for various purposes. Drag and drop the theme you wish to use to the right spot on the timeline, then use the software’s preview box to add the needed text.
Step #7: Export Your TikTok Video
Click the Export button when you’re sure there’s nothing else you want to do with your project. Pick the format that best suits the project you’re working on from the Format menu, give the video a title, and choose its location on your storage device. You can adjust the video resolution, frame rate, and encoder by selecting the Settings option.
Also read:
- [New] 2024 Approved Winning at Gaming Memory Capture Essentials on Windows 10
- [New] In 2024, The Cutting-Edge Professional Cameras - A 360° Overview, 2023
- [Updated] Android's Best Pick 10-Step Collage Journey
- [Updated] Configuring Picture-in-Picture for Apple Browsers
- [Updated] Eminent Playwriting for Podcasting for 2024
- [Updated] Optimum Locations Magnifying YouTube Videos
- 2024 Approved Battle of the Lenses SJ6 Vs. Yi 4K Prodigy
- A Detailed Guide on Faking Your Location in Mozilla Firefox On Honor V Purse | Dr.fone
- Assessing Photoshop Sway Reduction A Necessity Debate?
- Dark Knight Versus Shining Savior
- Ideal Culmination in Virtual Ventures
- New 2024 Approved Methods to Exclude Sound From Multimedia Files
- Supreme Selection Ideal Sierra Dvd & Video Apps
- Top Apps and Online Tools To Track Tecno Spark Go (2023) Phone With/Without IMEI Number
- Unveiling ChatGPT: The Future of Technology in Enhancing Health Services
- Title: Secrets to Successful Scrape Mass TikTok Videos
- Author: Mark
- Created at : 2025-01-24 16:54:54
- Updated at : 2025-01-26 16:41:20
- Link: https://extra-lessons.techidaily.com/secrets-to-successful-scrape-mass-tiktok-videos/
- License: This work is licensed under CC BY-NC-SA 4.0.