
"Step-by-Step Guide Fixing Non-Operational SRT Exports"
Step-by-Step Guide: Fixing Non-Operational SRT Exports
“Hello, I imported a .srt file to Premiere and I was able to edit it as per my requirements. But, after I completed the editing and tried exporting the file, the ‘Export’ button was grayed. Please is this a problem from Premiere? How can I fix it?”
The query above is from an Adobe Premiere user who is finding it difficult to export SRT from the software. If your situation is quite similar to his, then you’ve come to the right page to find a solution.
As experts in the technology industry, we took our time to review the ‘Exporting SRT from Premiere not working’ error, and fortunately, we’ve not just found the actual fix for the error, but also the reasons why it occurs. So, on this page, you’ll discover why Premiere pro export SRT fails and how to fix it. Stick with us.
- Method 1: Use Export Media Option
- Method 2: Export SRT as Sidecar File
- Method 3: Export SRT File with Timestamps
Part 1: Why Does Premiere Pro Export SRT Subtitles Fail
There are several reasons why Premiere pro export SRT subtitles might fail. The common ones include;
Wrong Element Selection in The Project Panel
Yes, when you’re exporting SRT, if you fail to select the caption file before you use the relevant buttons for exportation, the “Export” option will be grayed out. Hence, preventing you from being able to export the SRT file.
Improper settings selection
If, unfortunately, you select the wrong settings for your file during the exportation of SRT, there’s a high chance that you’ll not be able to complete the export action successfully.
Part 2: How to Fix Premiere Pro Export SRT Subtitles Fail
Fixing the Premiere pro export subtitles fail error is not a daunting task if you know the right tricks to execute the operation. Here, we’ve explained three methods that are not just reliable but also work for fixing export SRT from Premiere pro not working issue. Keep reading to find out more about these fixes.
Method 1: Use Export Media Option
The “Export Media” option in Adobe Premiere Pro is effective for exporting SRT without problems. However, using this method means you’re exploring the .srt file with a video file. The process to use this method is outlined below;
Step1 Firstly, right-click on the SRT file from the Premiere pro software project panel. Then select ‘Export Media.’
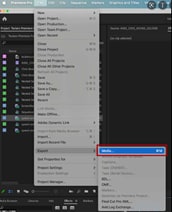
Step2 Once you click on “Export Media” you’ll notice different options. Ignore the video export options (or tick off ‘video’ if you like), then navigate down to the “Captions tab”.
Step3 Click on “Create Sidecar File” under ‘Export Options.
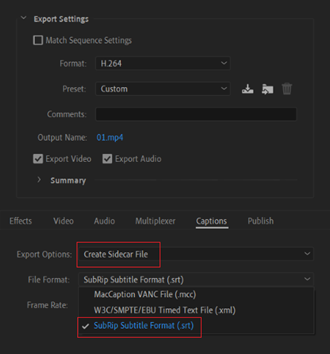
Step4 Finally, navigate to ‘File Format’ and select SubRip Subtitle Format (.srt). Then hit the “Export” button to complete the operation.
Method 2: Export SRT as Sidecar File
Another way to export SRT files from Adobe Premiere Pro is by exporting the file as a sidecar file. You might ask “What is a sidecar file?” A sidecar file refers to a computer file that stores data that is not supported by the format of its source file. The sidecar file from the source could be more than one, and it could contain meta databases.
Now let’s take a look at the step-by-step process to export SRT as a sidecar file.
Step1 Click on the “SRT File” from the Premiere Pro interface.
Step2 Navigate to “File” and select Exports, then choose “Captions”. By doing so, you’ll be able to export the SRT file.
Method 3: Export SRT File with Timestamps
The previously mentioned methods will allow you to export SRT either with video or as a sidecar file. But if you’re looking to export SRT file with timestamps, this method will work for you. The process is straightforward as the prior discussed methods.
Here is how the process works;
Step1 Firstly, select SEQUENCE in the project panel.
Step2 Up next, click File -> Export -> Captions. Once you complete that, you’ll export the SRT file as a sidecar file with timestamps.
![]()
Note: for this to work, the video must be on one video layer.
Part 3: Easiest & Actionable Fix: Edit and Export SRT Files Only with Wondershare Filmora
If Adobe Premiere Pro is still giving you issues with exporting SRT file from its interface, the best and easiest solution is to edit the SRT file on a powerful software like Wondershare Filmora . Yes, this is because, unlike Premiere pro, Filmora allows seamless exportation of SRT to computer or third-party platforms.
Filmora is loaded with a plethora of advanced features that enable users to edit SRT files, add SRT to videos, and do lots more video editing-related operations without necessarily having technological experience. Besides, Filmora is not limited to only editing SRT files in the English language - it can also edit SRT file in up to 20 languages without compromising the quality of the SRT file context.
Here is the step-by-step process to edit band export SRT with Wondershare Filmora.
Free Download For Win 7 or later(64-bit)
Free Download For macOS 10.14 or later
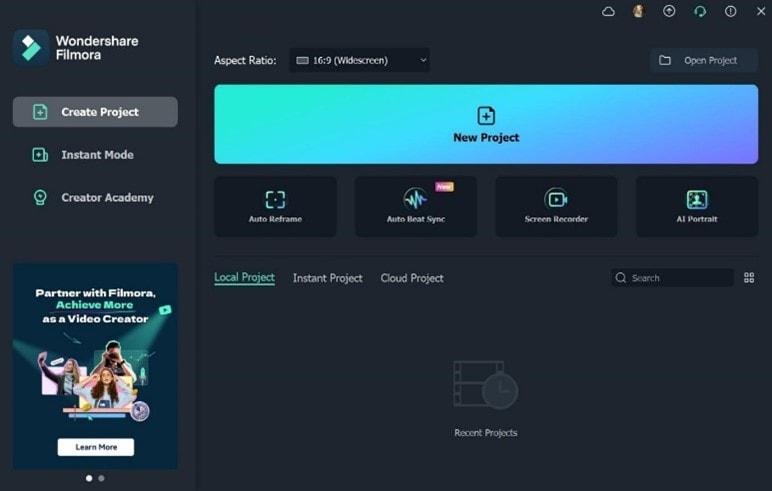
Step1 First, download and install the Filmora software on your computer, then start the program.
Step2 Up next, upload the SRT file you want to edit to the Filmora interface using the “Import” button. Alternatively, you can Drag-n-drop the SRT file.
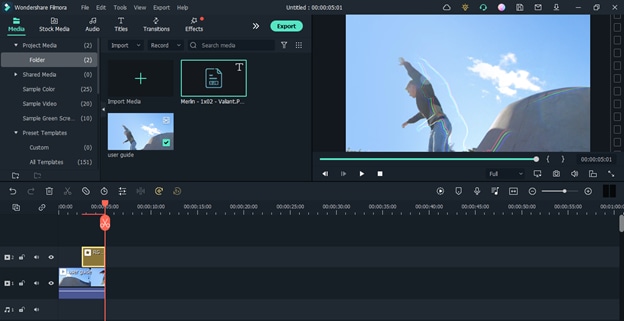
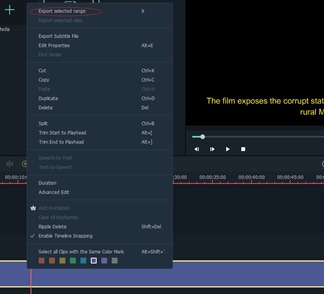
Step3 Move the uploaded SRT file to the Timeline by dragging and dropping it there, then right-click on it from the Timeline and choose “Advance Edit” from the pop-up list.

Step4 Start editing your SRT file. You can edit the text, time code, speed, text color, etc.

Step5 Once you’re done with the editing, right-click on the SRT file from the Timeline again and this time, select “Export Subtitle File” from the pop-up list and save it to your computer storage.
Final Words
If you’re experiencing the export SRT from Premiere pro not working error, the article above has explained all possible methods that you can utilize to fix it quickly and easily. You can either
That being said, if you want to save yourself from unwanted errors during the exportation of SRT from Premiere pro, the best thing to do is to acquire a better software like Wondershare Filmora . Filmora is more efficient for editing SRT files when compared to Premiere Pro. Plus, it supports more advanced tools that facilitate faster and easier SRT editing and exporting.
Part 1: Why Does Premiere Pro Export SRT Subtitles Fail
There are several reasons why Premiere pro export SRT subtitles might fail. The common ones include;
Wrong Element Selection in The Project Panel
Yes, when you’re exporting SRT, if you fail to select the caption file before you use the relevant buttons for exportation, the “Export” option will be grayed out. Hence, preventing you from being able to export the SRT file.
Improper settings selection
If, unfortunately, you select the wrong settings for your file during the exportation of SRT, there’s a high chance that you’ll not be able to complete the export action successfully.
Part 2: How to Fix Premiere Pro Export SRT Subtitles Fail
Fixing the Premiere pro export subtitles fail error is not a daunting task if you know the right tricks to execute the operation. Here, we’ve explained three methods that are not just reliable but also work for fixing export SRT from Premiere pro not working issue. Keep reading to find out more about these fixes.
Method 1: Use Export Media Option
The “Export Media” option in Adobe Premiere Pro is effective for exporting SRT without problems. However, using this method means you’re exploring the .srt file with a video file. The process to use this method is outlined below;
Step1 Firstly, right-click on the SRT file from the Premiere pro software project panel. Then select ‘Export Media.’
Step2 Once you click on “Export Media” you’ll notice different options. Ignore the video export options (or tick off ‘video’ if you like), then navigate down to the “Captions tab”.
Step3 Click on “Create Sidecar File” under ‘Export Options.
Step4 Finally, navigate to ‘File Format’ and select SubRip Subtitle Format (.srt). Then hit the “Export” button to complete the operation.
Method 2: Export SRT as Sidecar File
Another way to export SRT files from Adobe Premiere Pro is by exporting the file as a sidecar file. You might ask “What is a sidecar file?” A sidecar file refers to a computer file that stores data that is not supported by the format of its source file. The sidecar file from the source could be more than one, and it could contain meta databases.
Now let’s take a look at the step-by-step process to export SRT as a sidecar file.
Step1 Click on the “SRT File” from the Premiere Pro interface.
Step2 Navigate to “File” and select Exports, then choose “Captions”. By doing so, you’ll be able to export the SRT file.
Method 3: Export SRT File with Timestamps
The previously mentioned methods will allow you to export SRT either with video or as a sidecar file. But if you’re looking to export SRT file with timestamps, this method will work for you. The process is straightforward as the prior discussed methods.
Here is how the process works;
Step1 Firstly, select SEQUENCE in the project panel.
Step2 Up next, click File -> Export -> Captions. Once you complete that, you’ll export the SRT file as a sidecar file with timestamps.
![]()
Note: for this to work, the video must be on one video layer.
Part 3: Easiest & Actionable Fix: Edit and Export SRT Files Only with Wondershare Filmora
If Adobe Premiere Pro is still giving you issues with exporting SRT file from its interface, the best and easiest solution is to edit the SRT file on a powerful software like Wondershare Filmora . Yes, this is because, unlike Premiere pro, Filmora allows seamless exportation of SRT to computer or third-party platforms.
Filmora is loaded with a plethora of advanced features that enable users to edit SRT files, add SRT to videos, and do lots more video editing-related operations without necessarily having technological experience. Besides, Filmora is not limited to only editing SRT files in the English language - it can also edit SRT file in up to 20 languages without compromising the quality of the SRT file context.
Here is the step-by-step process to edit band export SRT with Wondershare Filmora.
Free Download For Win 7 or later(64-bit)
Free Download For macOS 10.14 or later
Step1 First, download and install the Filmora software on your computer, then start the program.
Step2 Up next, upload the SRT file you want to edit to the Filmora interface using the “Import” button. Alternatively, you can Drag-n-drop the SRT file.
Step3 Move the uploaded SRT file to the Timeline by dragging and dropping it there, then right-click on it from the Timeline and choose “Advance Edit” from the pop-up list.
Step4 Start editing your SRT file. You can edit the text, time code, speed, text color, etc.
Step5 Once you’re done with the editing, right-click on the SRT file from the Timeline again and this time, select “Export Subtitle File” from the pop-up list and save it to your computer storage.
Final Words
If you’re experiencing the export SRT from Premiere pro not working error, the article above has explained all possible methods that you can utilize to fix it quickly and easily. You can either
That being said, if you want to save yourself from unwanted errors during the exportation of SRT from Premiere pro, the best thing to do is to acquire a better software like Wondershare Filmora . Filmora is more efficient for editing SRT files when compared to Premiere Pro. Plus, it supports more advanced tools that facilitate faster and easier SRT editing and exporting.
Also read:
- [New] Best Online Houses Purchasing Unique, Tailored Boxed Gifts
- [New] In 2024, Sound Design Strategies Integrating YouTube Music Into Visual Media
- [New] Mobile Mastery YouTube Video Thumbnails Made Easy for 2024
- [Updated] VR Unveiled Understanding the Digital Illusion
- Essential Tips for Engaging with YouTube Comments
- Guide to Addressing Connect Your Device Bluetooth Issue
- Ideal Extra Memory for Sony A7C Model
- In 2024, Boost Your View Count This Tutorial's Top Hit
- Moto Z2 Unpacked A Smartphone's Triumph
- Navigating iPhone Camera for Nighttime Pics
- Simple Steps to Refresh Your Lenovo Dock
- Translating Views Into Dollars on YouTube via CPM for 2024
- VisionOS N Version 2 Revealed at WWDC: Examining the New Features that Spark Enthusiasm and Intrigue
- Voice Log Export & Critique
- Wallet-Friendly Spherical Camera Systems for Hobbyists
- Title: Step-by-Step Guide Fixing Non-Operational SRT Exports
- Author: Mark
- Created at : 2025-01-01 22:01:36
- Updated at : 2025-01-08 01:22:57
- Link: https://extra-lessons.techidaily.com/step-by-step-guide-fixing-non-operational-srt-exports/
- License: This work is licensed under CC BY-NC-SA 4.0.