
Techniques for Removing Cluttered Photo Backgrounds
Techniques for Removing Cluttered Photo Backgrounds
Is your image background not looking up to the mark? The crucial balance between backgrounds and foregrounds is often difficult to maintain. However, there are a variety of things you can modify in your background to make your image pop.
Here, you can learn all about modifying the backdrop of your photo, editing background, and more. Find step-by-step guides on how you can blur photo background or even remove it from your image. Also, discover some of the best photo background stock websites that can help you out.
In this article
01 How Can You Edit Photo Background Better?
02 How to Blur Photo Background?
03 How to Remove Photo Background?
04 3 Best Websites to Download Stunning Photo Editing Background Images
 Jet Profiler for MySQL, Enterprise Version: Jet Profiler for MySQL is real-time query performance and diagnostics tool for the MySQL database server. Its detailed query information, graphical interface and ease of use makes this a great tool for finding performance bottlenecks in your MySQL databases.
 Part 1: How Can You Edit Photo Background Better?
Want to achieve the perfect photo editing background technique? What better way to do that than Photoshop?
Photoshop by Adobe is a premium-level image and graphics editor. Photoshop has held the gold standard for editing graphics and images for years. It is undoubtedly the best photo background editor app you can find to get your job done. With its precise tools and a sleek interface, it is relatively easy to insert your photo and edit background image.
Here is how you can edit and replace your image background in Photoshop:
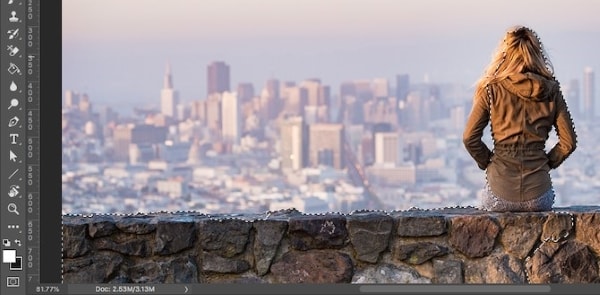
Step 1: Select your Subject
Add your image to the interface of the program. From the toolbar on the left, tap the “Quick Selection” tool. Now drag the area of the image you want to select using the brush. You can hold the “Alt” key and drag the unwanted areas to remove them from the selection.

Step 2: Mask your Selection
Go to the options bar present at the top. Tap on “Select and Mask” to convert your selection into a mask. From the “Properties” panel, tap “View Mode” to determine how you want to see your selection. “Overlay” works best in general.
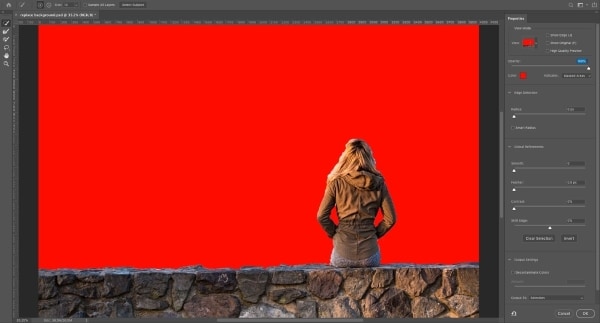
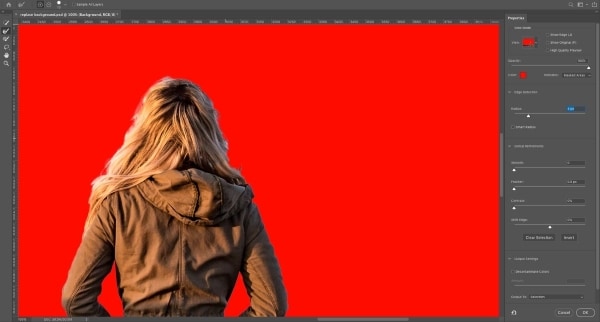
Step 3: Polish the Edges
You can now further refine your selected part using the different tools offered by Photoshop. Use the “Quick Selection” tool to add or remove large areas. For hair and soft edges, you can use the “Refine Edge Brush” tool. The “Lasso/Polygonal Lasso” tool can help manually draw areas for your selection.
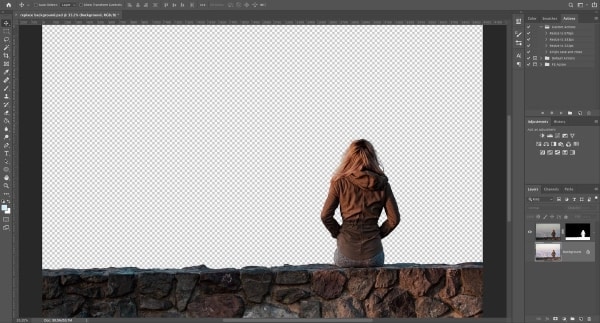
Step 4: Remove Residual Colors
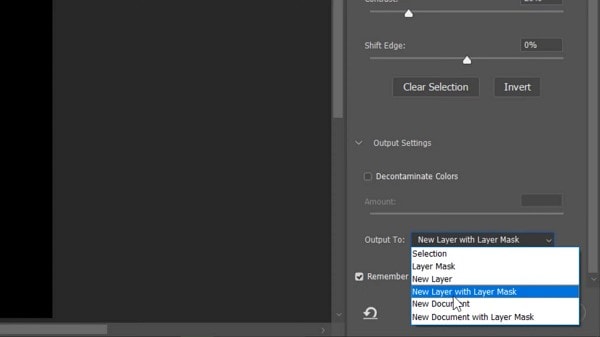
From the panel at the right, select “Output Settings.” Check the box next to “Decontaminate Colors” to get rid of any leftover color fringe from your foreground. From “Output,” you now need to add a new layer by clicking on “New Layer with Layer Mask.”

Step 5: Add a New Background
You can now paste the image you wish to add as a background for your photo. Position your image on the layer below the one with your foreground. You can resize your background image if required by selecting the “Free Transform” tool.
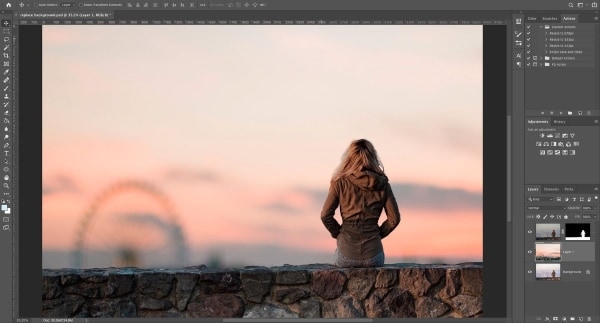
Step 6: Fix the Colors
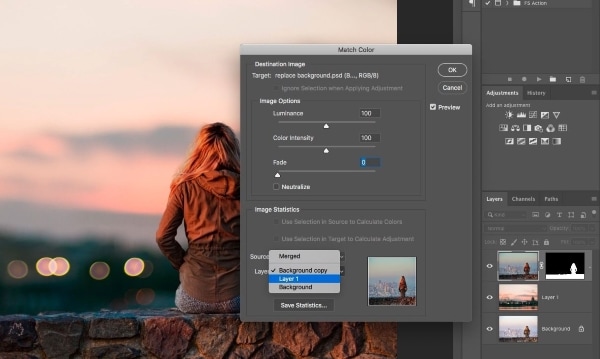
To blend the colors of your two images, select your foreground layer. Now go to “Image” and open “Adjustments.” From here, launch the “Match Color” popup window. Navigate to “Source” and select your image. From the “Layer” option, choose the layer you want to fix.
Tick the “Neutralize” box and adjust the “Luminance” and “Intensity” until you meet your requirements. You are all done now! Click “OK” and save your newly edited image.
Part 2: How to Blur Photo Background?
A blurred background helps bring your image into focus. If you want a photo editor to blur background of your image, you can try Photoshop. Here are the steps for that:
Step 1: Isolate Subject
Isolate your subject on a separate layer by accessing the “Quick Selection” tool and clicking on the “Select Subject” button. You can use the “Lasso” tool to refine your selection. Click on “Select and Mask” and select the “Black and White View.” Now, choose the output to “New Layer with Layer Mask.”
Step 2: Expand the Selection
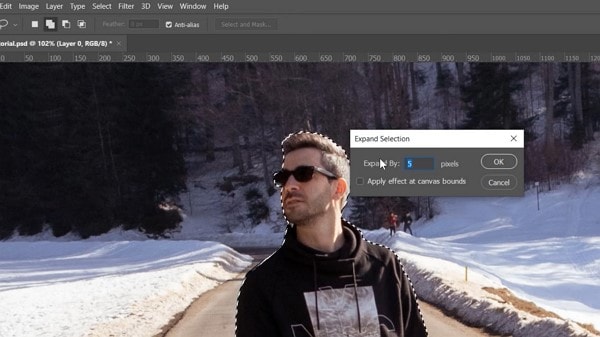
Hold the “CTRL” key and select your layer mask. Go to the “Select” tab, find and expand “Modify,” and tap “Expand.” Select a suitable number and tap “OK” Next, go to the “Edit” tab and select “Content-Aware Fill.”
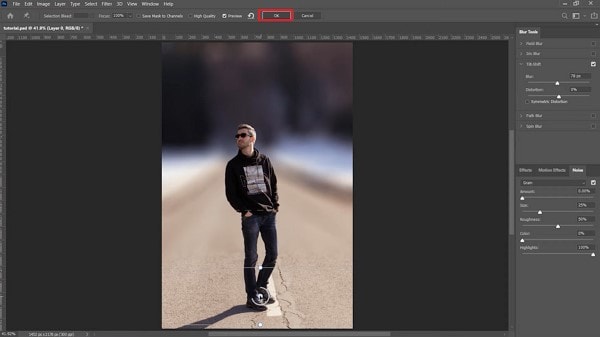
Step 3: Apply Photo Blur
Right-click on the background layer and choose “Convert to Smart Object.” Head over to the “Filter” tab, expand “Blur Gallery,” and choose “Tilt-Shift.” You can change the field lines to adjust the depth of field for your image and create a smooth transition. You can also control the intensity of the blur from the slider present on the right. Click “OK” and save your image.
 ZoneAlarm Pro Antivirus + Firewall NextGen
Part 3: How to Remove Photo Background?
Want to remove the background from your image? Photoshop offers a photo-cut background solution for that. You can try that by following the steps below:
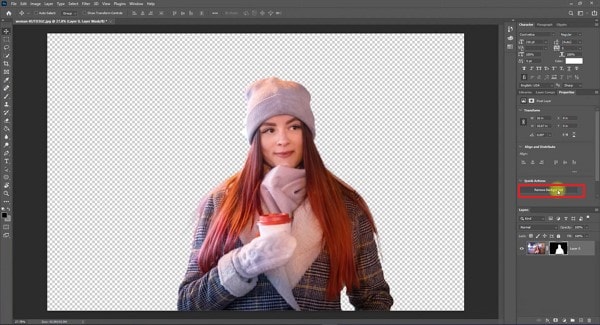
Step 1: Remove Background
To start with, insert your image and go to the Properties window. Under “Quick Options,” click on the “Remove Background” option. Photoshop will automatically detect your subject and remove the background.
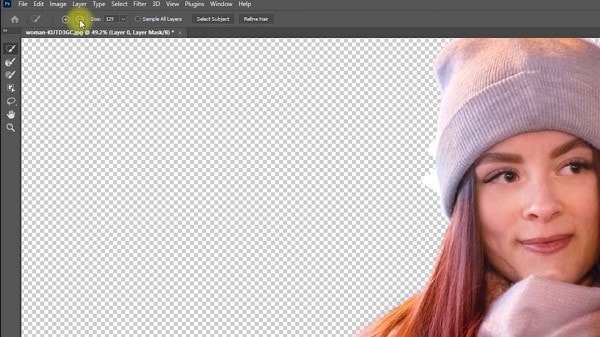
Step 2: Refine Outline
To fix any mistake in your selection, go to the “Select” tab and click “Select and Mask.” From the toolbar, choose the “Quick Selection” tool. You can use the minus sign to get rid of the extra background or the plus sign to bring back the background. Click on “OK” and save your image.
Part 4: 3 Best Websites to Download Stunning Photo Editing Background Images
Looking for a suitable background for your image? You can now download images and swap them for your original backgrounds easily. The following sites offer free background pictures for your every need.
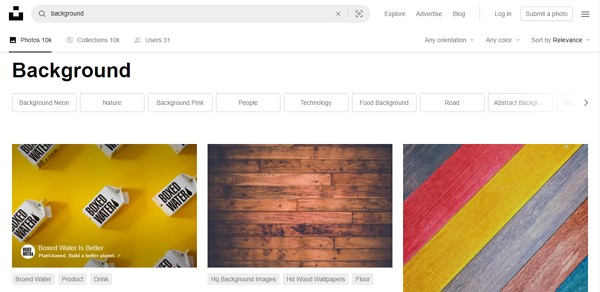
1. Unsplash
Want the best photo editing background library for your images? Unsplash might be the site you are looking for.
Unsplash is one of the biggest online storage sites for royalty-free images. You can find free images that you can use as image backgrounds in high resolution. You can search for any theme you want and find countless related images. Everything from nature to architectural and colorful backgrounds can be found on Unsplash.

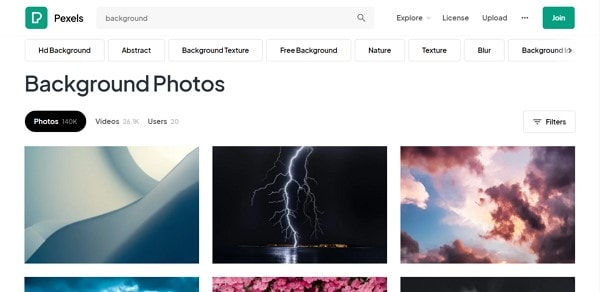
2. Pexels
Pexels is another web-based tool that contains numerous stock photos and videos for your various needs. You can find thousands of suitable images as your background photo. The app is used by designers, creators, bloggers, and everyday users alike.
You can search for the image background of your choice and download it for free on Pexels. Users can search for a specific theme, texture, color, and more. Pexels is powered by creators worldwide that contribute to its ever-growing library.
3. Pixabay
If you are looking for a website to find backgrounds in HD quality, you can try Pixabay. This remarkable site offers you a wide spectrum of options to choose from. Pixabay contains one of the widest collections of high-quality stock images.
Pixabay allows users to like, comment, or save the images of their choice. You can also refine your searches by orientation, size, color, and more. You can find background images that inspire and excite easily on Pixabay.

Wrapping Up
With a wide range of editing tools available today, you can change any aspect of your image quite easily. You can easily achieve photo editing background removal or photo editor blur background on Photoshop. To replace your image background, you can try the useful sites mentioned above. They can help you find some stunning background images for various purposes.
02 How to Blur Photo Background?
03 How to Remove Photo Background?
04 3 Best Websites to Download Stunning Photo Editing Background Images

Part 1: How Can You Edit Photo Background Better?
Want to achieve the perfect photo editing background technique? What better way to do that than Photoshop?
Photoshop by Adobe is a premium-level image and graphics editor. Photoshop has held the gold standard for editing graphics and images for years. It is undoubtedly the best photo background editor app you can find to get your job done. With its precise tools and a sleek interface, it is relatively easy to insert your photo and edit background image.
Here is how you can edit and replace your image background in Photoshop:
Step 1: Select your Subject
Add your image to the interface of the program. From the toolbar on the left, tap the “Quick Selection” tool. Now drag the area of the image you want to select using the brush. You can hold the “Alt” key and drag the unwanted areas to remove them from the selection.
Step 2: Mask your Selection
Go to the options bar present at the top. Tap on “Select and Mask” to convert your selection into a mask. From the “Properties” panel, tap “View Mode” to determine how you want to see your selection. “Overlay” works best in general.
 Forex Robotron Basic Package
Step 3: Polish the Edges
You can now further refine your selected part using the different tools offered by Photoshop. Use the “Quick Selection” tool to add or remove large areas. For hair and soft edges, you can use the “Refine Edge Brush” tool. The “Lasso/Polygonal Lasso” tool can help manually draw areas for your selection.

Step 4: Remove Residual Colors
From the panel at the right, select “Output Settings.” Check the box next to “Decontaminate Colors” to get rid of any leftover color fringe from your foreground. From “Output,” you now need to add a new layer by clicking on “New Layer with Layer Mask.”

Step 5: Add a New Background
You can now paste the image you wish to add as a background for your photo. Position your image on the layer below the one with your foreground. You can resize your background image if required by selecting the “Free Transform” tool.

Step 6: Fix the Colors
To blend the colors of your two images, select your foreground layer. Now go to “Image” and open “Adjustments.” From here, launch the “Match Color” popup window. Navigate to “Source” and select your image. From the “Layer” option, choose the layer you want to fix.
Tick the “Neutralize” box and adjust the “Luminance” and “Intensity” until you meet your requirements. You are all done now! Click “OK” and save your newly edited image.
Part 2: How to Blur Photo Background?
A blurred background helps bring your image into focus. If you want a photo editor to blur background of your image, you can try Photoshop. Here are the steps for that:
Step 1: Isolate Subject
Isolate your subject on a separate layer by accessing the “Quick Selection” tool and clicking on the “Select Subject” button. You can use the “Lasso” tool to refine your selection. Click on “Select and Mask” and select the “Black and White View.” Now, choose the output to “New Layer with Layer Mask.”
 vMix Pro - Software based live production. vMix Pro includes everything in vMix 4K plus 8 channels of Replay and 8 vMix Call
Step 2: Expand the Selection
Hold the “CTRL” key and select your layer mask. Go to the “Select” tab, find and expand “Modify,” and tap “Expand.” Select a suitable number and tap “OK” Next, go to the “Edit” tab and select “Content-Aware Fill.”
 KoolReport Pro is an advanced solution for creating data reports and dashboards in PHP. Equipped with all extended packages , KoolReport Pro is able to connect to various datasources, perform advanced data analysis, construct stunning charts and graphs and export your beautiful work to PDF, Excel, JPG or other formats. Plus, it includes powerful built-in reports such as pivot report and drill-down report which will save your time in building ones.
 It will help you to write dynamic data reports easily, to construct intuitive dashboards or to build a whole business intelligence cockpit.
KoolReport Pro package goes with Full Source Code, Royal Free, ONE (1) Year Priority Support, ONE (1) Year Free Upgrade and 30-Days Money Back Guarantee.
Developer License allows Single Developer to create Unlimited Reports, deploy on Unlimited Servers and able deliver the work to Unlimited Clients.
Step 3: Apply Photo Blur
Right-click on the background layer and choose “Convert to Smart Object.” Head over to the “Filter” tab, expand “Blur Gallery,” and choose “Tilt-Shift.” You can change the field lines to adjust the depth of field for your image and create a smooth transition. You can also control the intensity of the blur from the slider present on the right. Click “OK” and save your image.

Part 3: How to Remove Photo Background?
Want to remove the background from your image? Photoshop offers a photo-cut background solution for that. You can try that by following the steps below:
Step 1: Remove Background
To start with, insert your image and go to the Properties window. Under “Quick Options,” click on the “Remove Background” option. Photoshop will automatically detect your subject and remove the background.
Step 2: Refine Outline
To fix any mistake in your selection, go to the “Select” tab and click “Select and Mask.” From the toolbar, choose the “Quick Selection” tool. You can use the minus sign to get rid of the extra background or the plus sign to bring back the background. Click on “OK” and save your image.
 Simple and intuitive video editing
Part 4: 3 Best Websites to Download Stunning Photo Editing Background Images
Looking for a suitable background for your image? You can now download images and swap them for your original backgrounds easily. The following sites offer free background pictures for your every need.
1. Unsplash
Want the best photo editing background library for your images? Unsplash might be the site you are looking for.
Unsplash is one of the biggest online storage sites for royalty-free images. You can find free images that you can use as image backgrounds in high resolution. You can search for any theme you want and find countless related images. Everything from nature to architectural and colorful backgrounds can be found on Unsplash.
2. Pexels
Pexels is another web-based tool that contains numerous stock photos and videos for your various needs. You can find thousands of suitable images as your background photo. The app is used by designers, creators, bloggers, and everyday users alike.
You can search for the image background of your choice and download it for free on Pexels. Users can search for a specific theme, texture, color, and more. Pexels is powered by creators worldwide that contribute to its ever-growing library.
3. Pixabay
If you are looking for a website to find backgrounds in HD quality, you can try Pixabay. This remarkable site offers you a wide spectrum of options to choose from. Pixabay contains one of the widest collections of high-quality stock images.
Pixabay allows users to like, comment, or save the images of their choice. You can also refine your searches by orientation, size, color, and more. You can find background images that inspire and excite easily on Pixabay.
 Lyric Video Creator Professional Version
Wrapping Up
With a wide range of editing tools available today, you can change any aspect of your image quite easily. You can easily achieve photo editing background removal or photo editor blur background on Photoshop. To replace your image background, you can try the useful sites mentioned above. They can help you find some stunning background images for various purposes.
02 How to Blur Photo Background?
03 How to Remove Photo Background?
04 3 Best Websites to Download Stunning Photo Editing Background Images
Part 1: How Can You Edit Photo Background Better?
Want to achieve the perfect photo editing background technique? What better way to do that than Photoshop?
Photoshop by Adobe is a premium-level image and graphics editor. Photoshop has held the gold standard for editing graphics and images for years. It is undoubtedly the best photo background editor app you can find to get your job done. With its precise tools and a sleek interface, it is relatively easy to insert your photo and edit background image.
Here is how you can edit and replace your image background in Photoshop:
Step 1: Select your Subject
Add your image to the interface of the program. From the toolbar on the left, tap the “Quick Selection” tool. Now drag the area of the image you want to select using the brush. You can hold the “Alt” key and drag the unwanted areas to remove them from the selection.
Step 2: Mask your Selection
Go to the options bar present at the top. Tap on “Select and Mask” to convert your selection into a mask. From the “Properties” panel, tap “View Mode” to determine how you want to see your selection. “Overlay” works best in general.
Step 3: Polish the Edges
You can now further refine your selected part using the different tools offered by Photoshop. Use the “Quick Selection” tool to add or remove large areas. For hair and soft edges, you can use the “Refine Edge Brush” tool. The “Lasso/Polygonal Lasso” tool can help manually draw areas for your selection.
Step 4: Remove Residual Colors
From the panel at the right, select “Output Settings.” Check the box next to “Decontaminate Colors” to get rid of any leftover color fringe from your foreground. From “Output,” you now need to add a new layer by clicking on “New Layer with Layer Mask.”
Step 5: Add a New Background
You can now paste the image you wish to add as a background for your photo. Position your image on the layer below the one with your foreground. You can resize your background image if required by selecting the “Free Transform” tool.
Step 6: Fix the Colors
To blend the colors of your two images, select your foreground layer. Now go to “Image” and open “Adjustments.” From here, launch the “Match Color” popup window. Navigate to “Source” and select your image. From the “Layer” option, choose the layer you want to fix.
Tick the “Neutralize” box and adjust the “Luminance” and “Intensity” until you meet your requirements. You are all done now! Click “OK” and save your newly edited image.
Part 2: How to Blur Photo Background?
A blurred background helps bring your image into focus. If you want a photo editor to blur background of your image, you can try Photoshop. Here are the steps for that:
Step 1: Isolate Subject
Isolate your subject on a separate layer by accessing the “Quick Selection” tool and clicking on the “Select Subject” button. You can use the “Lasso” tool to refine your selection. Click on “Select and Mask” and select the “Black and White View.” Now, choose the output to “New Layer with Layer Mask.”
 CollageIt Pro
Step 2: Expand the Selection
Hold the “CTRL” key and select your layer mask. Go to the “Select” tab, find and expand “Modify,” and tap “Expand.” Select a suitable number and tap “OK” Next, go to the “Edit” tab and select “Content-Aware Fill.”
Step 3: Apply Photo Blur
Right-click on the background layer and choose “Convert to Smart Object.” Head over to the “Filter” tab, expand “Blur Gallery,” and choose “Tilt-Shift.” You can change the field lines to adjust the depth of field for your image and create a smooth transition. You can also control the intensity of the blur from the slider present on the right. Click “OK” and save your image.
Part 3: How to Remove Photo Background?
Want to remove the background from your image? Photoshop offers a photo-cut background solution for that. You can try that by following the steps below:
Step 1: Remove Background
To start with, insert your image and go to the Properties window. Under “Quick Options,” click on the “Remove Background” option. Photoshop will automatically detect your subject and remove the background.
Step 2: Refine Outline
To fix any mistake in your selection, go to the “Select” tab and click “Select and Mask.” From the toolbar, choose the “Quick Selection” tool. You can use the minus sign to get rid of the extra background or the plus sign to bring back the background. Click on “OK” and save your image.
 Software Update Pro - Check and update software installed on your computer.
Part 4: 3 Best Websites to Download Stunning Photo Editing Background Images
Looking for a suitable background for your image? You can now download images and swap them for your original backgrounds easily. The following sites offer free background pictures for your every need.
1. Unsplash
Want the best photo editing background library for your images? Unsplash might be the site you are looking for.
Unsplash is one of the biggest online storage sites for royalty-free images. You can find free images that you can use as image backgrounds in high resolution. You can search for any theme you want and find countless related images. Everything from nature to architectural and colorful backgrounds can be found on Unsplash.

2. Pexels
Pexels is another web-based tool that contains numerous stock photos and videos for your various needs. You can find thousands of suitable images as your background photo. The app is used by designers, creators, bloggers, and everyday users alike.
You can search for the image background of your choice and download it for free on Pexels. Users can search for a specific theme, texture, color, and more. Pexels is powered by creators worldwide that contribute to its ever-growing library.
3. Pixabay
If you are looking for a website to find backgrounds in HD quality, you can try Pixabay. This remarkable site offers you a wide spectrum of options to choose from. Pixabay contains one of the widest collections of high-quality stock images.
Pixabay allows users to like, comment, or save the images of their choice. You can also refine your searches by orientation, size, color, and more. You can find background images that inspire and excite easily on Pixabay.
Wrapping Up
With a wide range of editing tools available today, you can change any aspect of your image quite easily. You can easily achieve photo editing background removal or photo editor blur background on Photoshop. To replace your image background, you can try the useful sites mentioned above. They can help you find some stunning background images for various purposes.
02 How to Blur Photo Background?
03 How to Remove Photo Background?
04 3 Best Websites to Download Stunning Photo Editing Background Images
 PCDJ Karaoki is the complete professional karaoke software designed for KJs and karaoke venues. Karaoki includes an advanced automatic singer rotation list with singer history, key control, news ticker, next singers screen, a song book exporter and printer, a jukebox background music player and many other features designed so you can host karaoke shows faster and easier!
Part 1: How Can You Edit Photo Background Better?
Want to achieve the perfect photo editing background technique? What better way to do that than Photoshop?
Photoshop by Adobe is a premium-level image and graphics editor. Photoshop has held the gold standard for editing graphics and images for years. It is undoubtedly the best photo background editor app you can find to get your job done. With its precise tools and a sleek interface, it is relatively easy to insert your photo and edit background image.
Here is how you can edit and replace your image background in Photoshop:
Step 1: Select your Subject
Add your image to the interface of the program. From the toolbar on the left, tap the “Quick Selection” tool. Now drag the area of the image you want to select using the brush. You can hold the “Alt” key and drag the unwanted areas to remove them from the selection.
Step 2: Mask your Selection
Go to the options bar present at the top. Tap on “Select and Mask” to convert your selection into a mask. From the “Properties” panel, tap “View Mode” to determine how you want to see your selection. “Overlay” works best in general.
Step 3: Polish the Edges
You can now further refine your selected part using the different tools offered by Photoshop. Use the “Quick Selection” tool to add or remove large areas. For hair and soft edges, you can use the “Refine Edge Brush” tool. The “Lasso/Polygonal Lasso” tool can help manually draw areas for your selection.
Step 4: Remove Residual Colors
From the panel at the right, select “Output Settings.” Check the box next to “Decontaminate Colors” to get rid of any leftover color fringe from your foreground. From “Output,” you now need to add a new layer by clicking on “New Layer with Layer Mask.”
Step 5: Add a New Background
You can now paste the image you wish to add as a background for your photo. Position your image on the layer below the one with your foreground. You can resize your background image if required by selecting the “Free Transform” tool.
Step 6: Fix the Colors
To blend the colors of your two images, select your foreground layer. Now go to “Image” and open “Adjustments.” From here, launch the “Match Color” popup window. Navigate to “Source” and select your image. From the “Layer” option, choose the layer you want to fix.
Tick the “Neutralize” box and adjust the “Luminance” and “Intensity” until you meet your requirements. You are all done now! Click “OK” and save your newly edited image.
Part 2: How to Blur Photo Background?
A blurred background helps bring your image into focus. If you want a photo editor to blur background of your image, you can try Photoshop. Here are the steps for that:
Step 1: Isolate Subject
Isolate your subject on a separate layer by accessing the “Quick Selection” tool and clicking on the “Select Subject” button. You can use the “Lasso” tool to refine your selection. Click on “Select and Mask” and select the “Black and White View.” Now, choose the output to “New Layer with Layer Mask.”

Step 2: Expand the Selection
Hold the “CTRL” key and select your layer mask. Go to the “Select” tab, find and expand “Modify,” and tap “Expand.” Select a suitable number and tap “OK” Next, go to the “Edit” tab and select “Content-Aware Fill.”
Step 3: Apply Photo Blur
Right-click on the background layer and choose “Convert to Smart Object.” Head over to the “Filter” tab, expand “Blur Gallery,” and choose “Tilt-Shift.” You can change the field lines to adjust the depth of field for your image and create a smooth transition. You can also control the intensity of the blur from the slider present on the right. Click “OK” and save your image.
Part 3: How to Remove Photo Background?
Want to remove the background from your image? Photoshop offers a photo-cut background solution for that. You can try that by following the steps below:
Step 1: Remove Background
To start with, insert your image and go to the Properties window. Under “Quick Options,” click on the “Remove Background” option. Photoshop will automatically detect your subject and remove the background.
Step 2: Refine Outline
To fix any mistake in your selection, go to the “Select” tab and click “Select and Mask.” From the toolbar, choose the “Quick Selection” tool. You can use the minus sign to get rid of the extra background or the plus sign to bring back the background. Click on “OK” and save your image.

Part 4: 3 Best Websites to Download Stunning Photo Editing Background Images
Looking for a suitable background for your image? You can now download images and swap them for your original backgrounds easily. The following sites offer free background pictures for your every need.
1. Unsplash
Want the best photo editing background library for your images? Unsplash might be the site you are looking for.
Unsplash is one of the biggest online storage sites for royalty-free images. You can find free images that you can use as image backgrounds in high resolution. You can search for any theme you want and find countless related images. Everything from nature to architectural and colorful backgrounds can be found on Unsplash.
2. Pexels
Pexels is another web-based tool that contains numerous stock photos and videos for your various needs. You can find thousands of suitable images as your background photo. The app is used by designers, creators, bloggers, and everyday users alike.
You can search for the image background of your choice and download it for free on Pexels. Users can search for a specific theme, texture, color, and more. Pexels is powered by creators worldwide that contribute to its ever-growing library.

3. Pixabay
If you are looking for a website to find backgrounds in HD quality, you can try Pixabay. This remarkable site offers you a wide spectrum of options to choose from. Pixabay contains one of the widest collections of high-quality stock images.
Pixabay allows users to like, comment, or save the images of their choice. You can also refine your searches by orientation, size, color, and more. You can find background images that inspire and excite easily on Pixabay.

Wrapping Up
With a wide range of editing tools available today, you can change any aspect of your image quite easily. You can easily achieve photo editing background removal or photo editor blur background on Photoshop. To replace your image background, you can try the useful sites mentioned above. They can help you find some stunning background images for various purposes.
- Title: Techniques for Removing Cluttered Photo Backgrounds
- Author: Mark
- Created at : 2024-07-26 18:19:51
- Updated at : 2024-07-27 18:19:51
- Link: https://extra-lessons.techidaily.com/techniques-for-removing-cluttered-photo-backgrounds/
- License: This work is licensed under CC BY-NC-SA 4.0.