
"Transform Your HDR Images Into Professional-Grade Time Lapses with GoPro Studio"
Transform Your HDR Images Into Professional-Grade Time Lapses with GoPro Studio
How to Make Time Lapse Videos With GoPro Studio

Max Wales
Mar 27, 2024• Proven solutions
Time-lapse can be defined as a technique through which the photos are shot at a certain time interval and then played back at a faster speed which results in a lapse of time. There are 2 ways of creating time-lapse videos with GoPro:
- Record a still photo sequence on your action camera and then compile it later on your computer.
- Leave the task of compiling to your action camera to get an MP4 video.
The in-camera version, also known as the time lapse video mode, is present only in GoPro Hero4 and Hero5 series. For other GoPro models, it is necessary to use a software to compile images and video clips. The GoPro Studio, which developed by GoPro, is an ideal video editing software which allows you to create nicely edited time-lapse videos. In this article, we will show you how to create a time lapse video with images and clips in GoPro Studio.
 KoolReport Pro is an advanced solution for creating data reports and dashboards in PHP. Equipped with all extended packages , KoolReport Pro is able to connect to various datasources, perform advanced data analysis, construct stunning charts and graphs and export your beautiful work to PDF, Excel, JPG or other formats. Plus, it includes powerful built-in reports such as pivot report and drill-down report which will save your time in building ones.
 It will help you to write dynamic data reports easily, to construct intuitive dashboards or to build a whole business intelligence cockpit.
KoolReport Pro package goes with Full Source Code, Royal Free, ONE (1) Year Priority Support, ONE (1) Year Free Upgrade and 30-Days Money Back Guarantee.
Developer License allows Single Developer to create Unlimited Reports, deploy on Unlimited Servers and able deliver the work to Unlimited Clients.
Create GoPro Studio Time Lapse Videos from Images
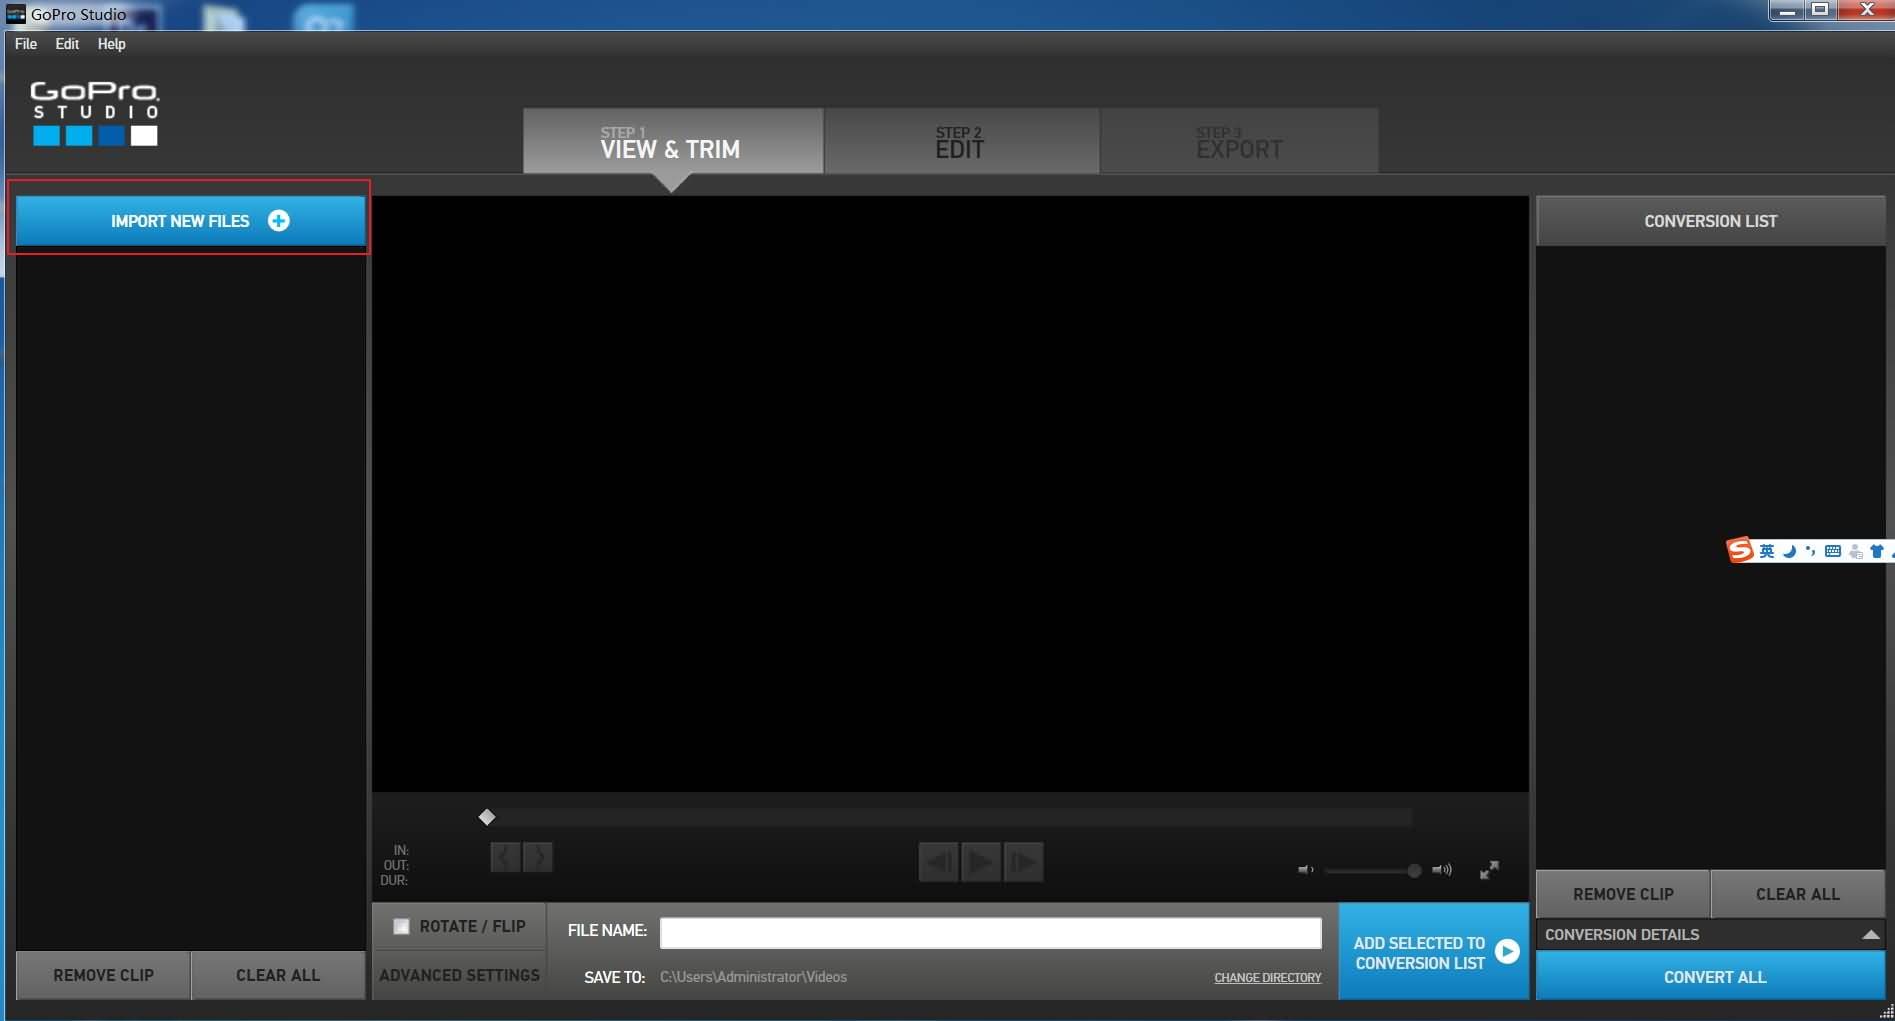
1. Import Images
The first thing you have to do is import your images. This can be done by clicking File > Import Media or click Import New Files on the left panel. Ideally you need to keep all your photos in a single folder and name them according to sequence. This would instantly pick up the image sequence when you click on the first file. Then the software will create a reference video automatically, which may take a couple of seconds.
Learn How to shoot a time-lapse video with GoPro Hero5 Black
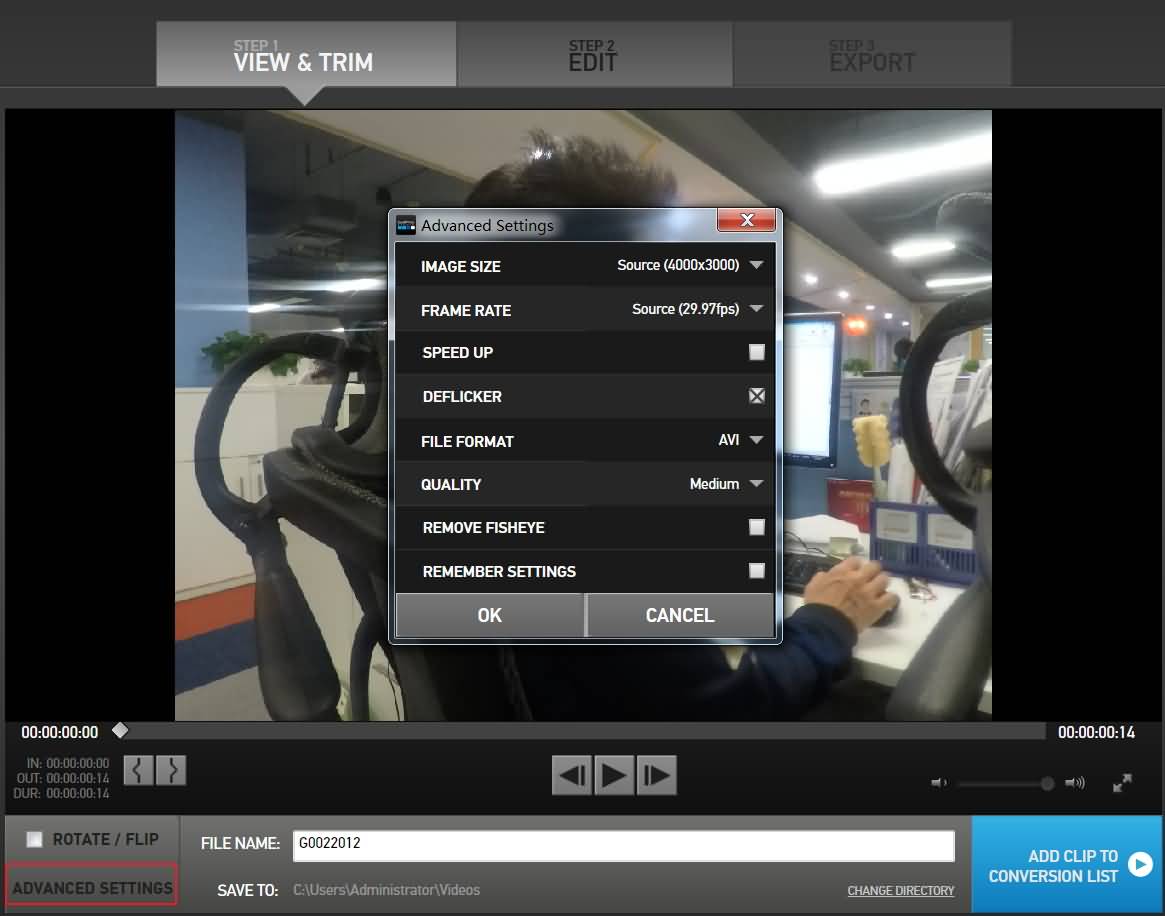
2. Select the Clips
The reference video would be imported by GoPro Studio. Go to Import New Files and click the video to add it to the central window. When you click the Play button, you can watch the time-lapse played at approximately 30 fps. In the left hand corner of the bottom you can see the Advanced Setting button. By adjusting these settings you will be able to select your desired frame rate. There are also other options like Quality setting, Motion Blur and the Speedup option.
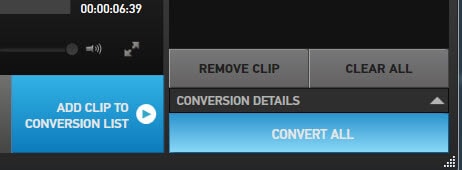
3. Convert
The clip is automatically queued at the conversion list. While adding more than one clip just repeat the process to add them to your conversion list panel. Now you just need to click the convert button, and all the sequences would be converted into a ready-to-edit video file. It might take some time depending on how many clips you have. You will see a preview in a tiny thumbnail while it’s processing.
4. Edit
Once the conversion is done, you need to click on Proceed to Next Stage which would take you to the edit panel. Now drag the videos from the media window and place them on the timeline just under the centre window. The video can be edited here and the speed can be altered in the right hand window by unfolding the video and dragging the speed slider. The framing can also be altered so that you can select how much of the image you want to show.

5. Export
If you are trying to find the easiest way to export a basic time-lapse footage then you can do away with the storyboard panel. If the basic settings don’t bother you, then just click the Export button. A new browser window would open, where you can name the file to be exported and select the location where you want to save. You can even select the setting at which you want it exported. You will find optimized settings for Vimeo and YouTube, and you can even do the setting individually by going to the Custom option.
Learn more in Complete Guide to Edit a Video with GoPro Studio

Create GoPro timelapse video from Video Clips
You can also choose to make a time-lapse video with the help of the video clips shot on your action camera.
After importing and converting your videos, go to the Edit section and drag the speed slider under the Video menu on the right hand panel. Generally 100% is the normal speed but you can always increase the number for a higher speed.
However, importing your video clips to GoPro Studio is a rather time taking process which is going to test your patience. So, we recommend you the Wondershare Filmora software. With Filmora, you will be able to import a video as large as 8GB in just 2 minutes, and the trim and merge feature would allow you to use certain specific frames without any loss in quality. The Filmora editing software would also allow you to speed up the video clips, so that you can speed up the trimmed no quality loss clips to make a wonderful time lapse video.

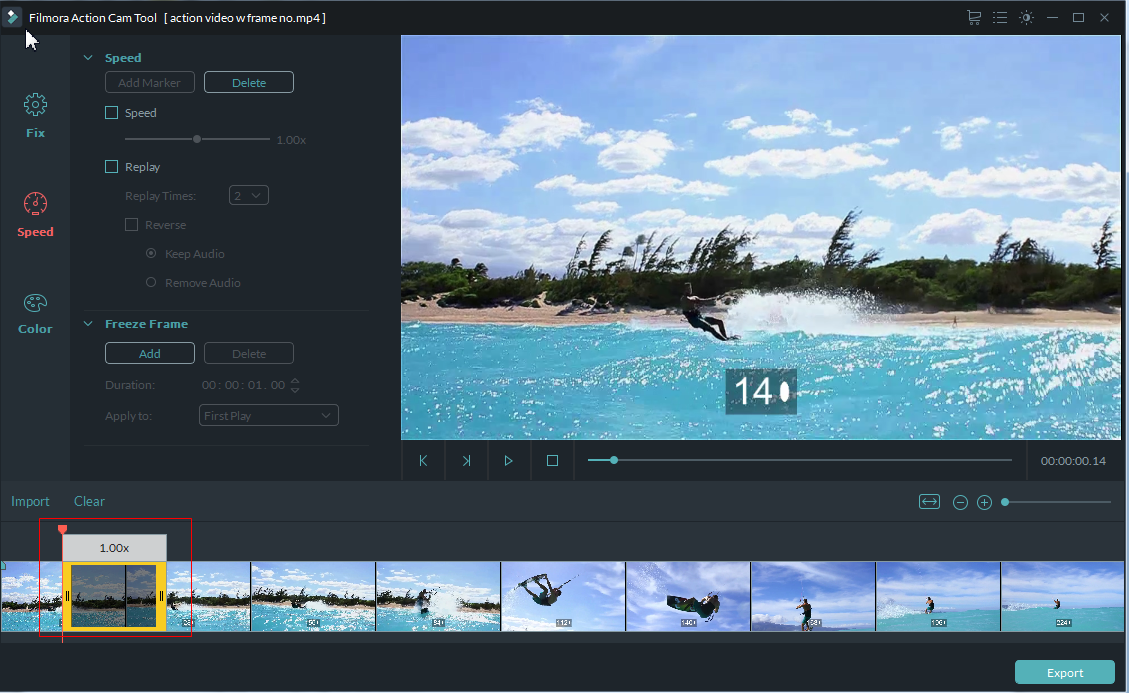
Check this video to know more about what can Filmora do with your GoPro footages
 Download Mac Version ](https://tools.techidaily.com/wondershare/filmora/download/ )

Max Wales
Max Wales is a writer and a lover of all things video.
Follow @Max Wales
Max Wales
Mar 27, 2024• Proven solutions
Time-lapse can be defined as a technique through which the photos are shot at a certain time interval and then played back at a faster speed which results in a lapse of time. There are 2 ways of creating time-lapse videos with GoPro:
- Record a still photo sequence on your action camera and then compile it later on your computer.
- Leave the task of compiling to your action camera to get an MP4 video.
The in-camera version, also known as the time lapse video mode, is present only in GoPro Hero4 and Hero5 series. For other GoPro models, it is necessary to use a software to compile images and video clips. The GoPro Studio, which developed by GoPro, is an ideal video editing software which allows you to create nicely edited time-lapse videos. In this article, we will show you how to create a time lapse video with images and clips in GoPro Studio.
Create GoPro Studio Time Lapse Videos from Images
1. Import Images
The first thing you have to do is import your images. This can be done by clicking File > Import Media or click Import New Files on the left panel. Ideally you need to keep all your photos in a single folder and name them according to sequence. This would instantly pick up the image sequence when you click on the first file. Then the software will create a reference video automatically, which may take a couple of seconds.
Learn How to shoot a time-lapse video with GoPro Hero5 Black
2. Select the Clips
The reference video would be imported by GoPro Studio. Go to Import New Files and click the video to add it to the central window. When you click the Play button, you can watch the time-lapse played at approximately 30 fps. In the left hand corner of the bottom you can see the Advanced Setting button. By adjusting these settings you will be able to select your desired frame rate. There are also other options like Quality setting, Motion Blur and the Speedup option.
3. Convert
The clip is automatically queued at the conversion list. While adding more than one clip just repeat the process to add them to your conversion list panel. Now you just need to click the convert button, and all the sequences would be converted into a ready-to-edit video file. It might take some time depending on how many clips you have. You will see a preview in a tiny thumbnail while it’s processing.
4. Edit
Once the conversion is done, you need to click on Proceed to Next Stage which would take you to the edit panel. Now drag the videos from the media window and place them on the timeline just under the centre window. The video can be edited here and the speed can be altered in the right hand window by unfolding the video and dragging the speed slider. The framing can also be altered so that you can select how much of the image you want to show.
 OtsAV Radio Webcaster
5. Export
If you are trying to find the easiest way to export a basic time-lapse footage then you can do away with the storyboard panel. If the basic settings don’t bother you, then just click the Export button. A new browser window would open, where you can name the file to be exported and select the location where you want to save. You can even select the setting at which you want it exported. You will find optimized settings for Vimeo and YouTube, and you can even do the setting individually by going to the Custom option.
Learn more in Complete Guide to Edit a Video with GoPro Studio
Create GoPro timelapse video from Video Clips
You can also choose to make a time-lapse video with the help of the video clips shot on your action camera.
After importing and converting your videos, go to the Edit section and drag the speed slider under the Video menu on the right hand panel. Generally 100% is the normal speed but you can always increase the number for a higher speed.
However, importing your video clips to GoPro Studio is a rather time taking process which is going to test your patience. So, we recommend you the Wondershare Filmora software. With Filmora, you will be able to import a video as large as 8GB in just 2 minutes, and the trim and merge feature would allow you to use certain specific frames without any loss in quality. The Filmora editing software would also allow you to speed up the video clips, so that you can speed up the trimmed no quality loss clips to make a wonderful time lapse video.

Check this video to know more about what can Filmora do with your GoPro footages
Download Mac Version ](https://tools.techidaily.com/wondershare/filmora/download/ )

Max Wales
Max Wales is a writer and a lover of all things video.
Follow @Max Wales
Max Wales
Mar 27, 2024• Proven solutions
Time-lapse can be defined as a technique through which the photos are shot at a certain time interval and then played back at a faster speed which results in a lapse of time. There are 2 ways of creating time-lapse videos with GoPro:
- Record a still photo sequence on your action camera and then compile it later on your computer.
- Leave the task of compiling to your action camera to get an MP4 video.
The in-camera version, also known as the time lapse video mode, is present only in GoPro Hero4 and Hero5 series. For other GoPro models, it is necessary to use a software to compile images and video clips. The GoPro Studio, which developed by GoPro, is an ideal video editing software which allows you to create nicely edited time-lapse videos. In this article, we will show you how to create a time lapse video with images and clips in GoPro Studio.

Create GoPro Studio Time Lapse Videos from Images
1. Import Images
The first thing you have to do is import your images. This can be done by clicking File > Import Media or click Import New Files on the left panel. Ideally you need to keep all your photos in a single folder and name them according to sequence. This would instantly pick up the image sequence when you click on the first file. Then the software will create a reference video automatically, which may take a couple of seconds.
Learn How to shoot a time-lapse video with GoPro Hero5 Black
2. Select the Clips
The reference video would be imported by GoPro Studio. Go to Import New Files and click the video to add it to the central window. When you click the Play button, you can watch the time-lapse played at approximately 30 fps. In the left hand corner of the bottom you can see the Advanced Setting button. By adjusting these settings you will be able to select your desired frame rate. There are also other options like Quality setting, Motion Blur and the Speedup option.
3. Convert
The clip is automatically queued at the conversion list. While adding more than one clip just repeat the process to add them to your conversion list panel. Now you just need to click the convert button, and all the sequences would be converted into a ready-to-edit video file. It might take some time depending on how many clips you have. You will see a preview in a tiny thumbnail while it’s processing.
4. Edit
Once the conversion is done, you need to click on Proceed to Next Stage which would take you to the edit panel. Now drag the videos from the media window and place them on the timeline just under the centre window. The video can be edited here and the speed can be altered in the right hand window by unfolding the video and dragging the speed slider. The framing can also be altered so that you can select how much of the image you want to show.
5. Export
If you are trying to find the easiest way to export a basic time-lapse footage then you can do away with the storyboard panel. If the basic settings don’t bother you, then just click the Export button. A new browser window would open, where you can name the file to be exported and select the location where you want to save. You can even select the setting at which you want it exported. You will find optimized settings for Vimeo and YouTube, and you can even do the setting individually by going to the Custom option.
Learn more in Complete Guide to Edit a Video with GoPro Studio
Create GoPro timelapse video from Video Clips
You can also choose to make a time-lapse video with the help of the video clips shot on your action camera.
After importing and converting your videos, go to the Edit section and drag the speed slider under the Video menu on the right hand panel. Generally 100% is the normal speed but you can always increase the number for a higher speed.
However, importing your video clips to GoPro Studio is a rather time taking process which is going to test your patience. So, we recommend you the Wondershare Filmora software. With Filmora, you will be able to import a video as large as 8GB in just 2 minutes, and the trim and merge feature would allow you to use certain specific frames without any loss in quality. The Filmora editing software would also allow you to speed up the video clips, so that you can speed up the trimmed no quality loss clips to make a wonderful time lapse video.
Check this video to know more about what can Filmora do with your GoPro footages
Download Mac Version ](https://tools.techidaily.com/wondershare/filmora/download/ )
Max Wales
Max Wales is a writer and a lover of all things video.
Follow @Max Wales
Max Wales
Mar 27, 2024• Proven solutions
Time-lapse can be defined as a technique through which the photos are shot at a certain time interval and then played back at a faster speed which results in a lapse of time. There are 2 ways of creating time-lapse videos with GoPro:
- Record a still photo sequence on your action camera and then compile it later on your computer.
- Leave the task of compiling to your action camera to get an MP4 video.
The in-camera version, also known as the time lapse video mode, is present only in GoPro Hero4 and Hero5 series. For other GoPro models, it is necessary to use a software to compile images and video clips. The GoPro Studio, which developed by GoPro, is an ideal video editing software which allows you to create nicely edited time-lapse videos. In this article, we will show you how to create a time lapse video with images and clips in GoPro Studio.
Create GoPro Studio Time Lapse Videos from Images
1. Import Images
The first thing you have to do is import your images. This can be done by clicking File > Import Media or click Import New Files on the left panel. Ideally you need to keep all your photos in a single folder and name them according to sequence. This would instantly pick up the image sequence when you click on the first file. Then the software will create a reference video automatically, which may take a couple of seconds.
Learn How to shoot a time-lapse video with GoPro Hero5 Black

2. Select the Clips
The reference video would be imported by GoPro Studio. Go to Import New Files and click the video to add it to the central window. When you click the Play button, you can watch the time-lapse played at approximately 30 fps. In the left hand corner of the bottom you can see the Advanced Setting button. By adjusting these settings you will be able to select your desired frame rate. There are also other options like Quality setting, Motion Blur and the Speedup option.
3. Convert
The clip is automatically queued at the conversion list. While adding more than one clip just repeat the process to add them to your conversion list panel. Now you just need to click the convert button, and all the sequences would be converted into a ready-to-edit video file. It might take some time depending on how many clips you have. You will see a preview in a tiny thumbnail while it’s processing.
4. Edit
Once the conversion is done, you need to click on Proceed to Next Stage which would take you to the edit panel. Now drag the videos from the media window and place them on the timeline just under the centre window. The video can be edited here and the speed can be altered in the right hand window by unfolding the video and dragging the speed slider. The framing can also be altered so that you can select how much of the image you want to show.
5. Export
If you are trying to find the easiest way to export a basic time-lapse footage then you can do away with the storyboard panel. If the basic settings don’t bother you, then just click the Export button. A new browser window would open, where you can name the file to be exported and select the location where you want to save. You can even select the setting at which you want it exported. You will find optimized settings for Vimeo and YouTube, and you can even do the setting individually by going to the Custom option.
Learn more in Complete Guide to Edit a Video with GoPro Studio
Create GoPro timelapse video from Video Clips
You can also choose to make a time-lapse video with the help of the video clips shot on your action camera.
After importing and converting your videos, go to the Edit section and drag the speed slider under the Video menu on the right hand panel. Generally 100% is the normal speed but you can always increase the number for a higher speed.
However, importing your video clips to GoPro Studio is a rather time taking process which is going to test your patience. So, we recommend you the Wondershare Filmora software. With Filmora, you will be able to import a video as large as 8GB in just 2 minutes, and the trim and merge feature would allow you to use certain specific frames without any loss in quality. The Filmora editing software would also allow you to speed up the video clips, so that you can speed up the trimmed no quality loss clips to make a wonderful time lapse video.
Check this video to know more about what can Filmora do with your GoPro footages
Download Mac Version ](https://tools.techidaily.com/wondershare/filmora/download/ )
 The Tube Sites Submitter is a fast and efficient tool for anyone who needs to upload videos quickly, easily and automatically to hundreds of tube sites in mere minutes .
Max Wales
Max Wales is a writer and a lover of all things video.
Follow @Max Wales
- Title: Transform Your HDR Images Into Professional-Grade Time Lapses with GoPro Studio
- Author: Mark
- Created at : 2024-07-26 19:04:21
- Updated at : 2024-07-27 19:04:21
- Link: https://extra-lessons.techidaily.com/transform-your-hdr-images-into-professional-grade-time-lapses-with-gopro-studio/
- License: This work is licensed under CC BY-NC-SA 4.0.