![[Updated] Azure for Audio Transcriptions A Beginner’s Manual](https://thmb.techidaily.com/c225407e5eb523ea35626965d7952f3e8eff461a435028604a3c634507f598f5.png)
"[Updated] Azure for Audio Transcriptions A Beginner’s Manual"
Azure for Audio Transcriptions: A Beginner’s Manual
Are you tired of manually typing texts into document editors like Word and Notepad? Use Microsoft speech to text service. This service was launched in 2020 alongside the text-to-speech service, which includes famous computer-generated voices like Microsoft Sam and his brother, Mike. So, in this short read, you’ll learn what Microsoft Azure speech to text service is and its capabilities. I’ll also introduce you to the best Microsoft Azure STT alternatives. Let’s hunker down!
Top Alternative to Microsoft Azure STT Save plenty of time on transcribing subtitles and boost your editing efficiency by applying Filmora Speech-To-Text.
Try STT Now Try STT Now Explore STT


Part 1: What is Microsoft Azure and Speech Studio?
Microsoft Azure STT and TTS are part of Microsoft Cognitive Services Speech. These cognitive services feature state-of-the-art intelligence covering voice recognition, speaker recognition, machine translation, and OCR (Optical Character Recognition). The Microsoft speech to text service uses Azure Machine Learning (Azure ML) to auto-recognize, analyze, and convert human voices to editable and searchable texts.
Having said that, Azure STT lets you transcribe streaming audio, microphone commentary, or local audio files. It supports 100+ languages, including English, German, French, Swahili, Hindi, Ukrainian, Turkish, Arabic, and more. Remember that this service also supports batch transcription, allowing you to transcribe multiple audios in batch.
In the meantime, Azure STT is available in many formats, including Speech SDK. Speech SDK (Software Development Kit) allows you to use popular programming languages to create a speech-enabled application. It’s compatible with Java, JavaScript, Python, Visual Studio C++, Swift, and Objective-C.
If you’re not good with programming languages, use Speech CLI, a command tool that allows you to use the speech recognition service without entering a code. Put simply, it features a minimal setup with precise requirements. Plus, it features pretty much everything you’ll find in Speech SDK. So, it depends on your skills and preference.
It is also worth noting that Azure Speech Studio supports keyword recognition or keyword spotting. You can generate keyword recognition models and specify any short phrase or word. Users can also personalize keywords with the correct punctuations. And best of all, there is no extra cost for customizing keywords.
Part 2: Step by Step Guide to Transcribe Speech to Text with Microsoft Speech Studio
Now let’s learn how to use Microsoft Azure speech recognition services. Remember, the conversion may not be accurate if the audio has lots of domain-industry jargon or ambient noises. Therefore, use crisp-clear audio with an external mic or train the software to recognize specific words or keywords. Let’s get started!
Step1Start by creating a Microsoft Azure account. You’ll start with the free version, which gives you a $200 credit to use within 30 days. After depleting the free credits, use the pay-as-you-go model, which unlocks 40+ Azure services.
Step2After creating a Microsoft Azure portal, you’ll see all Azure services. Click the Speech Services tab or search for “speech services” on the search bar. Now click Create and then fill out the project details. Then, click Review and Create before clicking Create.
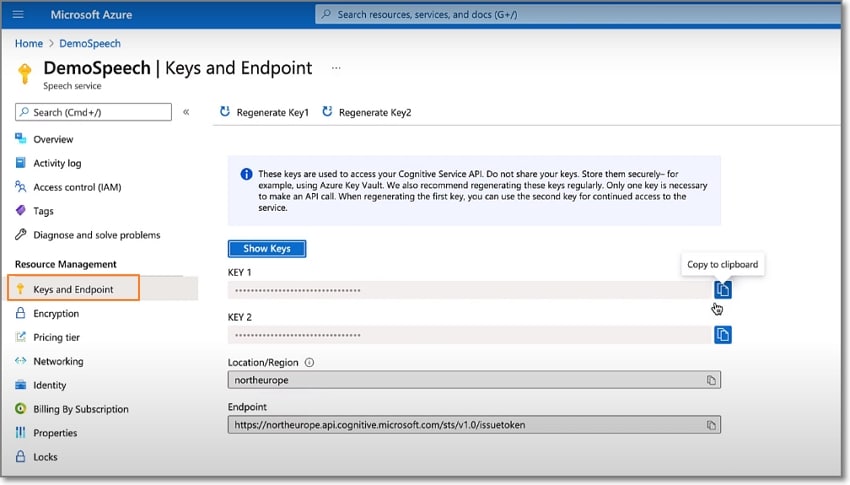
Step3The program will take a while to deploy an instance. Now tap Keys and endpoints on the left pane and copy the key and region identifier as you may need them later on.
Step4Download and install Microsoft Visual C++ and .NET Core 3.1 Runtime. Next, install Speech CL on .NET by running this command “**dotnet tool install -global Microsoft.CognitiveServices.Speech.CLI.**” Alternatively, download and install Speech CLI for Windows PCs as a ZIP file .
Step5Now enter the Azure regional identifier and subscription key on Windows Terminal or PowerShell. To configure the region and key, run these commands; “spx config @key –set SUBSCRIPTION-KEY and **spx config @region –set REGION.**”
Step6Now it’s time to convert speech to text using Azure STT Service. To do that, run “spx recognize -microphone” on Terminal or PowerShell. Azure Speech CLI will listen to sound input and convert it to text. And there is that!
![]()
Note: Click this video for a detailed guide on how to use Azure Speech Services with Visual Basic (SDK).
Part 3: What Are the Free Alternatives to the Microsoft Speech to Text Service?
We should all agree that using Microsoft Azures Speech Service is not a walk in the park. You need some knowledge of programming and Windows Command Prompt. Even worse, you’ll have to pay each time you want to convert speech to text after depleting the free credits.
Fortunately, there’s no shortage of free speech to text converters for beginners. So, in this part, we’ll discuss some free Microsoft Azure STT alternatives for beginners.
1. Wondershare Filmora
Let’s start with the best offline speech-to-text converter for macOS and Windows systems - Filmora. It’s a video editor for creating award-winning videos without prior editing skills. Just upload your local video and edit it as you please. And yes, it works with a host of video formats.
When you want to make perfect videos, you can use Filmora’s STT feature. Wondershare Filmora Speech to Text is quite different with other STT service providers. Other STT platforms/stages require you to use the application to convert speech-to-text, save, and export into other third-party software. However, Wondershare Filmora allows you to directly convert your speech-to-text on an ongoing production. For example, you can convert speech into subtitles during a video production on Wondershare Filmora.
What’s more, now Filmora’s STT feature supports direct transcription of bilingual subtitles with up to 27 languages of transcription in Filmora.
Top Adavantages of Filmora STT
- Supports direct transcription of bilingual subtitles.
- Allows to transcribe video speech to text in one click.
- Boosts editing efficiency by applying the STT feature.
Make STT Videos For Win 7 or later(64-bit)
Make STT Videos For macOS 10.14 or later

Use Filmora To Make STT videos
Step 1
Select the audio asset in the timeline, and click the “Speech-to-Text” icon in the toolbar; if there is no supported file type on the timeline, it will not be displayed.

Step 2
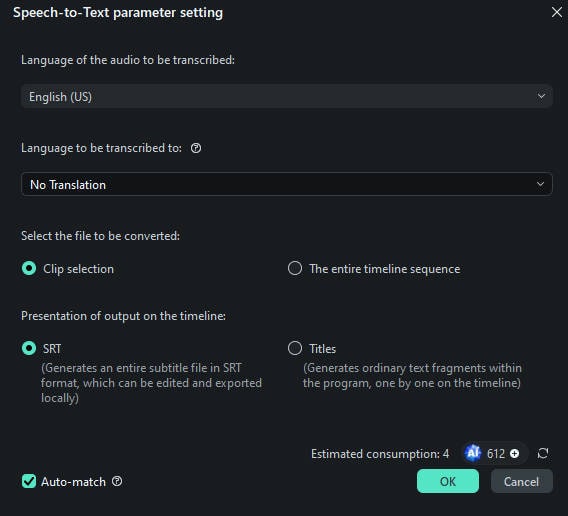
Click the “Speech-to-Text” icon, and it will show the parameter settings. You can choose the languages to be transcribed and to be transcribed to. Filmora’s STT feature supports direct transcription of bilingual subtitles with up to 27 languages of transcription

2. Google Docs - Free
 ZoneAlarm Pro Antivirus + Firewall NextGen
If you’re looking for free voice typing software, you’re better off with Google Docs. Most of you may not be aware that Google Docs can accurately convert speech to text. This makes it a handy tool if you find speaking easier than writing. As expected, this voice transcription tool recognizes hundreds of languages, like English, French, Italian, Hindi, etc.
But although it does a commendable job, less-than-clear audio won’t give you accurate transcriptions. Also, it doesn’t feature niceties like periods, commas, and other punctuations. As such, stick to a professional app like Filmora to transcribe your audio to text.
Steps to convert voice to text with Google Docs:
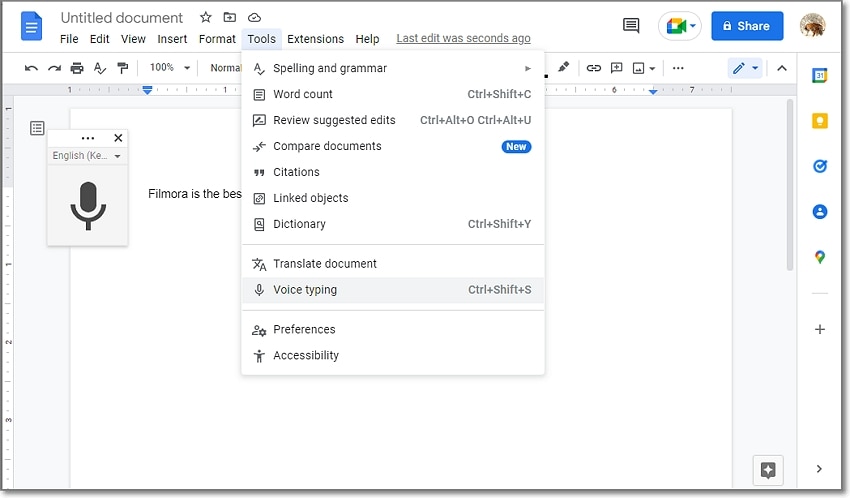
Step1Open a new document on Google Docs and then click Voice typing. The inbuilt microphone will automatically launch.
Step2Next, click the language drop-down arrow on the microphone to choose the transcription language. You can dictate texts in English, Espanol, French, Italian, Afrikaans, Arabic, and more.
Step3Click the Microphone icon to start dictating texts on Google Docs. After dictating enough texts, tap the red Microphone icon and edit your text. It’s that simple!

3.Audtext - $60 one-time fee
If Google’s voice recognition service is too slow for your liking, consider Audtext. It’s a highly rated online program that uses cutting-edge machine learning technology to transcribe audio to text in 60+ languages. You can easily train this program to identify the speaker in your interview or podcast file.
Meanwhile, Audtext can transcribe typical video and audio formats, including MP3, WAV, M4A, MP4, MOV, and more. And after transcribing audio to text, exploit the inbuilt text editor to retouch and make your text presentable.
Let’s find out how this STT service works:
Step1Create a transcription account on Audtext and click New Upload to choose the transcription mode. You can select the automatic transcription that uses AI or professional real-human transcription. So, let’s choose Automatic.
Step2Drag-n-drop your video or audio file on the program and then choose the transcription language. After adding your file, click Upload to scan and transcribe it. This should take a while.
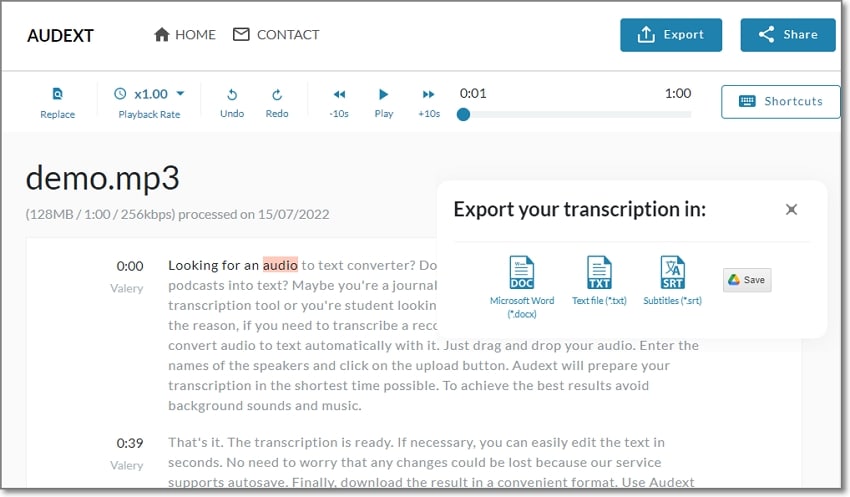
Step3Finally, click the transcribed text file to edit it with new texts and punctuations on the inbuilt editor. You can export your transcription in .txt, .srt, or .docx formats. Directly export to Google Drive is also available.
 SwifDoo PDF 2-Year Plan
Final Words
Up to this point, you should be ready to get started with the Microsoft Cognitive Services Speech. The speech-to-text feature allows you to convert unlimited voices to text on your computer. However, the program can be challenging to set up if you’re not a techie.
In that case, use a more straightforward option like Google Docs to dictate texts on the text editor. You might also want to consider Filmora 11 to encode any local audio or video file to editable text. Time to try!
Free Download For Win 7 or later(64-bit)
Free Download For macOS 10.14 or later
Try STT Now Try STT Now Explore STT
Part 1: What is Microsoft Azure and Speech Studio?
Microsoft Azure STT and TTS are part of Microsoft Cognitive Services Speech. These cognitive services feature state-of-the-art intelligence covering voice recognition, speaker recognition, machine translation, and OCR (Optical Character Recognition). The Microsoft speech to text service uses Azure Machine Learning (Azure ML) to auto-recognize, analyze, and convert human voices to editable and searchable texts.
Having said that, Azure STT lets you transcribe streaming audio, microphone commentary, or local audio files. It supports 100+ languages, including English, German, French, Swahili, Hindi, Ukrainian, Turkish, Arabic, and more. Remember that this service also supports batch transcription, allowing you to transcribe multiple audios in batch.
In the meantime, Azure STT is available in many formats, including Speech SDK. Speech SDK (Software Development Kit) allows you to use popular programming languages to create a speech-enabled application. It’s compatible with Java, JavaScript, Python, Visual Studio C++, Swift, and Objective-C.
If you’re not good with programming languages, use Speech CLI, a command tool that allows you to use the speech recognition service without entering a code. Put simply, it features a minimal setup with precise requirements. Plus, it features pretty much everything you’ll find in Speech SDK. So, it depends on your skills and preference.
It is also worth noting that Azure Speech Studio supports keyword recognition or keyword spotting. You can generate keyword recognition models and specify any short phrase or word. Users can also personalize keywords with the correct punctuations. And best of all, there is no extra cost for customizing keywords.
 With Screensaver Wonder you can easily make a screensaver from your own pictures and video files. Create screensavers for your own computer or create standalone, self-installing screensavers for easy sharing with your friends. Together with its sister product Screensaver Factory, Screensaver Wonder is one of the most popular screensaver software products in the world, helping thousands of users decorate their computer screens quickly and easily.
Part 2: Step by Step Guide to Transcribe Speech to Text with Microsoft Speech Studio
Now let’s learn how to use Microsoft Azure speech recognition services. Remember, the conversion may not be accurate if the audio has lots of domain-industry jargon or ambient noises. Therefore, use crisp-clear audio with an external mic or train the software to recognize specific words or keywords. Let’s get started!
Step1Start by creating a Microsoft Azure account. You’ll start with the free version, which gives you a $200 credit to use within 30 days. After depleting the free credits, use the pay-as-you-go model, which unlocks 40+ Azure services.
Step2After creating a Microsoft Azure portal, you’ll see all Azure services. Click the Speech Services tab or search for “speech services” on the search bar. Now click Create and then fill out the project details. Then, click Review and Create before clicking Create.
Step3The program will take a while to deploy an instance. Now tap Keys and endpoints on the left pane and copy the key and region identifier as you may need them later on.
Step4Download and install Microsoft Visual C++ and .NET Core 3.1 Runtime. Next, install Speech CL on .NET by running this command “**dotnet tool install -global Microsoft.CognitiveServices.Speech.CLI.**” Alternatively, download and install Speech CLI for Windows PCs as a ZIP file .
Step5Now enter the Azure regional identifier and subscription key on Windows Terminal or PowerShell. To configure the region and key, run these commands; “spx config @key –set SUBSCRIPTION-KEY and **spx config @region –set REGION.**”
Step6Now it’s time to convert speech to text using Azure STT Service. To do that, run “spx recognize -microphone” on Terminal or PowerShell. Azure Speech CLI will listen to sound input and convert it to text. And there is that!
![]()
Note: Click this video for a detailed guide on how to use Azure Speech Services with Visual Basic (SDK).
Part 3: What Are the Free Alternatives to the Microsoft Speech to Text Service?
We should all agree that using Microsoft Azures Speech Service is not a walk in the park. You need some knowledge of programming and Windows Command Prompt. Even worse, you’ll have to pay each time you want to convert speech to text after depleting the free credits.
Fortunately, there’s no shortage of free speech to text converters for beginners. So, in this part, we’ll discuss some free Microsoft Azure STT alternatives for beginners.
1. Wondershare Filmora
Let’s start with the best offline speech-to-text converter for macOS and Windows systems - Filmora. It’s a video editor for creating award-winning videos without prior editing skills. Just upload your local video and edit it as you please. And yes, it works with a host of video formats.
When you want to make perfect videos, you can use Filmora’s STT feature. Wondershare Filmora Speech to Text is quite different with other STT service providers. Other STT platforms/stages require you to use the application to convert speech-to-text, save, and export into other third-party software. However, Wondershare Filmora allows you to directly convert your speech-to-text on an ongoing production. For example, you can convert speech into subtitles during a video production on Wondershare Filmora.
What’s more, now Filmora’s STT feature supports direct transcription of bilingual subtitles with up to 27 languages of transcription in Filmora.
Top Adavantages of Filmora STT
- Supports direct transcription of bilingual subtitles.
- Allows to transcribe video speech to text in one click.
- Boosts editing efficiency by applying the STT feature.
Make STT Videos For Win 7 or later(64-bit)
Make STT Videos For macOS 10.14 or later
Use Filmora To Make STT videos
Step 1
Select the audio asset in the timeline, and click the “Speech-to-Text” icon in the toolbar; if there is no supported file type on the timeline, it will not be displayed.
Step 2
Click the “Speech-to-Text” icon, and it will show the parameter settings. You can choose the languages to be transcribed and to be transcribed to. Filmora’s STT feature supports direct transcription of bilingual subtitles with up to 27 languages of transcription
2. Google Docs - Free

If you’re looking for free voice typing software, you’re better off with Google Docs. Most of you may not be aware that Google Docs can accurately convert speech to text. This makes it a handy tool if you find speaking easier than writing. As expected, this voice transcription tool recognizes hundreds of languages, like English, French, Italian, Hindi, etc.
But although it does a commendable job, less-than-clear audio won’t give you accurate transcriptions. Also, it doesn’t feature niceties like periods, commas, and other punctuations. As such, stick to a professional app like Filmora to transcribe your audio to text.
Steps to convert voice to text with Google Docs:
Step1Open a new document on Google Docs and then click Voice typing. The inbuilt microphone will automatically launch.
Step2Next, click the language drop-down arrow on the microphone to choose the transcription language. You can dictate texts in English, Espanol, French, Italian, Afrikaans, Arabic, and more.
Step3Click the Microphone icon to start dictating texts on Google Docs. After dictating enough texts, tap the red Microphone icon and edit your text. It’s that simple!
3.Audtext - $60 one-time fee
If Google’s voice recognition service is too slow for your liking, consider Audtext. It’s a highly rated online program that uses cutting-edge machine learning technology to transcribe audio to text in 60+ languages. You can easily train this program to identify the speaker in your interview or podcast file.
Meanwhile, Audtext can transcribe typical video and audio formats, including MP3, WAV, M4A, MP4, MOV, and more. And after transcribing audio to text, exploit the inbuilt text editor to retouch and make your text presentable.
Let’s find out how this STT service works:
Step1Create a transcription account on Audtext and click New Upload to choose the transcription mode. You can select the automatic transcription that uses AI or professional real-human transcription. So, let’s choose Automatic.
Step2Drag-n-drop your video or audio file on the program and then choose the transcription language. After adding your file, click Upload to scan and transcribe it. This should take a while.
Step3Finally, click the transcribed text file to edit it with new texts and punctuations on the inbuilt editor. You can export your transcription in .txt, .srt, or .docx formats. Directly export to Google Drive is also available.

Final Words
Up to this point, you should be ready to get started with the Microsoft Cognitive Services Speech. The speech-to-text feature allows you to convert unlimited voices to text on your computer. However, the program can be challenging to set up if you’re not a techie.
In that case, use a more straightforward option like Google Docs to dictate texts on the text editor. You might also want to consider Filmora 11 to encode any local audio or video file to editable text. Time to try!
Free Download For Win 7 or later(64-bit)
Free Download For macOS 10.14 or later
- Title: [Updated] Azure for Audio Transcriptions A Beginner’s Manual
- Author: Mark
- Created at : 2024-07-26 17:32:53
- Updated at : 2024-07-27 17:32:53
- Link: https://extra-lessons.techidaily.com/updated-azure-for-audio-transcriptions-a-beginners-manual/
- License: This work is licensed under CC BY-NC-SA 4.0.