![[Updated] Banishing Curved Visuals Correcting GoPro's Fish Eye](https://thmb.techidaily.com/184d7cf1dfbfc8948b40afe261697d83b7fb70b650978462e7e0c6bc450abb26.png)
"[Updated] Banishing Curved Visuals Correcting GoPro's Fish Eye"
Banishing Curved Visuals: Correcting GoPro’s Fish Eye
How to Correct Fisheye (Lens Distortion) from GoPro Footage


Max Wales
Mar 27, 2024• Proven solutions
One of the most popular features of GoPro devices is their wide angle look as it assists in generation of images with large FOV. But, in some situations, the fisheye look is really a strong disturbance for images/videos as the straight lines become bent and from central location frames gets oversized. No matter whether you are shooting videos or working with photos, it is possible to remove fisheye distortion. The article below will provide you complete detail about the process of removing fisheye distortion.
How to Remove Fisheye from GoPro Footage

Section 1: Enable Linear FOV mode
What is Linear FOV Mode
GoPro Hero5 Black is developed with various latest shooting modes and Linear FOV mode is one of those. If you switch to this mode while capturing your photos then the camera itself provides software level correction to fisheye distortion. Once the lens distortion gets removed then images are directly saved to memory card.
Cons:
- Linear FOV mode cannot work with all frame rates and videos sizes. It works only with 2.7k, 1080p and below that.
- You can use Linear FOV feature with Timelapse Photo mode but it is not accessible with Timelapse video mode.
- It leads to edge cutting in photos as well as the parts that are close to edges get stretched with bad impression.
- Once you have enabled linear mode on images then it is not possible to reproduce the wide angle type images.
Section 2: Post Production
1. Using GoPro Studio
The desktop version of GoPro Studio provides distortion correction facility. You need to follow these steps to complete your action:
Step 1: First of all you need to import your GoPro camera output file with its original name and then hit the advanced settings option.
Step 2: Now select “Remove Fisheye” option from menu and then hit OK.

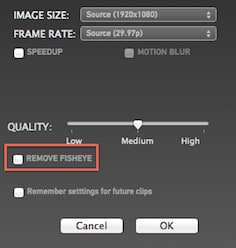
Note: This option can be shown only when the video you shot has fisheye effect.
Step 3: Finally put your clip in the conversion list on software and then convert it. You will find results without fisheye distortion.
Cons of GoPro Studio:
- This software does not contain the preview panel option.
2. Using Wondershare Filmora
Although there are so many professional video or image cutting/editing tools like Adobe Premier and Final Cut Pro etc. that can assist in fish eye correction. But the biggest problem is that they have complicated user interface and are difficult to operate. Thus if you are searching for a simple yet practical solution for fisheye distortion correction needs then professionals recommend to use Wondershare Filmora.
The reason behind this recommendation is that:
- The latest version of Filmora is designed with so many impressive features that can assist action camera users. The list includes colour correction (3D LUT, White Balance), advanced speed control, audio De-noise, video stabilization and lens distortion correction etc.
- It offers easy to use editing option to users with fast cut, trim and merge feature so you can create customized videos even without having any loss in quality. Users will be able to trim a GoPro footage of about 8GM size within one minute.
- This device supports encoding that is popular among MTS, MOV and MP4 like file formats. Hence it can assist users in fast editing of videos or photos captured from Home HD camcorders, Phones and action cams.

Key features:
• Import from any devices and cams, including GoPro and drones. All formats supported. Сurrently the only free video editor that allows users to export in a new H265/HEVC codec, something essential for those working with 4K and HD.
• Everything for hassle-free basic editing: cut, crop and merge files, add titles and favorite music
• Visual effects, advanced color correction and trendy Instagram-like filters
• All multimedia processing done from one app: video editing capabilities reinforced by a video converter, a screen capture, a video capture, a disc burner and a YouTube uploader
• Non-linear editing: edit several files with simultaneously
• Easy export to social networks: special profiles for YouTube, Facebook, Vimeo, Twitter and Instagram
• High quality export – no conversion quality loss, double export speed even of HD files due to hardware acceleration
• Stabilization tool will turn shaky or jittery footage into a more stable video automatically.
• Essential toolset for professional video editing: blending modes, Mask tool, advanced multiple-color Chroma Key


How to remove Fisheye in Wondershare Filmora
Let’s check this video first to know how to remove fisheye effect from GoPro video
Here are the detailed steps:
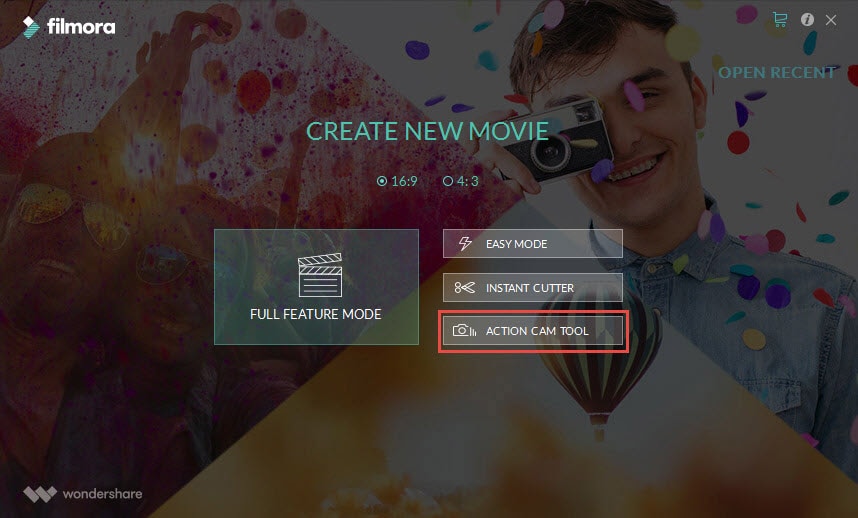
**Step 1:**Open Wondershare Filmora.
**Step 2:**Now select Action Cam Tool that is available on user interface.
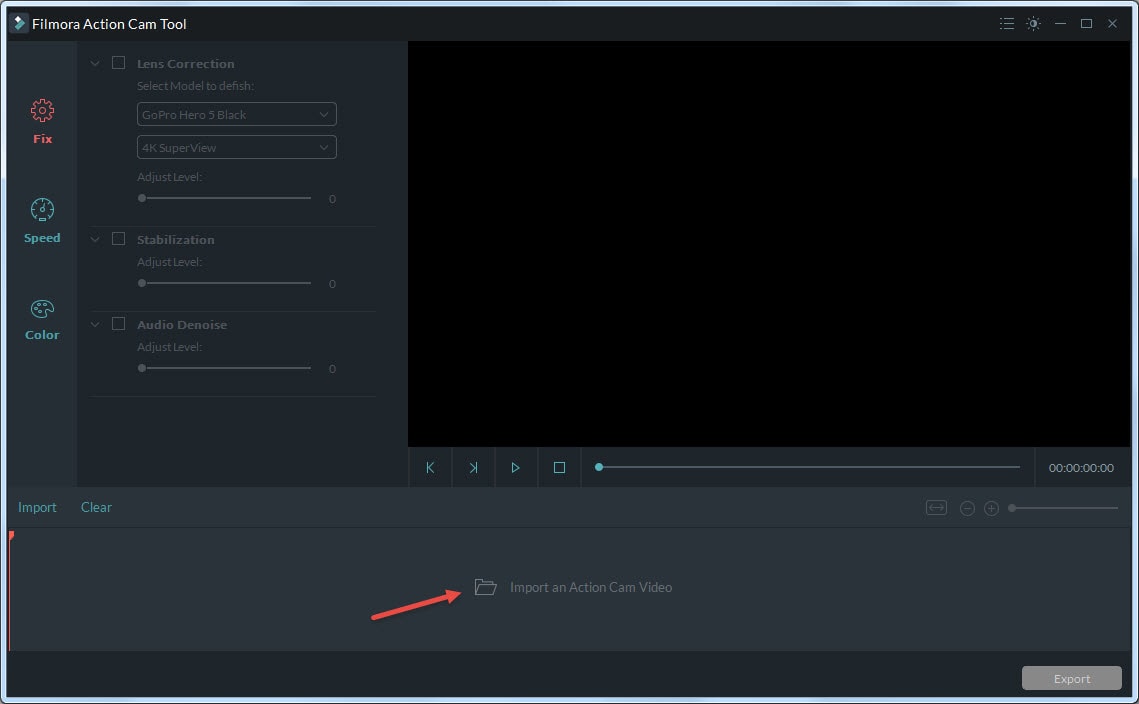
Step 3: Use import button to bring your photos on timeline or you can do this task with the help of simple drag and drop feature. Even the unwanted files can be easily removed by pressing Clear button on screen.
Step 4: Now enable Lens Correction option. The drop down list will help you to select your camera model as well as the video mode that was used for capturing videos. Once all selections are made then Filmora will immediately correct your distorted video. The correction level can be also adjusted manually as per need from the slide bar.


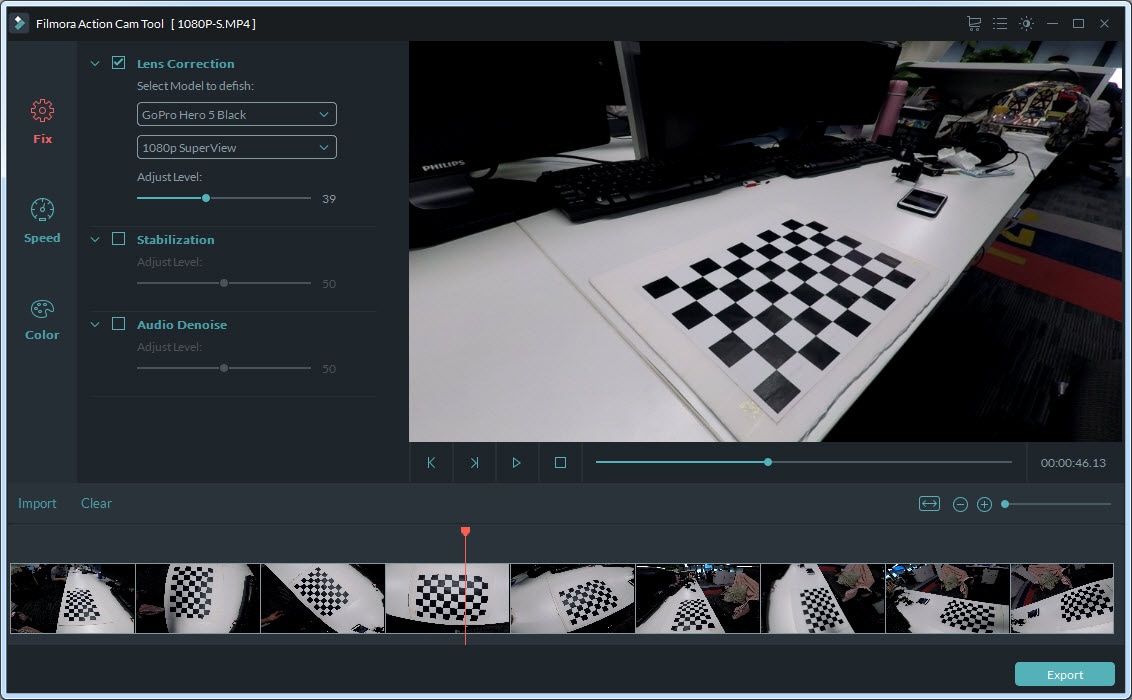
Step 5: Use preview window to check your results on real time basis.
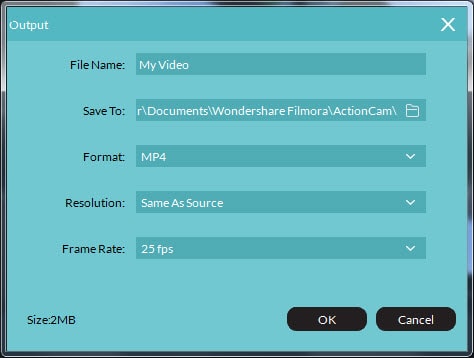
Step 6: Once you have finished the editing process then hit the export button just to save your video. From the pop up window you can easily select the output file format (MOV or MP4). It is also possible to change video resolution to 4K from 320*240 level at the frame rate value of 60fps. Finally hit OK.
Max Wales
Max Wales is a writer and a lover of all things video.
Follow @Max Wales
Max Wales
Mar 27, 2024• Proven solutions
One of the most popular features of GoPro devices is their wide angle look as it assists in generation of images with large FOV. But, in some situations, the fisheye look is really a strong disturbance for images/videos as the straight lines become bent and from central location frames gets oversized. No matter whether you are shooting videos or working with photos, it is possible to remove fisheye distortion. The article below will provide you complete detail about the process of removing fisheye distortion.
How to Remove Fisheye from GoPro Footage
Section 1: Enable Linear FOV mode
What is Linear FOV Mode
GoPro Hero5 Black is developed with various latest shooting modes and Linear FOV mode is one of those. If you switch to this mode while capturing your photos then the camera itself provides software level correction to fisheye distortion. Once the lens distortion gets removed then images are directly saved to memory card.
Cons:
- Linear FOV mode cannot work with all frame rates and videos sizes. It works only with 2.7k, 1080p and below that.
- You can use Linear FOV feature with Timelapse Photo mode but it is not accessible with Timelapse video mode.
- It leads to edge cutting in photos as well as the parts that are close to edges get stretched with bad impression.
- Once you have enabled linear mode on images then it is not possible to reproduce the wide angle type images.

Section 2: Post Production
1. Using GoPro Studio
The desktop version of GoPro Studio provides distortion correction facility. You need to follow these steps to complete your action:
Step 1: First of all you need to import your GoPro camera output file with its original name and then hit the advanced settings option.
Step 2: Now select “Remove Fisheye” option from menu and then hit OK.
Note: This option can be shown only when the video you shot has fisheye effect.
Step 3: Finally put your clip in the conversion list on software and then convert it. You will find results without fisheye distortion.
Cons of GoPro Studio:
- This software does not contain the preview panel option.
2. Using Wondershare Filmora
Although there are so many professional video or image cutting/editing tools like Adobe Premier and Final Cut Pro etc. that can assist in fish eye correction. But the biggest problem is that they have complicated user interface and are difficult to operate. Thus if you are searching for a simple yet practical solution for fisheye distortion correction needs then professionals recommend to use Wondershare Filmora.
The reason behind this recommendation is that:
- The latest version of Filmora is designed with so many impressive features that can assist action camera users. The list includes colour correction (3D LUT, White Balance), advanced speed control, audio De-noise, video stabilization and lens distortion correction etc.
- It offers easy to use editing option to users with fast cut, trim and merge feature so you can create customized videos even without having any loss in quality. Users will be able to trim a GoPro footage of about 8GM size within one minute.
- This device supports encoding that is popular among MTS, MOV and MP4 like file formats. Hence it can assist users in fast editing of videos or photos captured from Home HD camcorders, Phones and action cams.
How to remove Fisheye in Wondershare Filmora
Let’s check this video first to know how to remove fisheye effect from GoPro video
Here are the detailed steps:
**Step 1:**Open Wondershare Filmora.
**Step 2:**Now select Action Cam Tool that is available on user interface.
Step 3: Use import button to bring your photos on timeline or you can do this task with the help of simple drag and drop feature. Even the unwanted files can be easily removed by pressing Clear button on screen.

WPS Office Premium ( File Recovery, Photo Scanning, Convert PDF)–Yearly
Step 4: Now enable Lens Correction option. The drop down list will help you to select your camera model as well as the video mode that was used for capturing videos. Once all selections are made then Filmora will immediately correct your distorted video. The correction level can be also adjusted manually as per need from the slide bar.

Step 5: Use preview window to check your results on real time basis.
Step 6: Once you have finished the editing process then hit the export button just to save your video. From the pop up window you can easily select the output file format (MOV or MP4). It is also possible to change video resolution to 4K from 320*240 level at the frame rate value of 60fps. Finally hit OK.

Max Wales
Max Wales is a writer and a lover of all things video.
Follow @Max Wales
Max Wales
Mar 27, 2024• Proven solutions
One of the most popular features of GoPro devices is their wide angle look as it assists in generation of images with large FOV. But, in some situations, the fisheye look is really a strong disturbance for images/videos as the straight lines become bent and from central location frames gets oversized. No matter whether you are shooting videos or working with photos, it is possible to remove fisheye distortion. The article below will provide you complete detail about the process of removing fisheye distortion.
How to Remove Fisheye from GoPro Footage

Section 1: Enable Linear FOV mode
What is Linear FOV Mode
GoPro Hero5 Black is developed with various latest shooting modes and Linear FOV mode is one of those. If you switch to this mode while capturing your photos then the camera itself provides software level correction to fisheye distortion. Once the lens distortion gets removed then images are directly saved to memory card.
Cons:
- Linear FOV mode cannot work with all frame rates and videos sizes. It works only with 2.7k, 1080p and below that.
- You can use Linear FOV feature with Timelapse Photo mode but it is not accessible with Timelapse video mode.
- It leads to edge cutting in photos as well as the parts that are close to edges get stretched with bad impression.
- Once you have enabled linear mode on images then it is not possible to reproduce the wide angle type images.
Section 2: Post Production
1. Using GoPro Studio
The desktop version of GoPro Studio provides distortion correction facility. You need to follow these steps to complete your action:
Step 1: First of all you need to import your GoPro camera output file with its original name and then hit the advanced settings option.
Step 2: Now select “Remove Fisheye” option from menu and then hit OK.
Note: This option can be shown only when the video you shot has fisheye effect.
Step 3: Finally put your clip in the conversion list on software and then convert it. You will find results without fisheye distortion.
Cons of GoPro Studio:
- This software does not contain the preview panel option.
2. Using Wondershare Filmora
Although there are so many professional video or image cutting/editing tools like Adobe Premier and Final Cut Pro etc. that can assist in fish eye correction. But the biggest problem is that they have complicated user interface and are difficult to operate. Thus if you are searching for a simple yet practical solution for fisheye distortion correction needs then professionals recommend to use Wondershare Filmora.
The reason behind this recommendation is that:
- The latest version of Filmora is designed with so many impressive features that can assist action camera users. The list includes colour correction (3D LUT, White Balance), advanced speed control, audio De-noise, video stabilization and lens distortion correction etc.
- It offers easy to use editing option to users with fast cut, trim and merge feature so you can create customized videos even without having any loss in quality. Users will be able to trim a GoPro footage of about 8GM size within one minute.
- This device supports encoding that is popular among MTS, MOV and MP4 like file formats. Hence it can assist users in fast editing of videos or photos captured from Home HD camcorders, Phones and action cams.
How to remove Fisheye in Wondershare Filmora
Let’s check this video first to know how to remove fisheye effect from GoPro video
Here are the detailed steps:
**Step 1:**Open Wondershare Filmora.
**Step 2:**Now select Action Cam Tool that is available on user interface.
Step 3: Use import button to bring your photos on timeline or you can do this task with the help of simple drag and drop feature. Even the unwanted files can be easily removed by pressing Clear button on screen.
 dotConnect for Oracle is an ADO.NET data provider for Oracle with Entity Framework Support.
Step 4: Now enable Lens Correction option. The drop down list will help you to select your camera model as well as the video mode that was used for capturing videos. Once all selections are made then Filmora will immediately correct your distorted video. The correction level can be also adjusted manually as per need from the slide bar.
 PDF application, powered by AI-based OCR, for unified workflows with both digital and scanned documents.
Step 5: Use preview window to check your results on real time basis.
Step 6: Once you have finished the editing process then hit the export button just to save your video. From the pop up window you can easily select the output file format (MOV or MP4). It is also possible to change video resolution to 4K from 320*240 level at the frame rate value of 60fps. Finally hit OK.
 Jet Profiler for MySQL, Enterprise Version: Jet Profiler for MySQL is real-time query performance and diagnostics tool for the MySQL database server. Its detailed query information, graphical interface and ease of use makes this a great tool for finding performance bottlenecks in your MySQL databases.
Max Wales
Max Wales is a writer and a lover of all things video.
Follow @Max Wales
Max Wales
Mar 27, 2024• Proven solutions
One of the most popular features of GoPro devices is their wide angle look as it assists in generation of images with large FOV. But, in some situations, the fisheye look is really a strong disturbance for images/videos as the straight lines become bent and from central location frames gets oversized. No matter whether you are shooting videos or working with photos, it is possible to remove fisheye distortion. The article below will provide you complete detail about the process of removing fisheye distortion.
How to Remove Fisheye from GoPro Footage
Section 1: Enable Linear FOV mode
What is Linear FOV Mode
GoPro Hero5 Black is developed with various latest shooting modes and Linear FOV mode is one of those. If you switch to this mode while capturing your photos then the camera itself provides software level correction to fisheye distortion. Once the lens distortion gets removed then images are directly saved to memory card.
Cons:
- Linear FOV mode cannot work with all frame rates and videos sizes. It works only with 2.7k, 1080p and below that.
- You can use Linear FOV feature with Timelapse Photo mode but it is not accessible with Timelapse video mode.
- It leads to edge cutting in photos as well as the parts that are close to edges get stretched with bad impression.
- Once you have enabled linear mode on images then it is not possible to reproduce the wide angle type images.

Section 2: Post Production
1. Using GoPro Studio
The desktop version of GoPro Studio provides distortion correction facility. You need to follow these steps to complete your action:
Step 1: First of all you need to import your GoPro camera output file with its original name and then hit the advanced settings option.
Step 2: Now select “Remove Fisheye” option from menu and then hit OK.
Note: This option can be shown only when the video you shot has fisheye effect.
Step 3: Finally put your clip in the conversion list on software and then convert it. You will find results without fisheye distortion.
Cons of GoPro Studio:
- This software does not contain the preview panel option.
2. Using Wondershare Filmora
Although there are so many professional video or image cutting/editing tools like Adobe Premier and Final Cut Pro etc. that can assist in fish eye correction. But the biggest problem is that they have complicated user interface and are difficult to operate. Thus if you are searching for a simple yet practical solution for fisheye distortion correction needs then professionals recommend to use Wondershare Filmora.
The reason behind this recommendation is that:
- The latest version of Filmora is designed with so many impressive features that can assist action camera users. The list includes colour correction (3D LUT, White Balance), advanced speed control, audio De-noise, video stabilization and lens distortion correction etc.
- It offers easy to use editing option to users with fast cut, trim and merge feature so you can create customized videos even without having any loss in quality. Users will be able to trim a GoPro footage of about 8GM size within one minute.
- This device supports encoding that is popular among MTS, MOV and MP4 like file formats. Hence it can assist users in fast editing of videos or photos captured from Home HD camcorders, Phones and action cams.
How to remove Fisheye in Wondershare Filmora
Let’s check this video first to know how to remove fisheye effect from GoPro video
Here are the detailed steps:
**Step 1:**Open Wondershare Filmora.
**Step 2:**Now select Action Cam Tool that is available on user interface.
 PearlMountain Image Converter
Step 3: Use import button to bring your photos on timeline or you can do this task with the help of simple drag and drop feature. Even the unwanted files can be easily removed by pressing Clear button on screen.
Step 4: Now enable Lens Correction option. The drop down list will help you to select your camera model as well as the video mode that was used for capturing videos. Once all selections are made then Filmora will immediately correct your distorted video. The correction level can be also adjusted manually as per need from the slide bar.
Step 5: Use preview window to check your results on real time basis.
Step 6: Once you have finished the editing process then hit the export button just to save your video. From the pop up window you can easily select the output file format (MOV or MP4). It is also possible to change video resolution to 4K from 320*240 level at the frame rate value of 60fps. Finally hit OK.
Max Wales
Max Wales is a writer and a lover of all things video.
Follow @Max Wales
- Title: [Updated] Banishing Curved Visuals Correcting GoPro's Fish Eye
- Author: Mark
- Created at : 2024-07-26 18:06:27
- Updated at : 2024-07-27 18:06:27
- Link: https://extra-lessons.techidaily.com/updated-banishing-curved-visuals-correcting-gopros-fish-eye/
- License: This work is licensed under CC BY-NC-SA 4.0.