![[Updated] Cinematic Continuity A Kinemaster-Led Guide](https://thmb.techidaily.com/5cf7e45072025cfbbdb41e62586d386e0a0a7b2115c18b01f985181746d9f291.jpg)
"[Updated] Cinematic Continuity A Kinemaster-Led Guide"
Cinematic Continuity: A Kinemaster-Led Guide
Versatile Video Editor - Wondershare Filmora
An easy yet powerful editor
Numerous effects to choose from
Detailed tutorials provided by the official channel
Video making is not limited to creating and publishing in the online video sharing platform or networking sites like YouTube, Facebook, Twitter. But, there is a lot more you can do with the video to make it interactive and practical. Video editing nowadays comes out with multiple editing options such as adding excellent features, background music, animation, image effects, or transitional effects. And with the advancement of technology, you can have access to various online and offline resources to edit or modify the video.
However, proper knowledge of which source or medium suits you well for your task is essential. So, here you will learn about how to add transitions on Kinemaster, what is Kinemaster, and how to add transition effect in Kinemaster in this article.
In this article
01 [What is Kinemaster?](#Part 1)
02 [How to Add Transitions in Kinemaster?](#Part 2)
03 [Basic Transition Effects of Kinemaster](#Part 3)
Part 1 What is Kinemaster?
Kinemaster, in simple terms, is a subscription-based video editing tool that works well with both iOS and Android devices. Kinemaster does provide both free and paid services for the users. So if you need some basic editing, you can go with the free version. Otherwise, the paid version is there to get some additional benefits.
 Epubor Audible Converter for Win: Download and convert Audible AAXC/AA/AAX to MP3 with 100% original quality preserved.
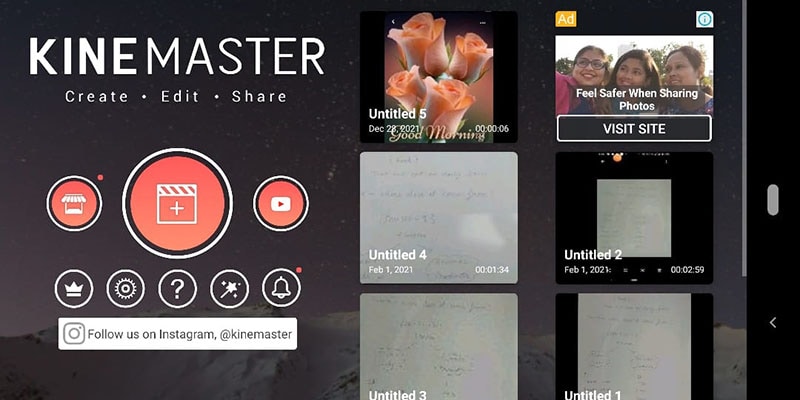
In recent years, Kinemaster gained popularity among different users such as video makers, bloggers, YouTubers, or others due to its helpful video editing facility. Various animation, background sound, images, transition, and more services one can access through Kinemaster pro. Whoever enters the field of video making either for monetizing through YouTube or other platforms, Kinemaster is gaining a great response. Application and processing within the Kinemaster interface are pretty simple.
If you are unsure how to add a transition in Kinemaster, just follow the steps mentioned in the following lines.
Note: If you want to put transitions in Kinemaster for PC, then you will need a separate Emulator software.
Part 2 How to Add Transitions in Kinemaster?
Transition reflects those animated effects such as swiping, screen zoom in/zoom out, and many visual effects that you can attach to your videos to bring about more weightage than a simple video. Or in other words, the transition can be added in between two video clips, that when played in continuation, gives it special effects whether in visuals or text animation, etc.
Step1 Launch Kinemaster
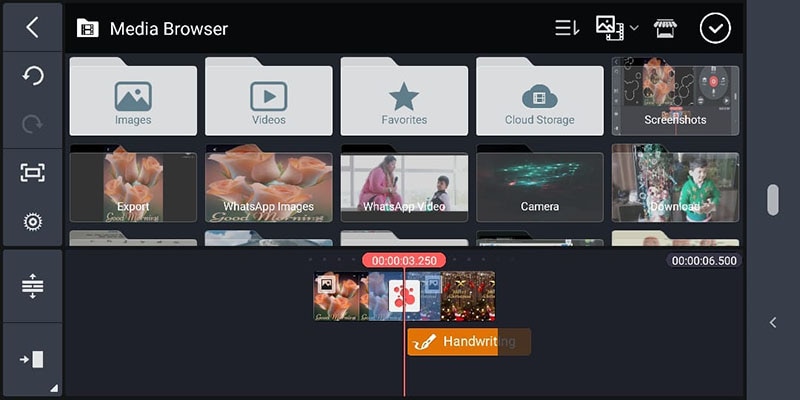
Using your Android or iOS device, you can easily download the software from the App Store. Then launch it; from the main interface, add your video clips/media files either from Media Browser or click the (+) symbol for the media files.
Note: to add transition effect, you need to add at least two clips or split the video in between to add a transition.
Step2 Open up the transition
Once video clips get uploaded, you will see the videos at the interface bottom area. Here, in between the clips, you will find the transition gap(menu). You need to click on it to view all the available transitions.
Note - If there is only one video uploaded, split the video to add the required transition.
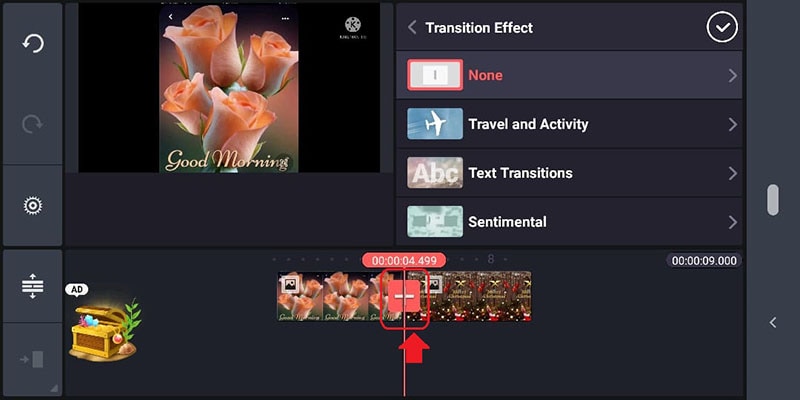
There, you need to click on it. Doing so will open multiple transition options (Such as 3D effect, text transition, free-flowing, presentation, and a lot more).
Step3 Select the transition effect
Finally, please select the desired ones as per your video requirements and then apply them out of the available transitional effects. To check how that effect works, you can play and see it.

Isn’t the step to add a transition in Kinemaster is quite simple? So follow the step guidelines and start editing your videos or series of pictures with the desired transition. Though, for a free version, the number of transitional effects is limited to a few. So, if money is not the issue, you can go with the pro version to get more advanced features with Kinemaster software.
Part 3 Basic Transition Effects of Kinemaster
For those eagerly waiting to apply some cool transitional effects through Kinemaster, you will get that chance here. This part will cover some of the most popular transition effects under Kinemaster Pro hereunder. Having a look over them will give you an idea of how it looks. And once you will download and start the application, it becomes easy for you to use the software to put transitions in Kinemaster quickly.
So, let’s take a look over some of the most commonly used Kinemaster transition effects liked by people worldwide. Here you go:

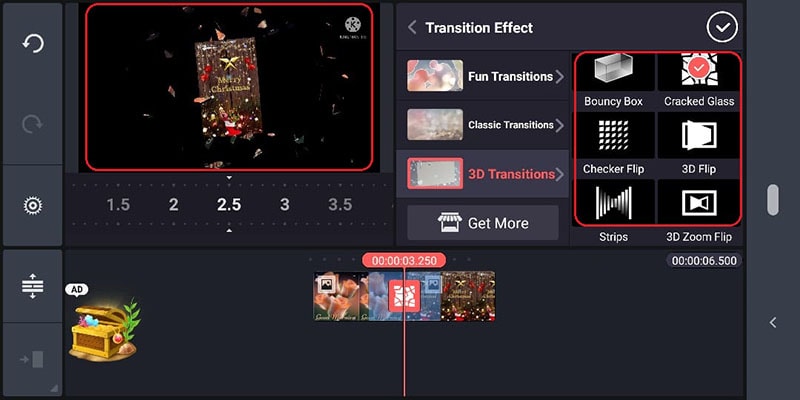
1. 3D transition
3D transition effects give your different options such as checker flip, cracked glass, strips, flipping, bouncing, and other options. So, applying this effect will provide you with the three-dimensional vision of the video part marked below.
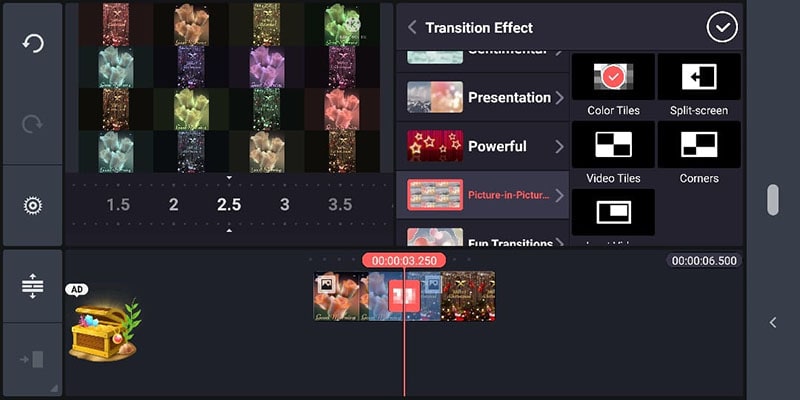
2. Picture in Picture
Different options such as split-screen, video tiles, color tiles, corners, or insert other video transition effects. One picture gets linked with that of another image or video part. It is also a different type of transition to try with a difference.

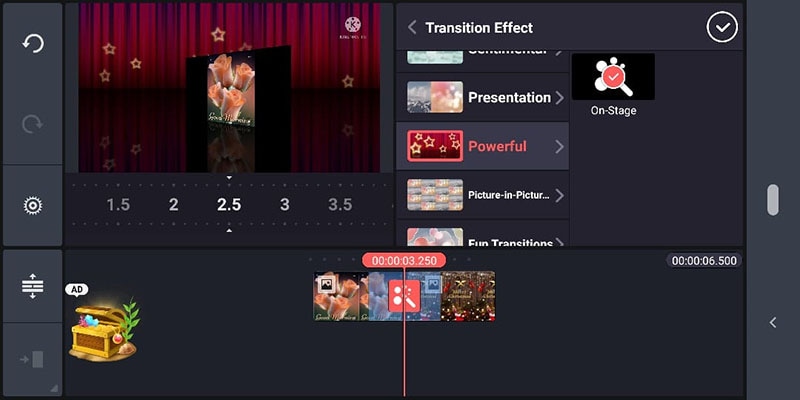
3. Powerful Transition Effect
If you wish to have a powerful on-stage background view, then, can go with this effect. If any video gets uploaded, the background stage will equip it with a different perspective.
![]() FX PRO (Gold Robot + Silver Robot(Basic Package))
FX PRO (Gold Robot + Silver Robot(Basic Package))
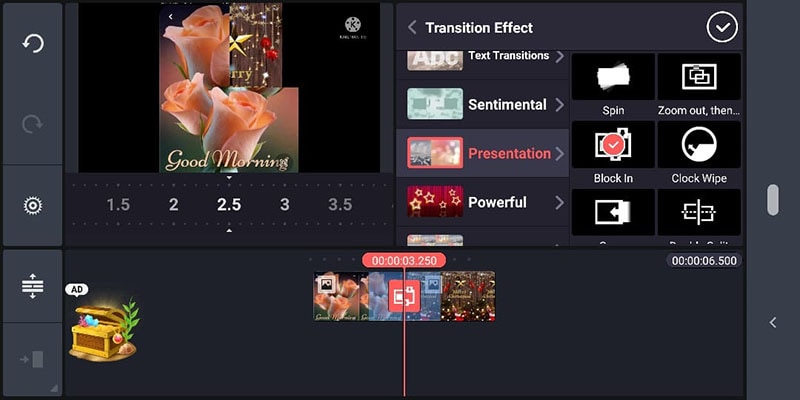
4. Presentation
Presentation transition equipped with multiple options such as zoom out, clock wipe, cover, block in, slide, split, wiping, uncover, etc. As the name suggests, this transition effect will assist you in presenting your video with different presentation ideas.
Tip: Additional Transition Effects with Filmora on PC
There is no doubt that Kinemaster gives you some sound transition effects, but the available transition is limited to a certain extent. However, if you are looking for more transition effects to your videos, you can go with Wondershare Filmora, with more than 500 transition effects. It will provide you with many options to choose and modify your video and get some so cool and awesome videos.
Using Filmora to apply transition or motion graphics using your PC or laptop becomes a perfect option to go about. It will add value to your video quality with transition effects as well as different editing options. So, without wasting your time, visit the Filmora website for the various transition effects coming up with its new updated version.
Wondershare Filmora
Get started easily with Filmora’s powerful performance, intuitive interface, and countless effects!
Try It Free Try It Free Try It Free Learn More about Filmora>

Conclusion
Thus, in this guide, you learned how to add transition effect in Kinemaster and the proper steps to modify your videos effectively. While sharing any video content, the quality of the content matters a lot. Since the video-sharing world is big enough, you need to reflect your video with optimal visual effects to grab the viewer’s attention. On this journey, Kinemaster is an excellent way to start with. On the other hand, while learning how to add a transition in Kinemaster, you have an alternate perfect way to add more transitional effects through Wondershare Filmora Video Editors. So, let you move ahead with following guidelines and start making some cool videos with transition effects.
Video making is not limited to creating and publishing in the online video sharing platform or networking sites like YouTube, Facebook, Twitter. But, there is a lot more you can do with the video to make it interactive and practical. Video editing nowadays comes out with multiple editing options such as adding excellent features, background music, animation, image effects, or transitional effects. And with the advancement of technology, you can have access to various online and offline resources to edit or modify the video.
However, proper knowledge of which source or medium suits you well for your task is essential. So, here you will learn about how to add transitions on Kinemaster, what is Kinemaster, and how to add transition effect in Kinemaster in this article.
In this article
01 [What is Kinemaster?](#Part 1)
02 [How to Add Transitions in Kinemaster?](#Part 2)
03 [Basic Transition Effects of Kinemaster](#Part 3)
Part 1 What is Kinemaster?
Kinemaster, in simple terms, is a subscription-based video editing tool that works well with both iOS and Android devices. Kinemaster does provide both free and paid services for the users. So if you need some basic editing, you can go with the free version. Otherwise, the paid version is there to get some additional benefits.
In recent years, Kinemaster gained popularity among different users such as video makers, bloggers, YouTubers, or others due to its helpful video editing facility. Various animation, background sound, images, transition, and more services one can access through Kinemaster pro. Whoever enters the field of video making either for monetizing through YouTube or other platforms, Kinemaster is gaining a great response. Application and processing within the Kinemaster interface are pretty simple.
If you are unsure how to add a transition in Kinemaster, just follow the steps mentioned in the following lines.
Note: If you want to put transitions in Kinemaster for PC, then you will need a separate Emulator software.

Part 2 How to Add Transitions in Kinemaster?
Transition reflects those animated effects such as swiping, screen zoom in/zoom out, and many visual effects that you can attach to your videos to bring about more weightage than a simple video. Or in other words, the transition can be added in between two video clips, that when played in continuation, gives it special effects whether in visuals or text animation, etc.
Step1 Launch Kinemaster
Using your Android or iOS device, you can easily download the software from the App Store. Then launch it; from the main interface, add your video clips/media files either from Media Browser or click the (+) symbol for the media files.
Note: to add transition effect, you need to add at least two clips or split the video in between to add a transition.
Step2 Open up the transition
Once video clips get uploaded, you will see the videos at the interface bottom area. Here, in between the clips, you will find the transition gap(menu). You need to click on it to view all the available transitions.
Note - If there is only one video uploaded, split the video to add the required transition.
There, you need to click on it. Doing so will open multiple transition options (Such as 3D effect, text transition, free-flowing, presentation, and a lot more).
Step3 Select the transition effect
Finally, please select the desired ones as per your video requirements and then apply them out of the available transitional effects. To check how that effect works, you can play and see it.
Isn’t the step to add a transition in Kinemaster is quite simple? So follow the step guidelines and start editing your videos or series of pictures with the desired transition. Though, for a free version, the number of transitional effects is limited to a few. So, if money is not the issue, you can go with the pro version to get more advanced features with Kinemaster software.
Part 3 Basic Transition Effects of Kinemaster
For those eagerly waiting to apply some cool transitional effects through Kinemaster, you will get that chance here. This part will cover some of the most popular transition effects under Kinemaster Pro hereunder. Having a look over them will give you an idea of how it looks. And once you will download and start the application, it becomes easy for you to use the software to put transitions in Kinemaster quickly.
So, let’s take a look over some of the most commonly used Kinemaster transition effects liked by people worldwide. Here you go:

1. 3D transition
3D transition effects give your different options such as checker flip, cracked glass, strips, flipping, bouncing, and other options. So, applying this effect will provide you with the three-dimensional vision of the video part marked below.
2. Picture in Picture
Different options such as split-screen, video tiles, color tiles, corners, or insert other video transition effects. One picture gets linked with that of another image or video part. It is also a different type of transition to try with a difference.
 CalendarBudget - Monthly subscription membership to CalendarBudget via web browser or mobile app. Support included.
3. Powerful Transition Effect
If you wish to have a powerful on-stage background view, then, can go with this effect. If any video gets uploaded, the background stage will equip it with a different perspective.

4. Presentation
Presentation transition equipped with multiple options such as zoom out, clock wipe, cover, block in, slide, split, wiping, uncover, etc. As the name suggests, this transition effect will assist you in presenting your video with different presentation ideas.
Tip: Additional Transition Effects with Filmora on PC
There is no doubt that Kinemaster gives you some sound transition effects, but the available transition is limited to a certain extent. However, if you are looking for more transition effects to your videos, you can go with Wondershare Filmora, with more than 500 transition effects. It will provide you with many options to choose and modify your video and get some so cool and awesome videos.
Using Filmora to apply transition or motion graphics using your PC or laptop becomes a perfect option to go about. It will add value to your video quality with transition effects as well as different editing options. So, without wasting your time, visit the Filmora website for the various transition effects coming up with its new updated version.
Wondershare Filmora
Get started easily with Filmora’s powerful performance, intuitive interface, and countless effects!
Try It Free Try It Free Try It Free Learn More about Filmora>
Conclusion
Thus, in this guide, you learned how to add transition effect in Kinemaster and the proper steps to modify your videos effectively. While sharing any video content, the quality of the content matters a lot. Since the video-sharing world is big enough, you need to reflect your video with optimal visual effects to grab the viewer’s attention. On this journey, Kinemaster is an excellent way to start with. On the other hand, while learning how to add a transition in Kinemaster, you have an alternate perfect way to add more transitional effects through Wondershare Filmora Video Editors. So, let you move ahead with following guidelines and start making some cool videos with transition effects.
Video making is not limited to creating and publishing in the online video sharing platform or networking sites like YouTube, Facebook, Twitter. But, there is a lot more you can do with the video to make it interactive and practical. Video editing nowadays comes out with multiple editing options such as adding excellent features, background music, animation, image effects, or transitional effects. And with the advancement of technology, you can have access to various online and offline resources to edit or modify the video.
However, proper knowledge of which source or medium suits you well for your task is essential. So, here you will learn about how to add transitions on Kinemaster, what is Kinemaster, and how to add transition effect in Kinemaster in this article.
In this article
01 [What is Kinemaster?](#Part 1)
02 [How to Add Transitions in Kinemaster?](#Part 2)
03 [Basic Transition Effects of Kinemaster](#Part 3)

Part 1 What is Kinemaster?
Kinemaster, in simple terms, is a subscription-based video editing tool that works well with both iOS and Android devices. Kinemaster does provide both free and paid services for the users. So if you need some basic editing, you can go with the free version. Otherwise, the paid version is there to get some additional benefits.
In recent years, Kinemaster gained popularity among different users such as video makers, bloggers, YouTubers, or others due to its helpful video editing facility. Various animation, background sound, images, transition, and more services one can access through Kinemaster pro. Whoever enters the field of video making either for monetizing through YouTube or other platforms, Kinemaster is gaining a great response. Application and processing within the Kinemaster interface are pretty simple.
If you are unsure how to add a transition in Kinemaster, just follow the steps mentioned in the following lines.
Note: If you want to put transitions in Kinemaster for PC, then you will need a separate Emulator software.
Part 2 How to Add Transitions in Kinemaster?
Transition reflects those animated effects such as swiping, screen zoom in/zoom out, and many visual effects that you can attach to your videos to bring about more weightage than a simple video. Or in other words, the transition can be added in between two video clips, that when played in continuation, gives it special effects whether in visuals or text animation, etc.
Step1 Launch Kinemaster
Using your Android or iOS device, you can easily download the software from the App Store. Then launch it; from the main interface, add your video clips/media files either from Media Browser or click the (+) symbol for the media files.
Note: to add transition effect, you need to add at least two clips or split the video in between to add a transition.
Step2 Open up the transition
Once video clips get uploaded, you will see the videos at the interface bottom area. Here, in between the clips, you will find the transition gap(menu). You need to click on it to view all the available transitions.
Note - If there is only one video uploaded, split the video to add the required transition.
There, you need to click on it. Doing so will open multiple transition options (Such as 3D effect, text transition, free-flowing, presentation, and a lot more).
Step3 Select the transition effect
Finally, please select the desired ones as per your video requirements and then apply them out of the available transitional effects. To check how that effect works, you can play and see it.
 The Tube Sites Submitter is a fast and efficient tool for anyone who needs to upload videos quickly, easily and automatically to hundreds of tube sites in mere minutes .
Isn’t the step to add a transition in Kinemaster is quite simple? So follow the step guidelines and start editing your videos or series of pictures with the desired transition. Though, for a free version, the number of transitional effects is limited to a few. So, if money is not the issue, you can go with the pro version to get more advanced features with Kinemaster software.
Part 3 Basic Transition Effects of Kinemaster
For those eagerly waiting to apply some cool transitional effects through Kinemaster, you will get that chance here. This part will cover some of the most popular transition effects under Kinemaster Pro hereunder. Having a look over them will give you an idea of how it looks. And once you will download and start the application, it becomes easy for you to use the software to put transitions in Kinemaster quickly.
So, let’s take a look over some of the most commonly used Kinemaster transition effects liked by people worldwide. Here you go:
1. 3D transition
3D transition effects give your different options such as checker flip, cracked glass, strips, flipping, bouncing, and other options. So, applying this effect will provide you with the three-dimensional vision of the video part marked below.

 Easy GIF Animator is a powerful animated GIF editor and the top tool for creating animated pictures, banners, buttons and GIF videos. You get extensive animation editing features, animation effects, unmatched image quality and optimization for the web. No other GIF animation software matches our features and ease of use, that’s why Easy GIF Animator is so popular.
2. Picture in Picture
Different options such as split-screen, video tiles, color tiles, corners, or insert other video transition effects. One picture gets linked with that of another image or video part. It is also a different type of transition to try with a difference.
3. Powerful Transition Effect
If you wish to have a powerful on-stage background view, then, can go with this effect. If any video gets uploaded, the background stage will equip it with a different perspective.
 Greeting Card Builder
4. Presentation
Presentation transition equipped with multiple options such as zoom out, clock wipe, cover, block in, slide, split, wiping, uncover, etc. As the name suggests, this transition effect will assist you in presenting your video with different presentation ideas.


Tip: Additional Transition Effects with Filmora on PC
There is no doubt that Kinemaster gives you some sound transition effects, but the available transition is limited to a certain extent. However, if you are looking for more transition effects to your videos, you can go with Wondershare Filmora, with more than 500 transition effects. It will provide you with many options to choose and modify your video and get some so cool and awesome videos.
Using Filmora to apply transition or motion graphics using your PC or laptop becomes a perfect option to go about. It will add value to your video quality with transition effects as well as different editing options. So, without wasting your time, visit the Filmora website for the various transition effects coming up with its new updated version.
Wondershare Filmora
Get started easily with Filmora’s powerful performance, intuitive interface, and countless effects!
Try It Free Try It Free Try It Free Learn More about Filmora>

Conclusion
Thus, in this guide, you learned how to add transition effect in Kinemaster and the proper steps to modify your videos effectively. While sharing any video content, the quality of the content matters a lot. Since the video-sharing world is big enough, you need to reflect your video with optimal visual effects to grab the viewer’s attention. On this journey, Kinemaster is an excellent way to start with. On the other hand, while learning how to add a transition in Kinemaster, you have an alternate perfect way to add more transitional effects through Wondershare Filmora Video Editors. So, let you move ahead with following guidelines and start making some cool videos with transition effects.
Video making is not limited to creating and publishing in the online video sharing platform or networking sites like YouTube, Facebook, Twitter. But, there is a lot more you can do with the video to make it interactive and practical. Video editing nowadays comes out with multiple editing options such as adding excellent features, background music, animation, image effects, or transitional effects. And with the advancement of technology, you can have access to various online and offline resources to edit or modify the video.
However, proper knowledge of which source or medium suits you well for your task is essential. So, here you will learn about how to add transitions on Kinemaster, what is Kinemaster, and how to add transition effect in Kinemaster in this article.
In this article
01 [What is Kinemaster?](#Part 1)
02 [How to Add Transitions in Kinemaster?](#Part 2)
03 [Basic Transition Effects of Kinemaster](#Part 3)
Part 1 What is Kinemaster?
Kinemaster, in simple terms, is a subscription-based video editing tool that works well with both iOS and Android devices. Kinemaster does provide both free and paid services for the users. So if you need some basic editing, you can go with the free version. Otherwise, the paid version is there to get some additional benefits.
In recent years, Kinemaster gained popularity among different users such as video makers, bloggers, YouTubers, or others due to its helpful video editing facility. Various animation, background sound, images, transition, and more services one can access through Kinemaster pro. Whoever enters the field of video making either for monetizing through YouTube or other platforms, Kinemaster is gaining a great response. Application and processing within the Kinemaster interface are pretty simple.
If you are unsure how to add a transition in Kinemaster, just follow the steps mentioned in the following lines.
Note: If you want to put transitions in Kinemaster for PC, then you will need a separate Emulator software.
Part 2 How to Add Transitions in Kinemaster?
Transition reflects those animated effects such as swiping, screen zoom in/zoom out, and many visual effects that you can attach to your videos to bring about more weightage than a simple video. Or in other words, the transition can be added in between two video clips, that when played in continuation, gives it special effects whether in visuals or text animation, etc.
Step1 Launch Kinemaster
Using your Android or iOS device, you can easily download the software from the App Store. Then launch it; from the main interface, add your video clips/media files either from Media Browser or click the (+) symbol for the media files.
Note: to add transition effect, you need to add at least two clips or split the video in between to add a transition.
 Power Tools add-on for Google Sheets, Lifetime subscription
Step2 Open up the transition
Once video clips get uploaded, you will see the videos at the interface bottom area. Here, in between the clips, you will find the transition gap(menu). You need to click on it to view all the available transitions.
Note - If there is only one video uploaded, split the video to add the required transition.
There, you need to click on it. Doing so will open multiple transition options (Such as 3D effect, text transition, free-flowing, presentation, and a lot more).
Step3 Select the transition effect
Finally, please select the desired ones as per your video requirements and then apply them out of the available transitional effects. To check how that effect works, you can play and see it.
Isn’t the step to add a transition in Kinemaster is quite simple? So follow the step guidelines and start editing your videos or series of pictures with the desired transition. Though, for a free version, the number of transitional effects is limited to a few. So, if money is not the issue, you can go with the pro version to get more advanced features with Kinemaster software.

Part 3 Basic Transition Effects of Kinemaster
For those eagerly waiting to apply some cool transitional effects through Kinemaster, you will get that chance here. This part will cover some of the most popular transition effects under Kinemaster Pro hereunder. Having a look over them will give you an idea of how it looks. And once you will download and start the application, it becomes easy for you to use the software to put transitions in Kinemaster quickly.
So, let’s take a look over some of the most commonly used Kinemaster transition effects liked by people worldwide. Here you go:
1. 3D transition
3D transition effects give your different options such as checker flip, cracked glass, strips, flipping, bouncing, and other options. So, applying this effect will provide you with the three-dimensional vision of the video part marked below.
 Software Update Pro - Check and update software installed on your computer.
2. Picture in Picture
Different options such as split-screen, video tiles, color tiles, corners, or insert other video transition effects. One picture gets linked with that of another image or video part. It is also a different type of transition to try with a difference.
3. Powerful Transition Effect
If you wish to have a powerful on-stage background view, then, can go with this effect. If any video gets uploaded, the background stage will equip it with a different perspective.
 Lyric Video Creator Professional Version
4. Presentation
Presentation transition equipped with multiple options such as zoom out, clock wipe, cover, block in, slide, split, wiping, uncover, etc. As the name suggests, this transition effect will assist you in presenting your video with different presentation ideas.

Tip: Additional Transition Effects with Filmora on PC
There is no doubt that Kinemaster gives you some sound transition effects, but the available transition is limited to a certain extent. However, if you are looking for more transition effects to your videos, you can go with Wondershare Filmora, with more than 500 transition effects. It will provide you with many options to choose and modify your video and get some so cool and awesome videos.
Using Filmora to apply transition or motion graphics using your PC or laptop becomes a perfect option to go about. It will add value to your video quality with transition effects as well as different editing options. So, without wasting your time, visit the Filmora website for the various transition effects coming up with its new updated version.
Wondershare Filmora
Get started easily with Filmora’s powerful performance, intuitive interface, and countless effects!
Try It Free Try It Free Try It Free Learn More about Filmora>
Conclusion
Thus, in this guide, you learned how to add transition effect in Kinemaster and the proper steps to modify your videos effectively. While sharing any video content, the quality of the content matters a lot. Since the video-sharing world is big enough, you need to reflect your video with optimal visual effects to grab the viewer’s attention. On this journey, Kinemaster is an excellent way to start with. On the other hand, while learning how to add a transition in Kinemaster, you have an alternate perfect way to add more transitional effects through Wondershare Filmora Video Editors. So, let you move ahead with following guidelines and start making some cool videos with transition effects.
- Title: [Updated] Cinematic Continuity A Kinemaster-Led Guide
- Author: Mark
- Created at : 2024-07-26 19:59:45
- Updated at : 2024-07-27 19:59:45
- Link: https://extra-lessons.techidaily.com/updated-cinematic-continuity-a-kinemaster-led-guide/
- License: This work is licensed under CC BY-NC-SA 4.0.